 I hate wasting food! So, as the self-proclaimed Queen Of Freeze, I’m constantly freezing little bits of leftover this or that for future use. And it’s paid off many times.
One thing I always seem to have a plethora of is egg whites because so many dessert recipes call for yolks only. Unfortunately, aside from meringue (which I still have yet to perfect), there aren’t that many recipes in which to use them…..until now.
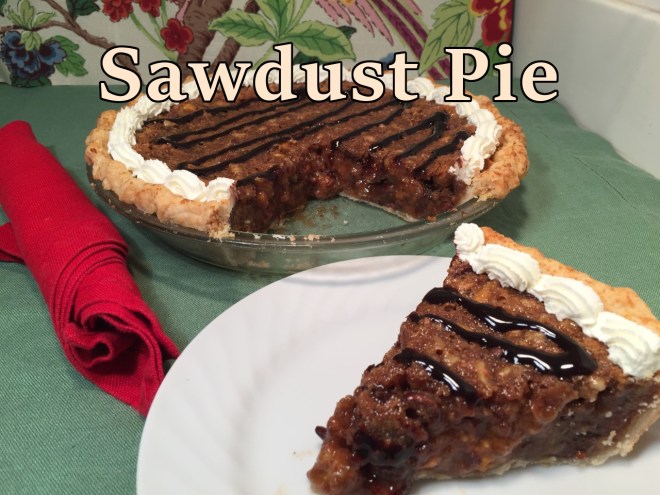
While watching a baking competition, I was ecstatic when a home cook from Kentucky made a Sawdust Pie that called for 7 egg whites! First of all, it looked amazing. And, second of all: 7 egg whites!!! I found and followed an online recipe. While I liked the general idea, I didn’t care for the coconut, wanted to change the consistency so it was firmer, add a variety of chips, and embed the pastry crust with graham cracker crumbs. I altered the recipe and made it my own.
This is a fast and easy pie to assemble, but needs to refrigerate at least 8 hours to firm up so it doesn’t gush when sliced. Thus, plan ahead!
By the way, I’m guessing the name “Sawdust” Pie comes from the abundance of graham cracker crumbs in the filling.
Note: I strongly encourage you to make your own pie crust. Honestly, it’s simple and so much tastier (not to mention cheaper!). But, you can purchase one, if you must. I’ve included my recipe for you adventurous souls.
SAWDUST PIE
Single pie crust
- 1¼ cup all-purpose flour
- 1/8 tsp salt
- 1 T sugar
- 1/2 cup Crisco shortening, chill if it’s a hot day
- 4 – 5 T ice water
- 1/4 cup graham cracker crumbs – about 2 rectangles
Preheat oven to 425º Fahrenheit.
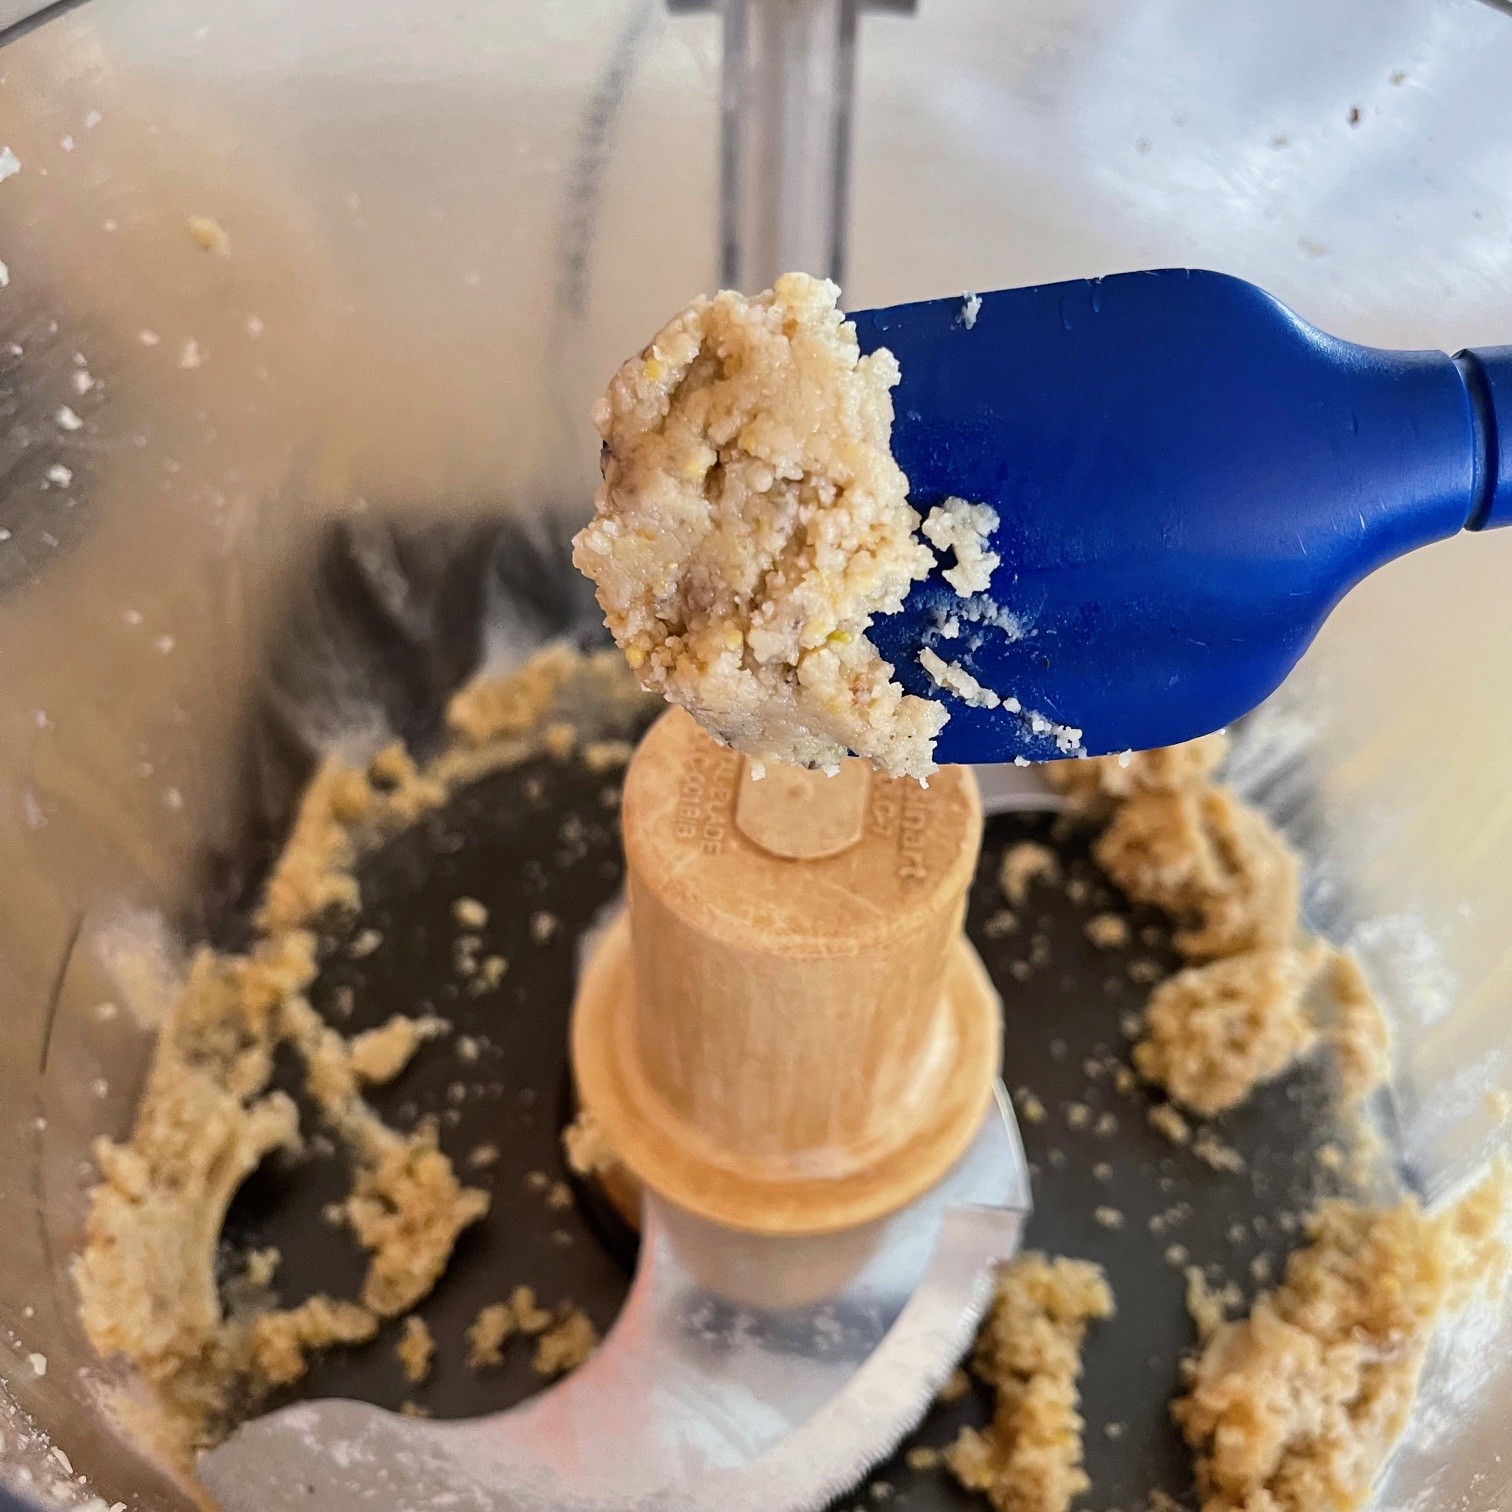
You can either use a food processor or a pastry cutter to mix the Crisco and flour. (I prefer to use the pastry cutter since it’s easy and I hate to wash the food processor just for this.)
For the pastry cutter method, put the flour, salt, and sugar in a bowl and mix with the pastry cutter. 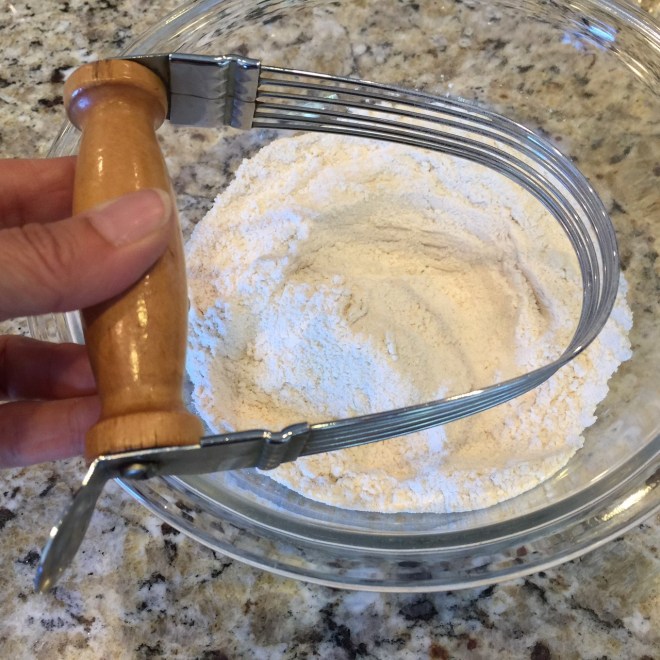 Add in the Crisco and use the cutter to combine the flour and Crisco.
  Work until it resembles a coarse meal.
 For the food processor method, put the flour, salt, and sugar in work bowl and pulse a couple of times. Add in the Crisco and pulse several times, until mixture forms a coarse meal. Empty into a mixing bowl. You are NOT adding the water in the food processor – your dough will be tough!!!
Sprinkle 4 T ice water into the flour mixture. Using a fork, gently slice with the side of the tines to mix. The goal is to use enough water to incorporate all the flour so it forms a ball, but not be too wet. You may need a little more water – I usually do. Don’t overwork the dough or it will be tough.  Form the dough into a tight ball and chill at least 30 minutes to make it easier to roll.
  Sprinkle flour, then 2 T graham crackers on a flat surface to prevent the dough from sticking.
  Place the dough ball in the center. With floured hands, push down the dough with one hand while pressing in the sides with the other. This will help keep the edges from fraying.
  Sprinkle some flour on the flattened dough and spread it around so the rolling pin doesn’t stick.
 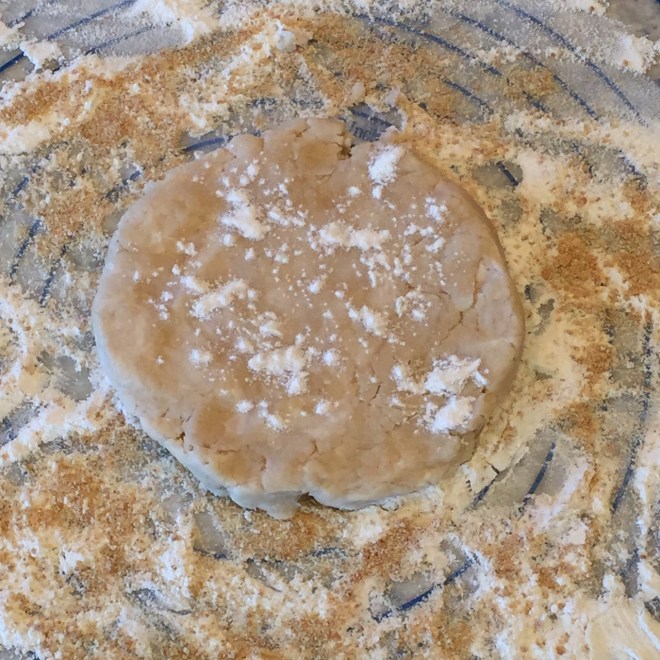 Using a floured rolling pin, begin rolling the dough from the center out in all directions. When it gets to be about 8″ in diameter, push in the edges again – they’ll probably be fraying again. Lift up the edges and brush the graham cracker crumbs underneath.
  Roll until the diameter is about 12½”. Sprinkle 2T graham cracker crumbs over the top of the pastry and lightly press them in with your fingertips. (Don’t use the rolling pin – the crumbs tend to stick to it.)
 Place the pie pan next to the circle. Fold dough in half towards you, then carefully lift it to pan. Unfold and center it, gently adjusting pastry so it fits into the corners. If the dough splits, just overlap it and press it together. Leaving a 1/2″ overhang border from the pie pan edge, cut away excess dough with kitchen scissors. Crimps edges by rolling this 1/2″ border in on itself, then pinching with thumbs and forefingers.
  Cut a piece of waxed or parchment paper about 2″ longer than diameter of pie pan. Place on top of pastry and fill with pie weights or raw beans (that’s what I use). Very gently work the paper and beans into corners so the beans weigh down the entire bottom.
 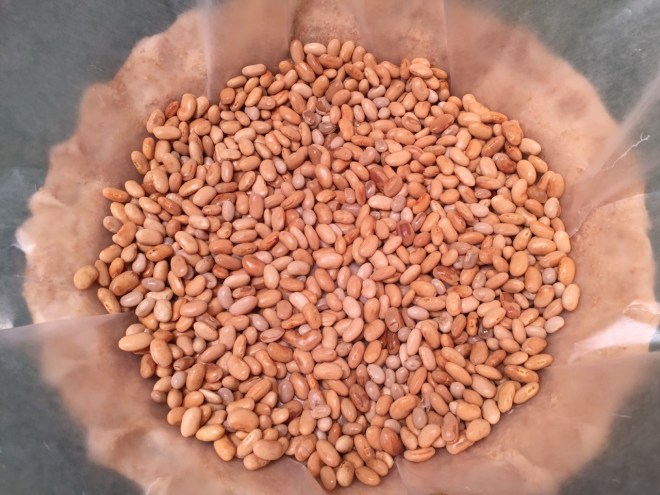 Parbake at 425º F for 7 minutes. Remove the paper and weights by pulling one corner of the paper slowly towards the center, then the opposite corner towards the center, then one of the other corners, and the final one. Grab all 4 and lift it out in a rolling motion – don’t pull straight up or the center may still be stuck. Bake another 5 minutes, then remove and cool.
 Filling
- 7 egg whites
- 1½ cups (5 oz, 145 g) graham cracker crumbs – about (10 rectangles)
- 1/2 cup (41 g) raw oatmeal (OR 1/2 cup all-purpose flour)
- 1½ cups (7½ oz, 215 g) dark brown sugar, packed
- 1/2 tsp salt
- 1½ cups (5 oz, 135 g) walnuts, chopped and toasted
- 3/4 cup (120 g, 4 oz) milk chocolate chips
- 3/4 cup (120 g, 4 oz) semi-sweet chocolate chips
- 3/4 cup (120 g, 4 oz) butterscotch chips
Preheat oven to 350º Fahrenheit.
NOTE: The oats or flour are a thickener. Either will do, but I prefer the oats just a wee bit.
If using oats, grind them finely in a food processor or blender. Using an electric mixer or rotary egg beater, beat egg whites until frothy on medium/low speed about 30 seconds – just to break them up.
Add in the graham cracker crumbs, ground oats (or flour), brown sugar, and salt. Mix on low speed just to blend.
Stir in walnuts, milk chocolate chips, semi-sweet chips, and butterscotch chips.
Pour into pie crust and bake at 350º F for 25-30 minutes. I find 28 minutes is perfect for my oven. You’re looking for a slight wobble in just the center, not the whole top. 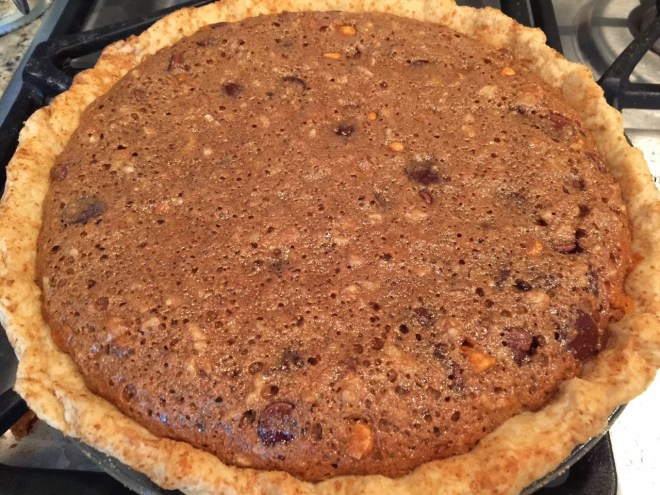 Cool on rack completely, then refrigerate at least 8 hours.
 What could be better when that late afternoon hunger hits than a nice cup of tea and a freshly baked scone?
 Pulse 10 times to form a coarse texture.
  (If you don’t have a food processor, then crosscut the butter into small bits using 2 knives.)
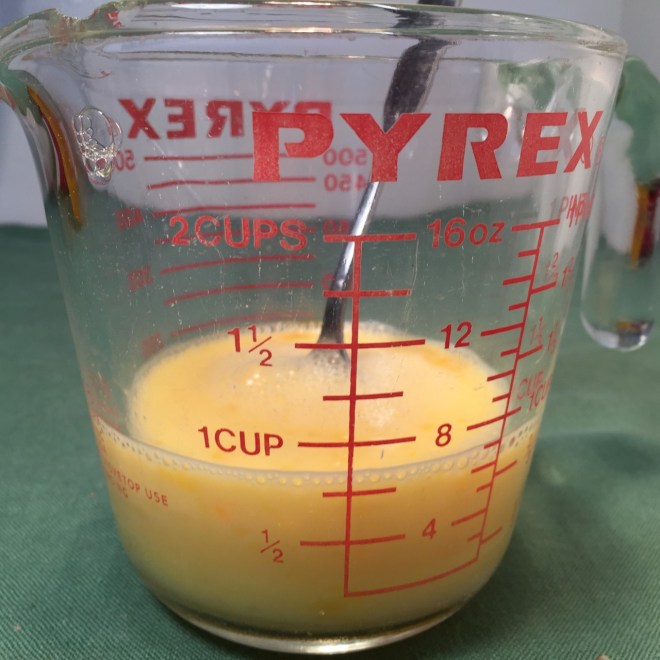 Empty flour mixture into a mixing bowl. Pour in all but 1 T egg mixture (you’re going to use the reserved liquid as a wash) and stir gently to blend. (You don’t want to overmix or the scone will be tough.)
  Lightly flour a flat surface and dump dough onto it. With floured hands, pat the dough into an 8″x5″ rectangle if cutting circles, or a 6″ diameter circle if cutting wedges.
  If you’re making circles, dip circle-mold in flour then press straight down into dough. Don’t twist. Dip into flour each time before cutting a circle. If making wedges, slice 3 lines, intersecting in middle to form 6 equal wedges.
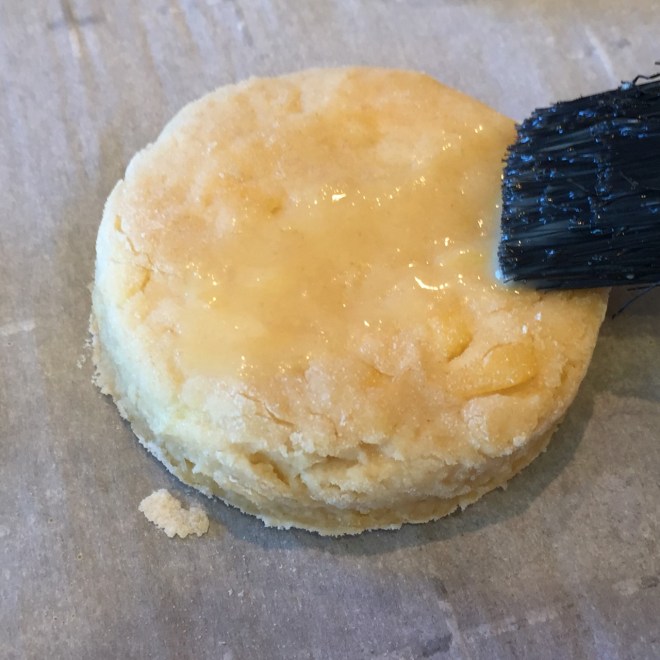 Sprinkle on a few strands of cheese, if you like.
  Place in preheated oven and bake until golden brown – about 12 minutes for circles, 13-15 minutes for wedges. Remove to a wire rack to cool a bit, then serve.
 It occurred to me that while I make pizza quite often, I’ve never written a blog about it. So I decided to start with one that’s easy to make and is actually one of my favorites: PAN PIZZA.
 Cover with a plate and let rest about 30 minutes.
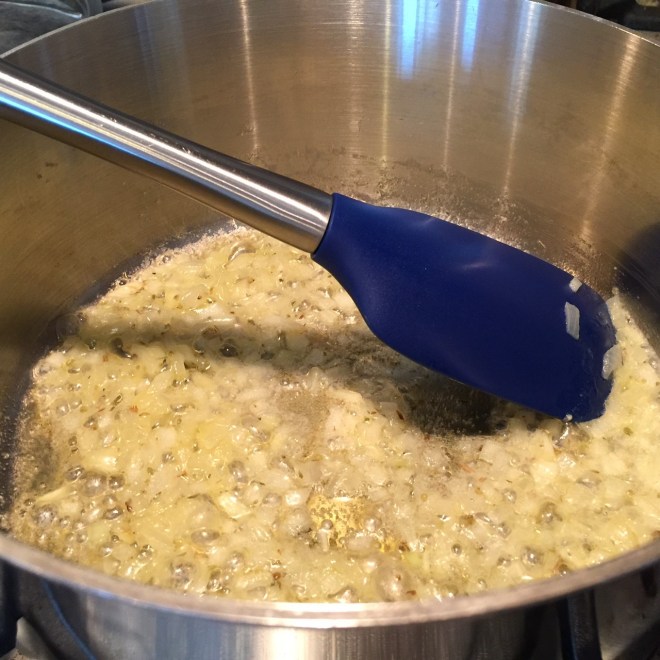 Stir in the tomatoes and remaining
  The sauce will be thickened. Remove from heat. Stir in
  When the dough has risen for 30 minutes, roll it out on a NON-floured surface to a rectangle 15″ x 12″. Spread on the softened butter that you set aside earlier over dough to 1/2″ from edges.
 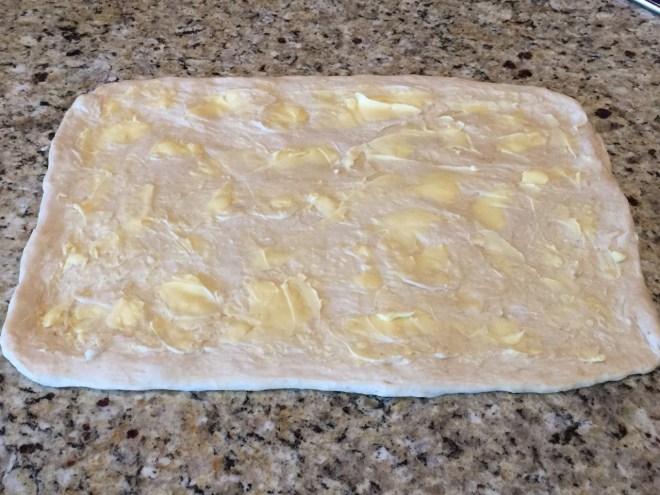 Starting at one of the short sides, roll up all the way into a cylinder.
  Roll cylinder into a rectangle 18″ x 4″.
  Cut in half (so now there are 2 9″ x 4″ pieces).
  Fold each piece in on itself in thirds – like a business letter, pinching ends to seal.
 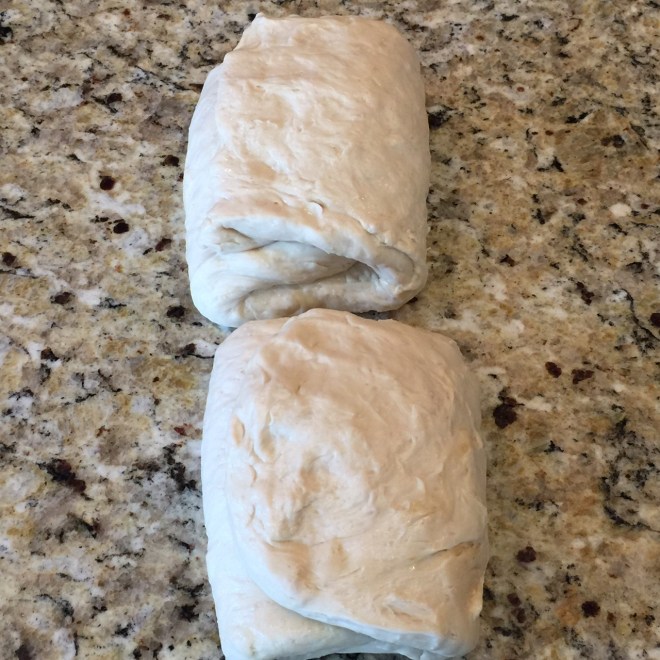 Spread
 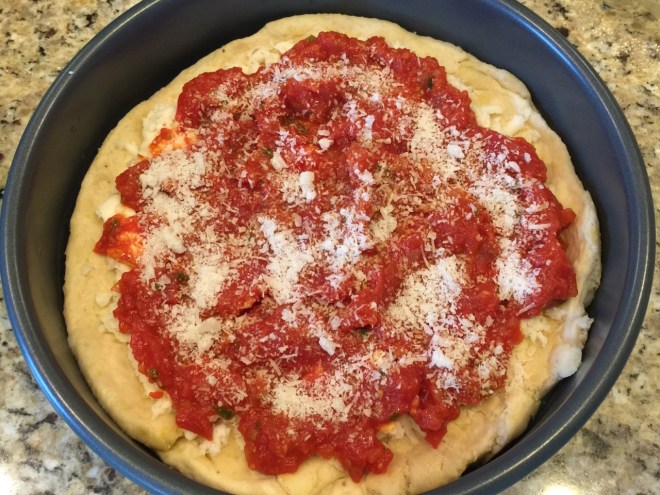 Place in oven and bake 20-30 minutes (rotating halfway through), until crust is well-browned.
  Sprinkle on remaining 2 T basil and let set in pan a couple of minutes, then remove to cutting board. Slice and serve immediately.
 There are certain kitchen appliances I can’t live without – such as my food processor. But one-trick pony gadgets – like a rice maker – have literally no place in my kitchen.
 Add in the 2 quarts of water and bring to boil. Cook for 15 minutes – until rice still has a little chew.
  Immediately drain in a sieve and spread out onto a parchment lined, rimmed cookie sheet to dry and cool.
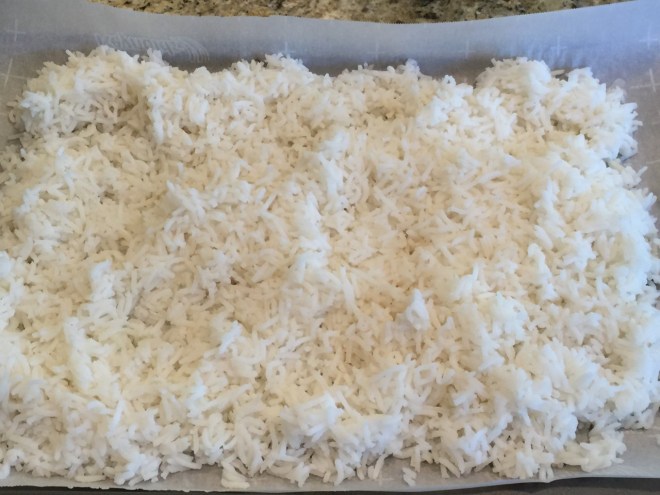 In a small bowl, whisk together the oil, vinegar, orange juice, black pepper, zest, garlic, and oregano. Set aside. (Yes, I know it’s not pretty – but, it’s delicious!)
 Now it’s time to peel the oranges. TAKE YOUR TIME WITH THIS SO YOU DON’T CUT YOURSELF! Slice off the tops and bottoms of oranges – this will stabilize the orange so it doesn’t roll. Using a sharp knife, remove peel down past the wedge skin. Try to remove all the bitter white parts.
  Hold the orange in one hand or lay it on a cutting board, and carefully slice along the inside of the skin that encases each segment down to the core. Do this on both sides of each segment. Removing the skin will allow the juice to blend into the rice. Cut segments in half widthwise, and set aside.
 To assemble, put rice into a large serving bowl. I would suggest transferring the bulk of the rice via a spatula – the parchment will be wet and may tear if you lift it with all of the rice. Add in the oranges, feta, cranberries, and dressing.
  Gently mix well. Let set for, at least, 20 minutes to blend flavors. Add in almonds at serving time to keep them crunchy.
 Lasagna is one of those dishes that’s good on many levels: it’s easy to put together, it’s a potluck favorite, it can be made ahead of time, and it’s fabulous leftover.
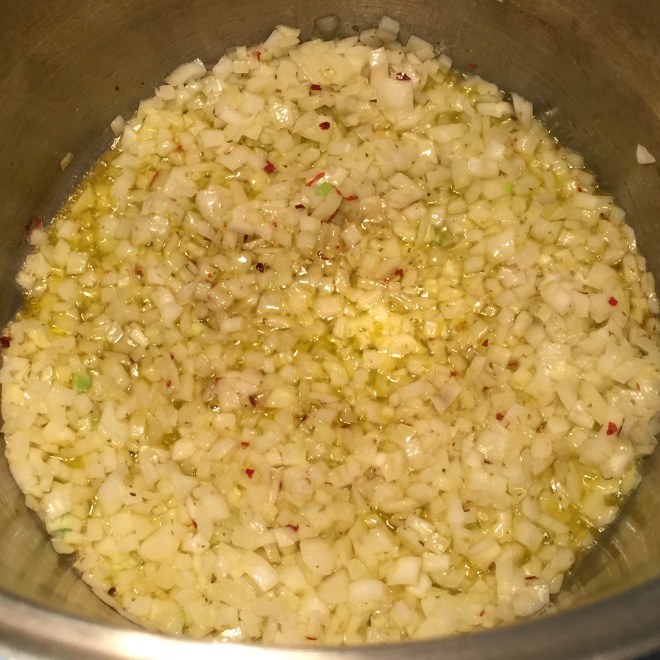 Remove and discard the stem ends, peels, and any imperfections from canned tomatoes. Pulse in food processor or chop by hand. Add to onion mixture along with tomato paste, and 35g (1/2 cup) (1 1/4 oz) Pecorino. Bring to boil, then lower flame to keep a simmer for 20 minutes UNcovered.
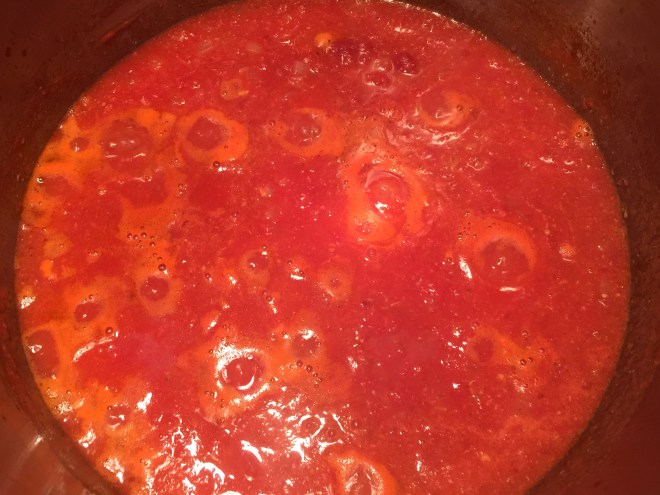 Boil at least 4 cups of water. Place dried noodles in 9″x13″ casserole dish. When water is boiling, pour over noodles so they’re immersed. Gyrate them so they don’t stick. Let set 15 minutes to parcook.
 While the noodles are softening and the sauce is cooking, mix together cottage cheese, 113g (4 oz) (1½ cups) Pecorino, cream, garlic, remaining 1/4 tsp salt, pepper, and 1 tsp cornstarch. Set aside.
 When 15 minutes for the noodles is up, place them on tea towels in a single layer. Pat tops to dry. Cut 2 of them in half widthwise (so they’re each about 5″ long). Empty and dry casserole dish.
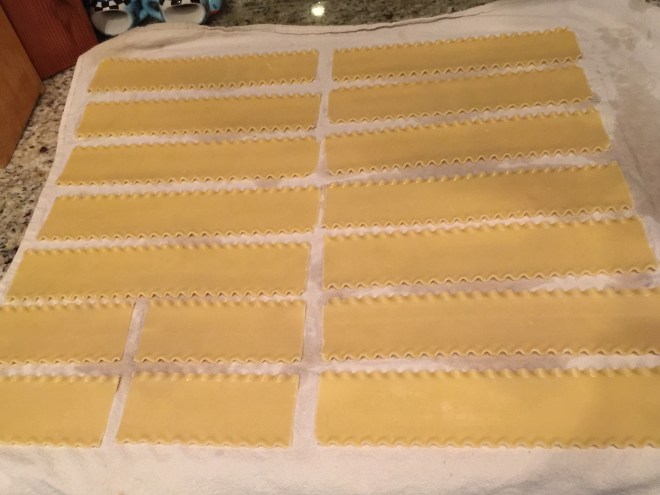 Preheat oven to 375º (190°C) Fahrenheit.
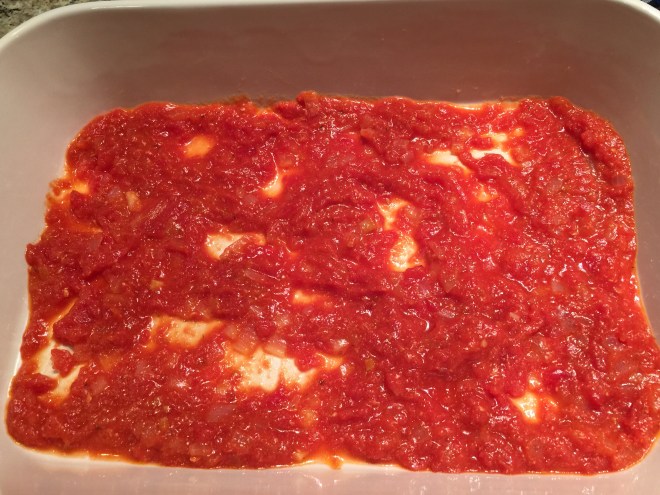 Lay 3 long noodles, all touching the same short side of casserole. Take one of the short noodles and lay it along the opposite short side. (This will fill in the gap.)
 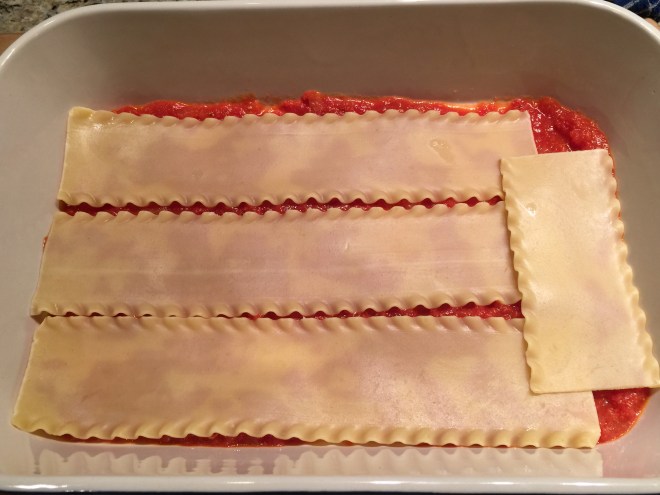 Carefully spread half of the cottage cheese mixture over noodles. Sprinkle on 39g (1/2 cup) Fontina.
 LAYER TWO: Place 3 long noodles on top, this time touching the opposite short side. Take 1 short noodle and place it along the other short side of casserole.
 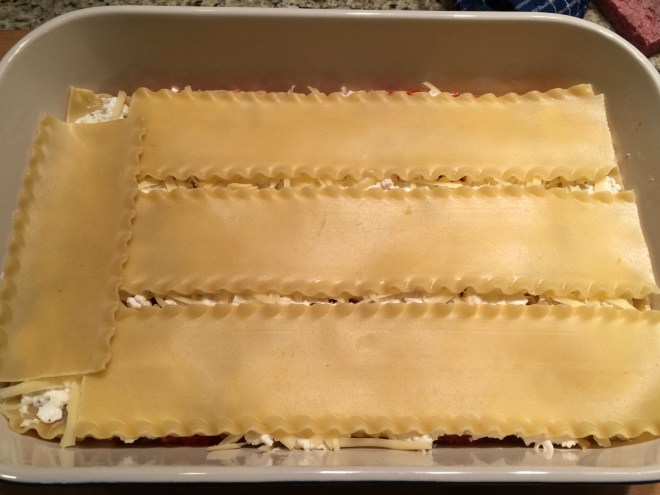 Pour and spread 429g (1½ cups) sauce. Sprinkle on 39g (1/2 cup) Fontina.
 LAYER THREE: Place 3 long noodles on top, touching the same side as layer one, followed by (you guessed it) 1 short noodle on the opposite side.
  Spread on the remaining cottage cheese mixture and sprinkle with 39g (1/2 cup) Fontina.
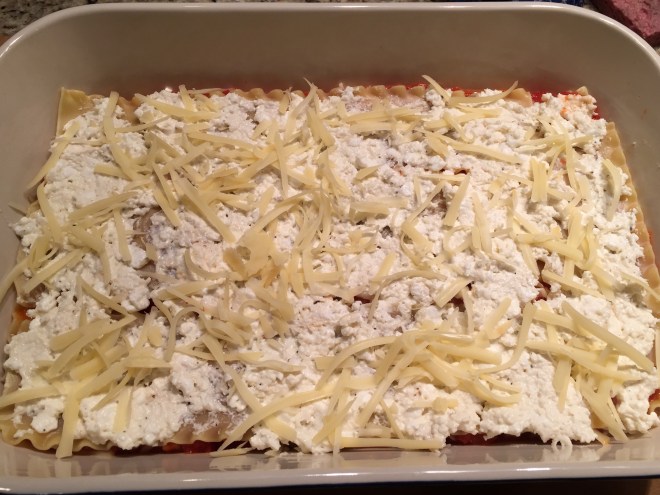 TOP LAYER: Place 3 long noodles touching the same side as layer two, and the remaining short piece on opposite side.
  Pour on remaining marinara sauce. With your fingers, mix together the remaining 39g (1/2 cup) Fontina with 1/8 tsp cornstarch. Sprinkle on top of sauce. Finally, sprinkle on remaining 21g (3/4 oz) Pecorino.
 Cover with foil and bake at 375ºF (190°C) for 35 minutes. Increase oven to 500ºF (260°) and remove foil. Bake 10 minutes more. Remove from oven and let lasagna rest on stovetop at least 20 minutes to set. Sprinkle on basil.
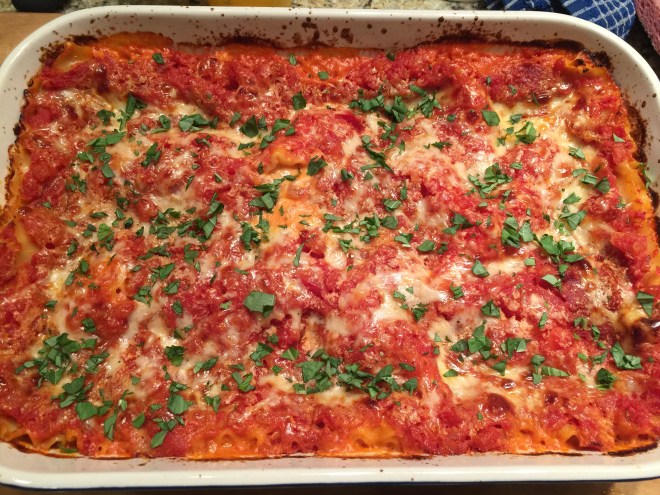
 With the weather heating up and bulky clothes coming off, I’m always looking for ways to appease my hunger but shred the pounds. Soups are generally my go-to diet food since they fill you up without a lot of calories. But hot soup in hot weather doesn’t really appeal to me, so I look to chilled soups.
 Once I fine-tune a recipe to my liking, I move on. However, I’m not a gal so set in her ways that I’m not willing to be flexible about revisiting a recipe. (This does NOT apply to household activities in which I’m constantly suggesting (okay, nagging) that my husband put his keys and wallet in the same spot so he doesn’t have to spend 15 minutes daily looking for them.)
 In a small bowl, combine flour, salt, and baking soda. Set aside.
 Stir in cinnamon until blended. Then, using a large spoon, add in brown sugar, granulated sugar, oil, and vanilla, mixing until smooth.
 Lightly beat together the whole egg and yolk,
  Stir in the flour mixture until most of flour is incorporated.
 Finally, stir in oats and butterscotch chips.
 Preheat oven to 375º Fahrenheit.
 Bake at 375º F for 9-10 minutes. The key is to look at the edges, not the center. The edge should start to look baked, but the center should not be browned. Because the cookies will continue to cook on the hot sheet out of the oven, if you wait to remove them from the oven until they look baked, they’ll be overcooked.
 Let cookies cool on cookie sheet before removing them to a wire rack.
 I’m always interested in new salads – one can only eat so many lettuce and tomato dinner salads. My ISRAELI COUSCOUS SALAD combines Israeli couscous (aka pearl couscous) with arugula, mint, dried cranberries, pistachio nuts, and feta cheese with a tasty vinaigrette.
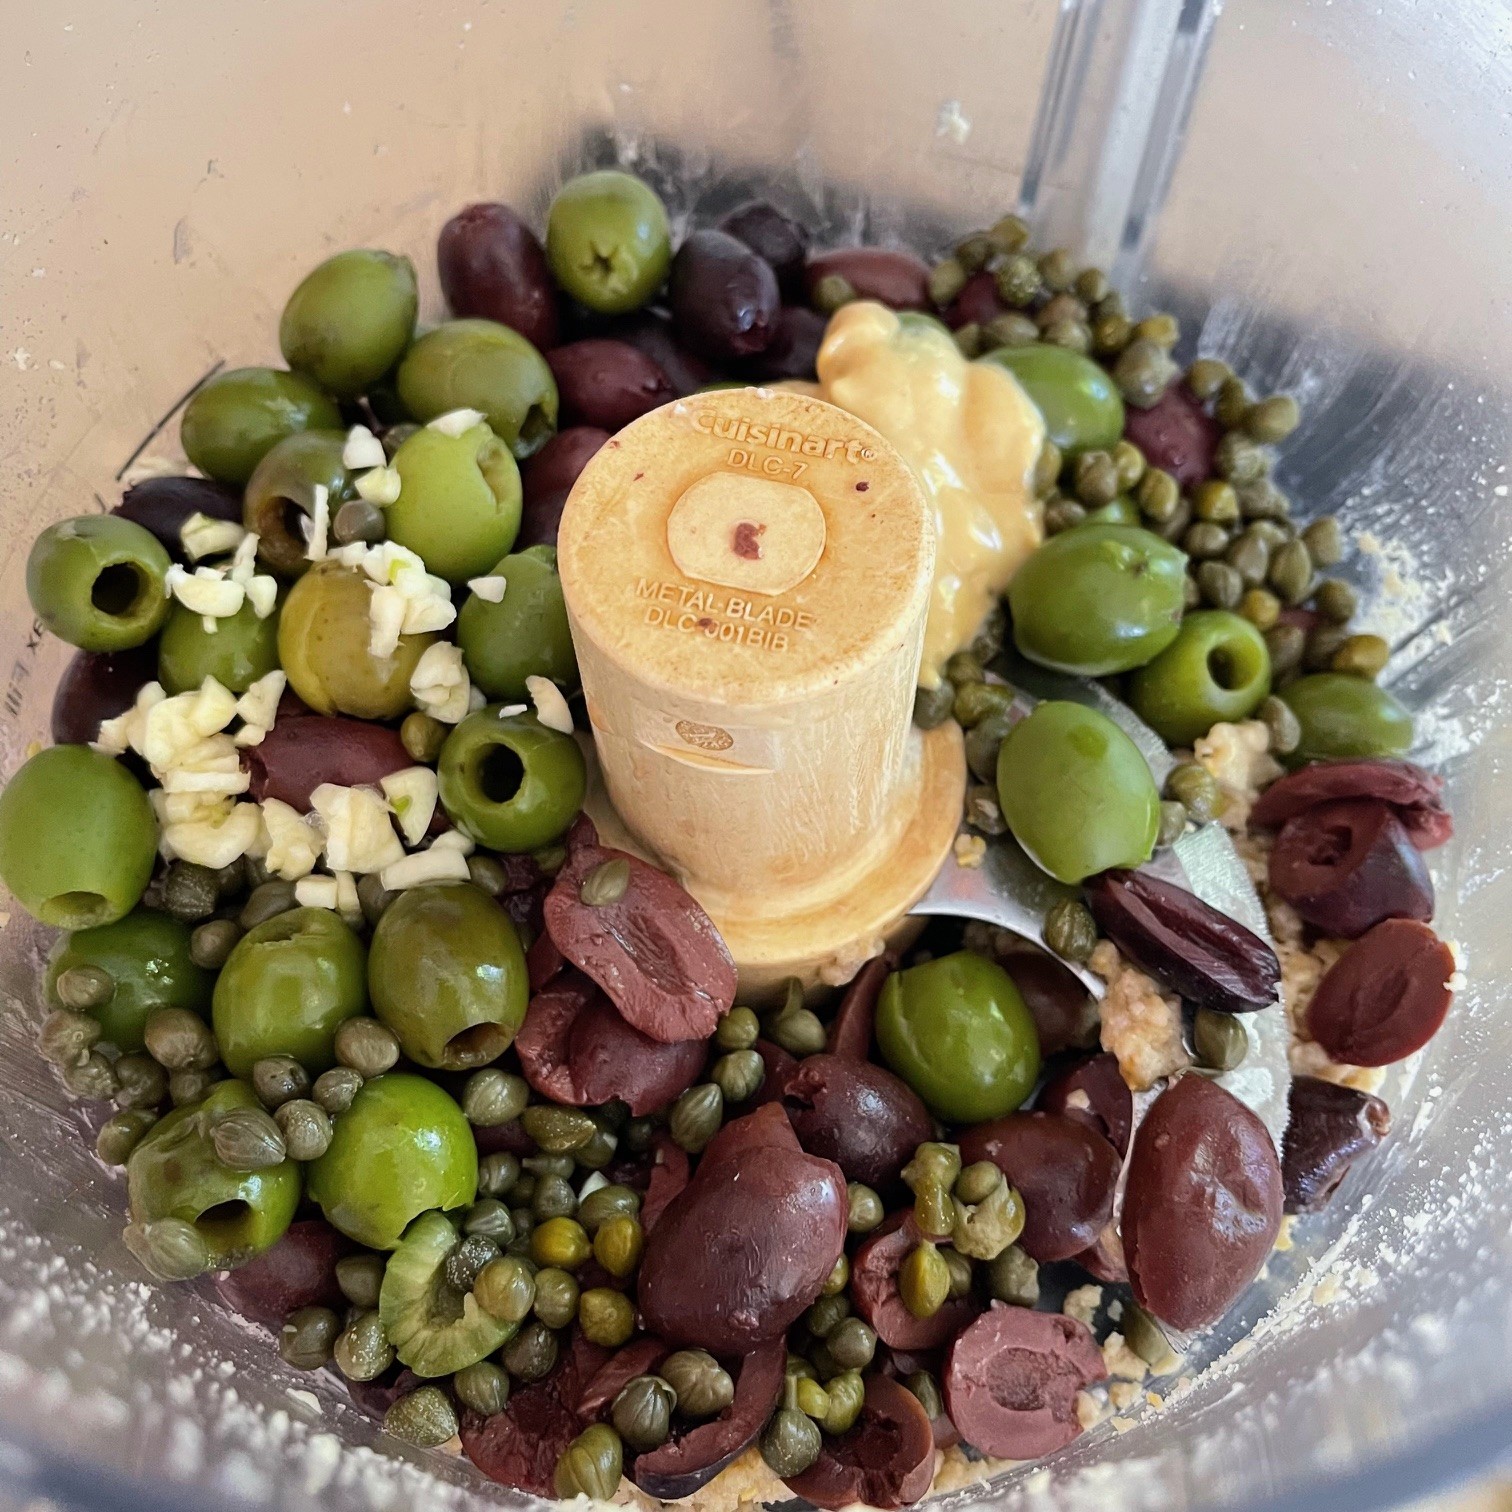
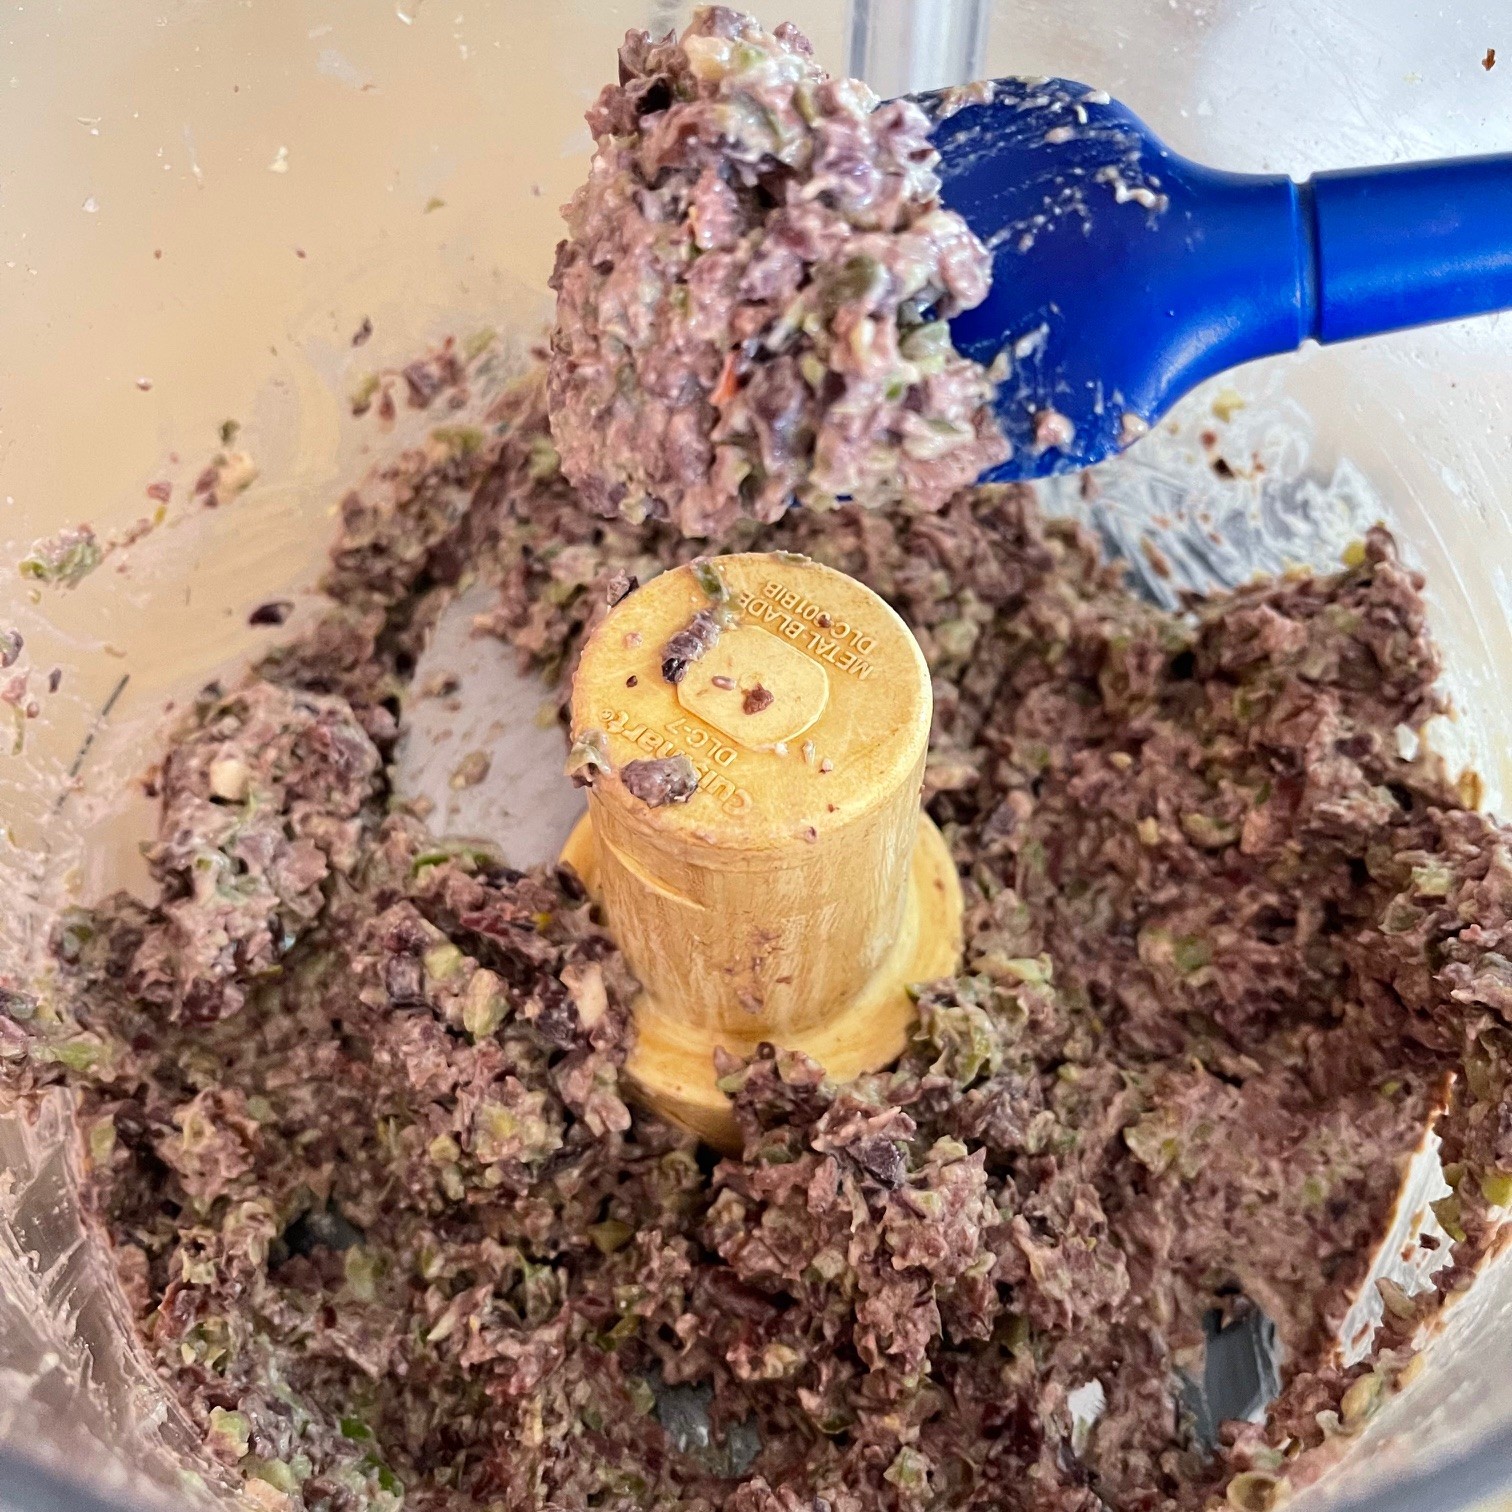
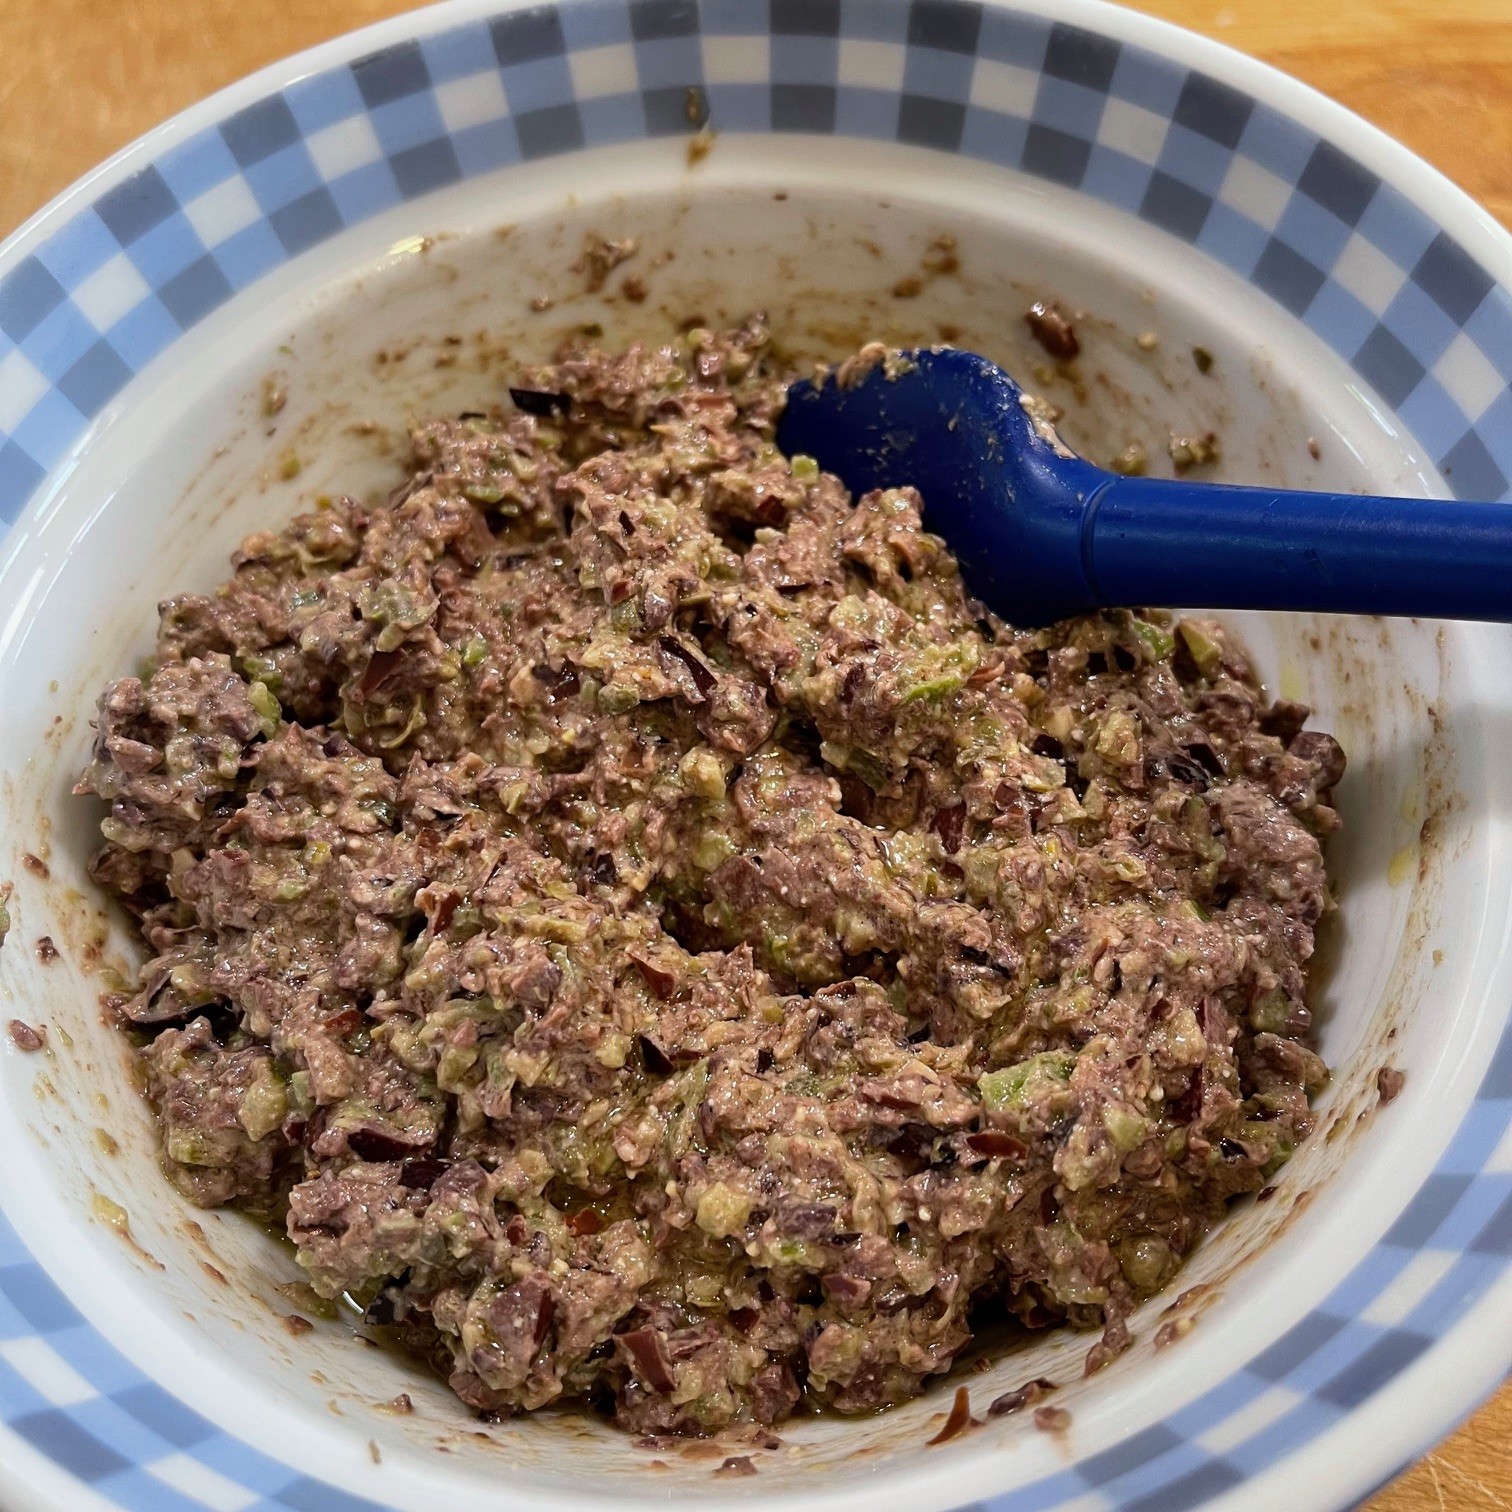
 It’s tricky business when you have guests for dinner. I usually gear my meal to be ready half an hour after the designated arrival time. But there’s the rub. Sometimes people are late, or worse, early. They’re hungry, but you don’t want them to fill up on weighty appetizers.