
 Let me say right off the bat, this is an EXTREMELY easy recipe. Honestly! Yes, it involves making those ultra thin pancakes that wrap the stir-fry, but I promise, you can do it!!!
As a devoted from-scratch cook, I’m always up for a new challenge. While I’ve been making flour tortillas for years, I was a little nervous about these thin moo shu pancakes. How can I roll them so thin and still be able to handle them with tearing? America’s Test Kitchen to the rescue! They came up with an ingenious method that truly works.
The filling can be altered to suit your taste – I used shiitake mushrooms, scrambled eggs, asparagus, and cabbage.
VEGETARIAN MOO SHU – makes 12
Pancakes
- 215g (7½ oz) (or 1+2/3 cup) all-purpose flour
- 165g (3/4 cup) boiling water
- 1½ T sesame oil
- 1 T vegetable oil
Mix flour and boiling water together in the food processor (or, by hand if you don’t own one) until smooth – about 30 seconds. Let dough rest, covered, for 30 minutes. On a well-floured board, roll dough into a 12″ log.
  Slice into 12 pieces.
  Using floured fingers, pat each piece into a 3″ disc.
  Generously brush 6 of the discs with the sesame oil (you may have some left over).
 Place each dry disc on top of an oiled one, creating a kind of sandwich.
 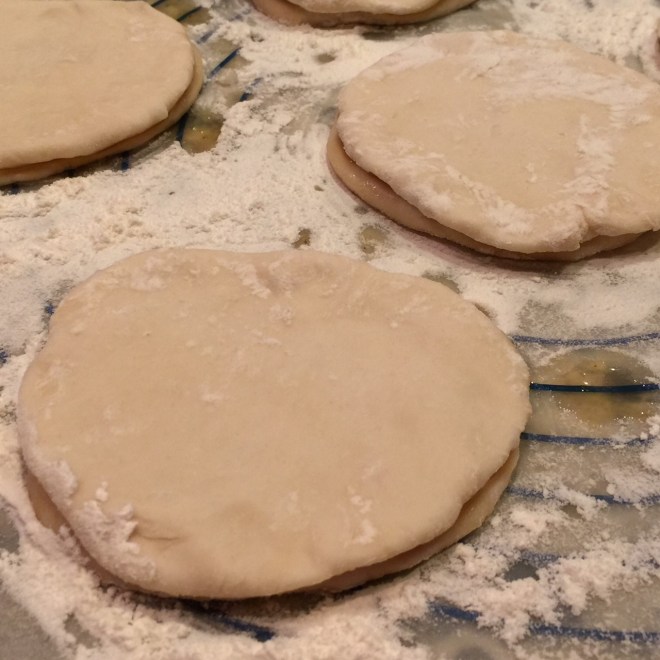 Roll each of these into a 6″-ish circle. (To save time and counter space, while one pancake sandwich is cooking, I’m rolling out the next – but this is pretty hectic.)
 Heat 1/2 tsp vegetable oil in a nonstick skillet over medium/low. Place one dough circle in skillet and cook on medium/low for 1 minute. Flip and cook other side for 1 minute.
  Remove to a tea towel to let cool a few seconds. Then, carefully split apart the pancakes.
 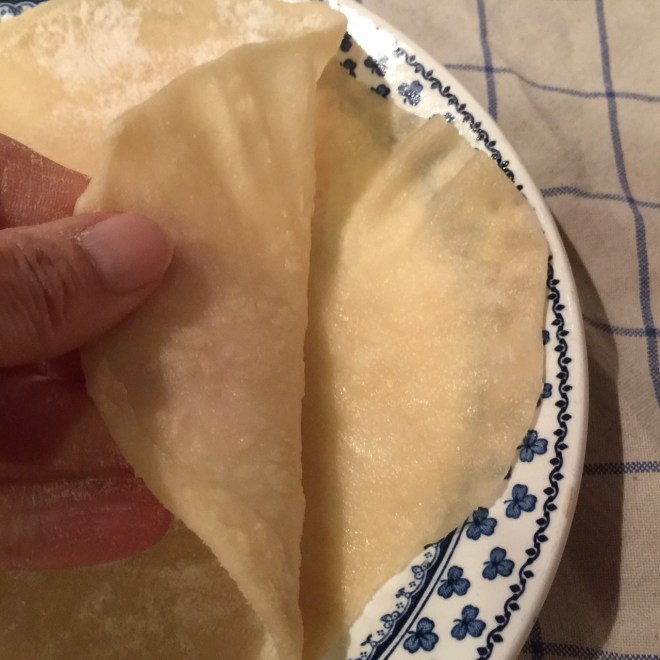 Stack them, oiled side up. Carry on with the remaining circles. (You may not need to oil the pan with each new pancake, depending on the non-stick ability of your skillet – I put in a little vegetable oil every other one.) Keep warm in the wrapped tea towel until ready to use.
Filling
- 227g (8 oz) fresh shiitake mushrooms, cut into 1″ pieces
- 110g (1/2 cup) water
- 2 T Mirin sweet rice vinegar
- 1/2 tsp cornstarch
- 110g (1/2 cup) soy sauce
- 80g (1/2 cup) sugar
- 1/4 tsp ground ginger or 1 tsp fresh, minced
- 1 garlic clove, pressed
- 1 tsp sesame oil
- 1 T + 1 tsp vegetable oil, divided
- 57g (2/3 cup) scallions (about 6 scallions), sliced
- 7 asparagus stalks, sliced into 1/2″ pieces
- 8 oz can bamboo shoots, cut into matchsticks – see photo:

- 3 cups Napa cabbage or bok choy, sliced thin
- 4 eggs
- 1/4 cup teriyaki sauce (recipe below, or purchased)
In a bowl, combine the shiitakes and 110g (1/2 cup) water. Let soak while you prepare the rest. (You’ll be using some this flavored water in the moo shu.) Prepare teriyaki sauce: In a small saucepan, combine the Mirin and cornstarch, smooshing out any lumps.
  Add in the soy sauce, sugar, ginger, garlic, and sesame oil. Cook over medium heat until thickened. Set aside.
  Note: You only need 1/4 cup of the teriyaki sauce for the Moo Shu. Store remainder in refrigerator.
In a nonstick 12″ skillet, heat 1 T vegetable oil over high heat. Add in the scallions, asparagus, and bamboo shoots. Sauté on high for 2 minutes.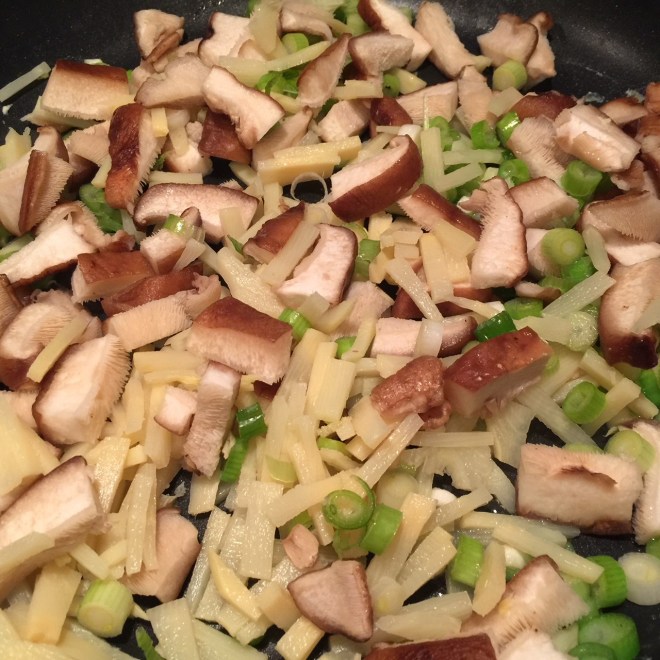 Drain the mushrooms over a container.
 Add 1/3 cup of this mushroom water to the skillet, along with the cabbage and drained mushrooms. Cook on high for another 2 minutes.
 Pour all of the stir-fry mixture into a colander or sieve, discarding the drained liquid.
Put 1 tsp vegetable oil in the now-empty skillet and heat over medium/high. Lightly beat eggs, and cook them in skillet for about 20 seconds, until they’re cooked, but soft. (They’ll continue to cook when the hot vegetables are added.) Add in the drained veggies and the 1/4 cup teriyaki sauce. Blend together and heat through.
Place a spoonful of filling on a each pancake. Fold up pancake in half (like a taco), 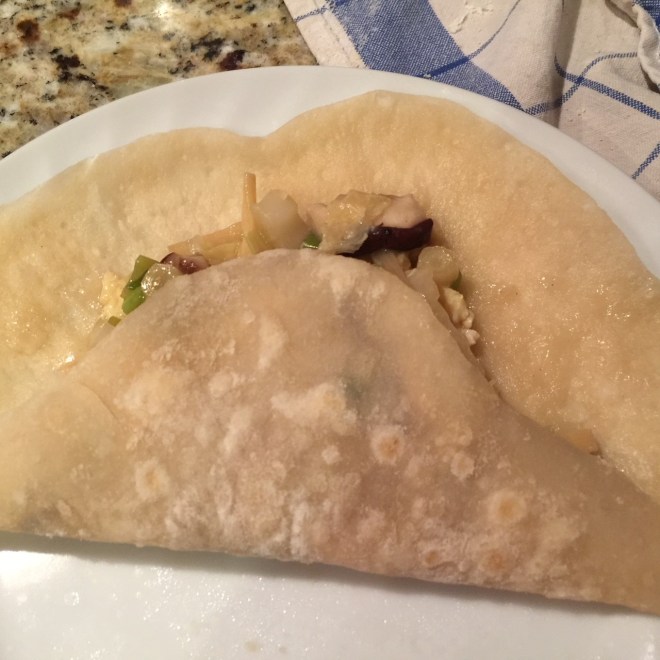 then fold in sides.
 If you like, dip in plum or hoisin sauce as you eat.
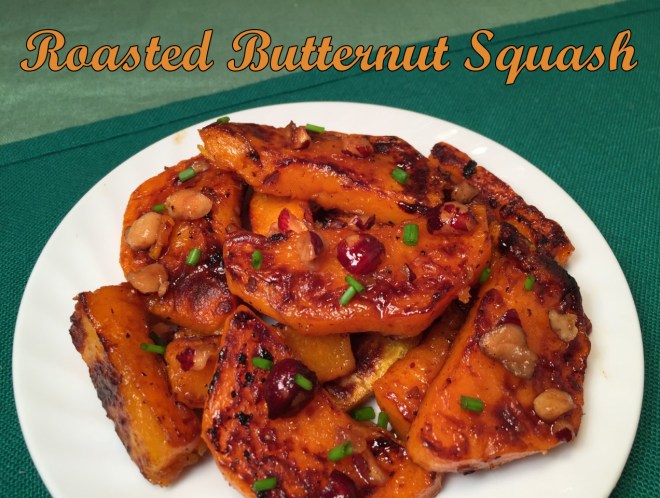 I love roasted vegetables! Their flavor comes to life, enhanced by the sweet caramelization process. Add to that the slight crispiness. Yum!!!
 Slice the body and neck in half lengthwise (yikes!) and remove seeds and fibres. Cut the four halves into 1/2″ pieces.
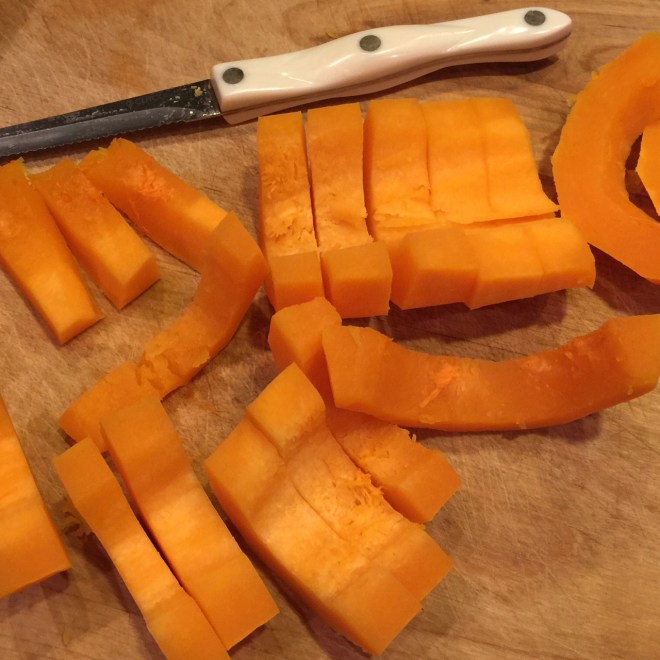
 Lay butternut squash pieces in a single layer on a rimmed baking sheet. Bake in preheated oven for 30-40 minutes, until bottoms are browned. Flip pieces and bake another 10-15 minutes, until well browned on both sides.
  While squash is baking, coarsely chop hazelnuts. In a small skillet or saucepan, melt remaining 2 T butter. Add in chopped nuts and sauté over medium/high heat. Stirring constantly, cook until nuts are browned – about 2 minutes. (The butter will be bubbly at first.)
 Remove from heat and stir in the 1 T water. Let cool a little, then add in the lemon juice and a pinch of salt.
  When squash is cooked, place slices into a mixing bowl (I use the same one from before). Gently stir in the hazelnuts and butter. Sprinkle on chives. Serve while hot.
 Cranberry Tart is a beautiful dessert that can be served year-round. But I thought it particularly appropriate for Valentine’s Day…even though the only chocolate in it is the white chocolate I sprinkled on top (which doesn’t really count).
 Add in softened butter and almond extract. Pulse until mixture clumps together.
  Place a 9″ tart pan on a cookie sheet – this is important since tart pans have a removable bottom and you don’t want to accidentally push it up when you lift the filled tart. (You don’t need the cookie sheet if you’re using a regular pie plate.) Scatter pieces of the dough around the tart pan (or regular 9″ pie pan), putting more near the edges.
  With fingers, press down the dough starting with the sides so it evenly covers the sides all the way up the top, and the bottom of the pan. Pay special attention to the corners – push them in so you have a nice sharp inside edge with more room for the filling.
 Place a piece of waxed paper over crust and fill with pie weights, uncooked beans, or rice. Bake in
  In another saucepan, combine the cranberries, sugar, salt, pomegranate juice, and lemon zest. Bring to a boil and cook until the cranberries start to pop – about 5 minutes. Remove from heat.
 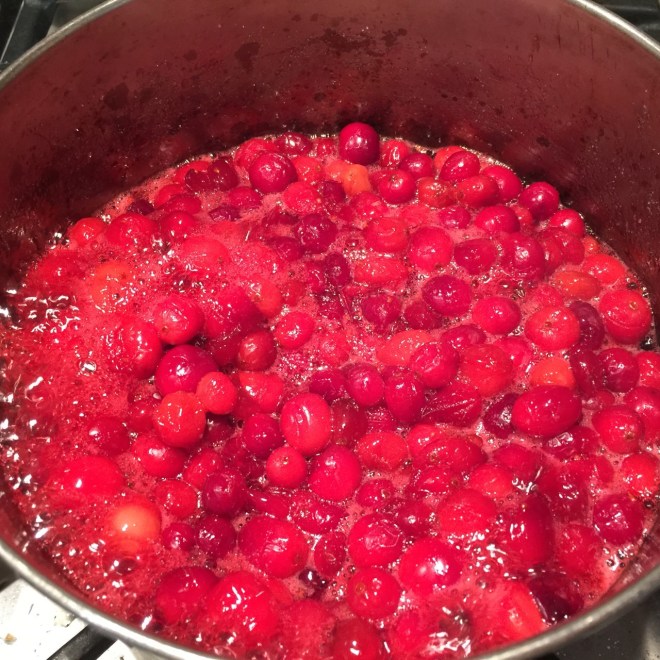 Note: Possible suggestion (although I haven’t tried this): To eliminate the above step of separately boiling the beet, try quartering the peeled beet (so you can find them easier), and add them to the cranberries before boiling. Then remove the 4 beet pieces before running the cranberries through the food mill.
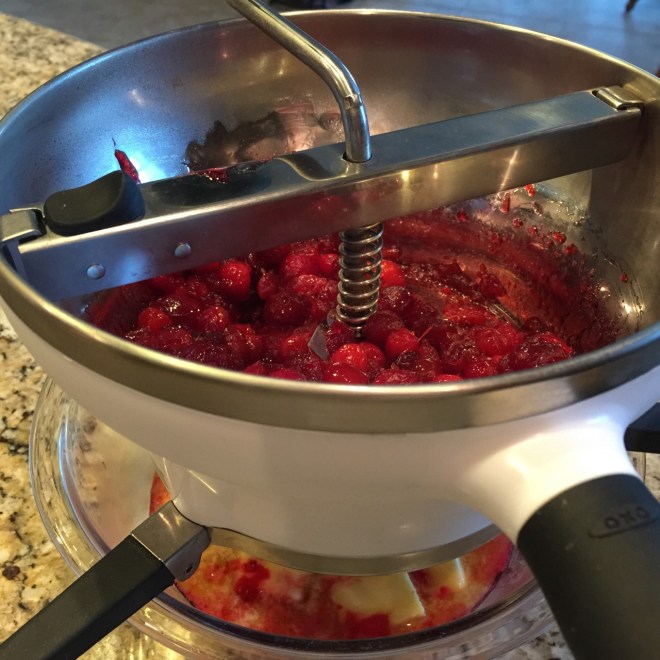 Beat the whole eggs and yolks together in a small bowl, then slowly whisk into the cranberry mixture. Add beet juice (if using).
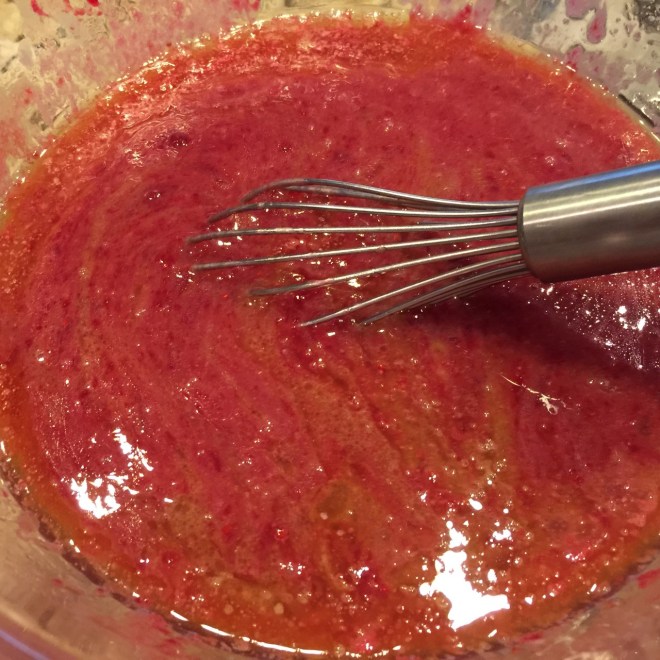 Clean out the saucepan you used for cooking the cranberries. Pour the filling through a strainer (to remove any bits from the egg and/or cranberries) into the empty saucepan. This takes some time since it’s thick! You don’t HAVE to do this step, but the curd is silkier if you remove the bits. You can see what would have been left in the curd if I hadn’t strained.
 Over medium heat, cook until thickened, stirring often – about 5 minutes.
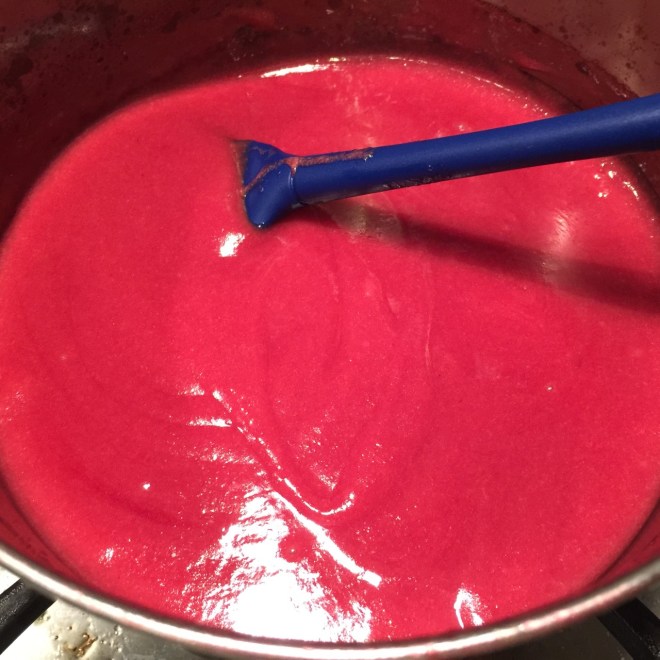 When oven is preheated, pour filling into cooled crust. (Make sure tart pan is still sitting on a cookie sheet – you really don’t want to chance pushing up on the bottom!)
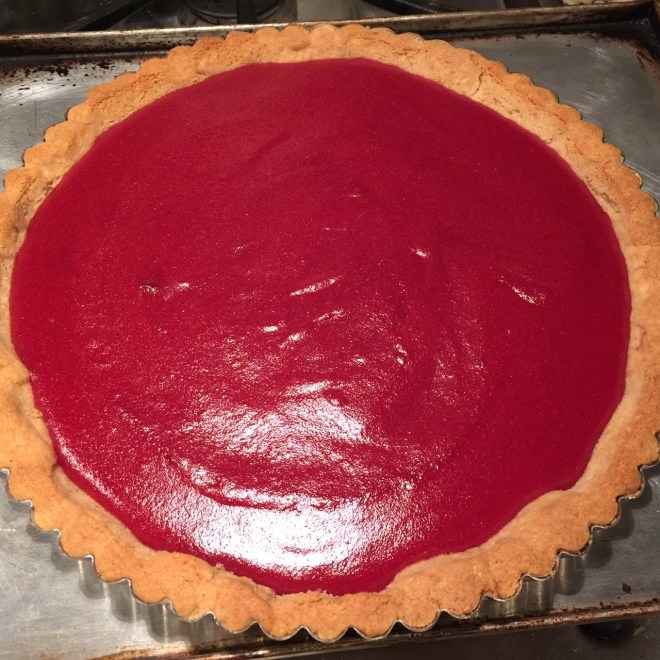 While tart is still hot, remove tart pan side by very carefully scooting the tart pan from the cookie sheet onto a wide can or bowl. (Make sure the diameter of the bowl is smaller than the tart pan opening.) Gently press down on tart pan edge and it should fall right down. Don’t move the tart yet – let it completely cool before moving it.
  Once tart is completely cooled, remove tart pan base – it may crack if it’s still warm. To remove base, run a thin, long implement (or maybe unflavored dental floss – I haven’t tried that, though) between crust and tart pan bottom. Carefully, nudge tart onto a serving plate.