QUINOA STUFFED EGGPLANT – Get Ready For Summer!

quinoa stuffed eggplant text

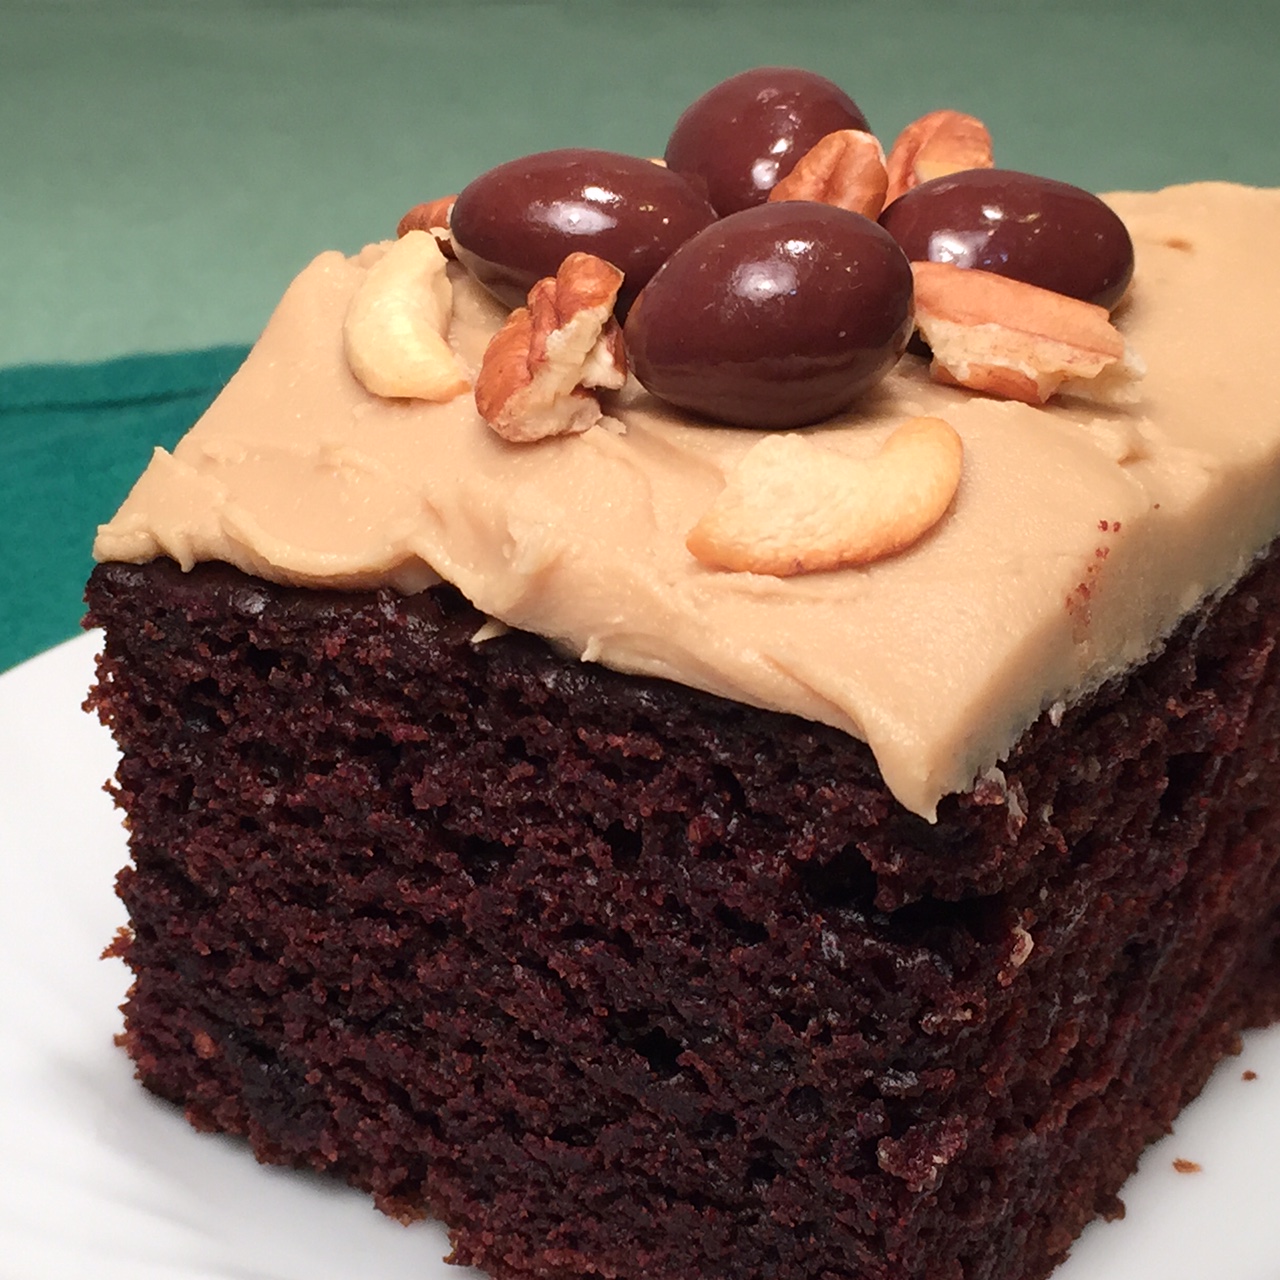
Last week I wrote about CHOCOLATE WACKY CAKE after being asked to use and critique a coconut balsamic vinegar. I know vinegar, particularly balsamic, sounds like a crazy ingredient for a chocolate cake, but it’s amazing – try it, and thank me later.

This week I’m posting about about QUINOA STUFFED EGGPLANT, which also calls for vinegar. It’s an easy recipe, and excellent to add to your repertoire for when your friends come calling with bags of eggplant from their garden.

NOTE: You can substitute rice or sorghum for the quinoa.

QUINOA STUFFED EGGPLANT

  • 1 large eggplant, or 2-3 smaller ones
  • 1 T olive oil
  • 1/2 c quinoa, raw
  • 1 cup onions, chopped
  • 3 garlic, pressed
  • 1 T fresh basil, chopped
  • 1/4 tsp cinnamon
  • 1/8 tsp cayenne pepper
  • 1 lb Roma tomatoes, chopped
  • 1 cup hard cheese (such as Parmesan, Romano, or Pecorino-Romano), grated
  • 2 T pine nuts, toasted
  • 2 tsp red wine vinegar
  • 2 T parsley, chopped

Slice eggplant in half lengthwise. Score each half by making slashes diagonally through pulp, half an inch apart. Do the same going the opposite way. MAKE SURE YOU DON’T CUT THROUGH THE SKIN! Brush a liberal amount of olive oil on cut sides, then sprinkle with salt and pepper.

Line a cookie sheet with parchment paper and place the eggplant cut side down. Bake on lowest rack at 400º for 40-50 minutes, until softened. Drain by laying the eggplant cut side down, on a terry cloth towel that’s topped with a couple of layers of paper towels.

Cook quinoa according to package directions.

Sauté onion in the 1 T olive oil. Add garlic, basil, cinnamon, cayenne, and 1/2 tsp salt. Cook 30 seconds only, then stir in cooked quinoa, tomatoes, 3/4 cup cheese, pine nuts, and vinegar.

Turn eggplant cut side up, and smash down pulp with a spoon to make eggplant into a bowl. Divide the quinoa filling between the eggplant halves, compacting and mounding it.

Top with remaining cheese and return eggplant to parchment lined cookie sheet. Bake at 400º in the upper third of oven for 5-10 minutes, until cheese browns.

Sprinkle on fresh basil and serve.

Advertisement

WACKY CAKE: It’s Crazy Good!

IMG_2354

I was recently asked to try a coconut balsamic vinegar and give my opinion. I used it in recipes you’d expect: Apple Sorghum Salad, Quinoa Stuffed Eggplant, and Roasted Garlic Brussels Sprouts. But, I also wanted to do a think-outside-the-box dish. A dessert perhaps? WHAT????

Then I recalled a chocolate cake recipe, called Wacky Cake, I found years ago in a lady’s club cookbook. At the time, I thought it was so named because all of the ingredients were put in a bowl and mixed at once. Now that I have made MANY cakes from scratch, I realize it’s because there are NO eggs, butter, or milk. Crazy, right?!

Wacky Cake came into frugal existence during the days of rationing, when these ingredients were hard to come by. The recipe called for cocoa, oil, baking soda, sugar…and white vinegar. At first glance, vinegar sounds like a horrible ingredient for a chocolate cake. But then I remembered, you can make buttermilk by combining milk with vinegar. So suddenly the vinegar didn’t seem so odd….until I realized there was no milk in this recipe. Hmmmm.

Since I’d made the cake before and knew it tasted good, I decided to take a chance and use the coconut balsamic vinegar. (I like to live on the edge….or, at least, nearby.)

Believe it or not, the Chocolate Wacky Cake came out utterly delicious! It was moist, firm, rose beautifully, and chocolatie. Day 3 tasted just as good as Day 1. There was no Day 4.

I topped it with a  Brown Sugar Frosting (Betty Crocker’s recipe), which was the perfect complement to the rich chocolate. I’ve included the recipe below.

Note:  You can make 29 cupcakes from this recipe.  Bake them at 350º F for about 17 minutes.

CHOCOLATE WACKY CAKE

  • 2 cups (387g) granulated sugar
  • 3 cups (364g) all-purpose flour
  • 2 tsp baking soda
  • 1 tsp salt
  • 1/2 cup (41g) unsweetened cocoa powder
  • 2 T vinegar (I’ve used both white and balsamic)
  • 2 tsp vanilla
  • 2/3 cup (165ml / 141 grams by weight) vegetable oil
  • 2 cups (473 ml) water
  • 1 T instant coffee granules (you  can probably use 1 cup of coffee & dilute it with 1 cup water if you don’t have the granules – but I’ve never done this myself)

Heat water to boiling and add the coffee granules. Stir and let cool to room temperature.

Preheat oven to 350º F.

In a large bowl combine all of the ingredients. You can do this on low speed of an electric mixer, an egg beater, or a whisk.

Pour into a greased and floured 13″x 9″ baking pan. Bake for 30-40 minutes, until top springs back when lightly pressed (mine baked for 34 minutes). Let cool completely before frosting.

BROWN SUGAR FROSTING – covers a 13″x 9″ cake

  • 1/2 cup butter (1 stick)
  • 1 cup dark brown sugar, packed
  • 1/4 cup milk
  • 2 cups powdered sugar, measure before sifting

In a saucepan melt butter. Over medium heat, stir in brown sugar and bring to boiling. Lower flame to low and stir constantly for 2 minutes. Add milk, increase heat, and bring to boil. Then, remove from heat and let cool for 30 minutes.

Sift powdered sugar to prevent lumps. Gradually stir into butter/sugar. Place saucepan into a bowl of ice water, and stir continuously until spreadable, but not too thick.

Frost cake. Let set at least 20 minutes before slicing.

MINI YORKIES: Fun Sized Yorkshire Puddings

mini yorkies text

As promised in last week’s TOFU ST. JACQUES A LA BONNIE post, this week I’m writing about Mini Yorkshire Puddings, which were the container for this scrumptious dish. (Often, puff pastry shells are used, but who needs the fat and calories!)

Yorkshire Pudding is traditionally made in a large pan, using drippings from whatever roast you’re cooking. But the sides would became tall and crispy, while the large center sunk and was kind of flabby and tasteless. Since the best part of the pud is the crispy edge, baking Yorkshire Pudding in muffin tins has gained in popularity.

I tried different ratios of eggs to milk to flour, achieving the best texture for my palate.

I also experimented with shortening versus butter versus oil to grease the cups. Shortening won that contest – it yielded a crispier pudding.

The final variable was whether to flour the sides. It didn’t seem to matter that much – both versions were crispy, however, the floured ones were very slightly taller. Since flouring muffin tins is kind of a messy task, it wasn’t worth the effort to me.

NOTE: The batter needs to rest for at least 30 minutes before baking, so plan accordingly. They need to be served immediately.

MINI YORKSHIRE PUDDINGS – makes 12

  • 4 eggs
  • 1½ cup milk (I used nonfat)
  • 3/4 tsp salt
  • 1½ cup all purpose flour
  • 1 T vegetable oil

Into a bowl beat the eggs and milk. Whisk in the salt and flour until fairly smooth (some small flour lumps are acceptable). Place a plate over bowl and let rest for, at least, 30 minutes.

With rack in middle position, turn oven to 450º F.

While oven is heating, grease cups (sides and bottoms) of a 12-cup muffin tin with shortening.

In a small saucepan pour 1 T vegetable oil. As the oven gets close to 450º F, heat up the oil and drizzle it into the batter, whisking continuously. Pour batter into a container with a spout (such as a pitcher or measuring cup) to make it easier to fill the muffin cups. Fill each cup halfway to start, then go back and evenly divide the remaining batter amongst the cups.

When oven is at 450º F (don’t jump the gun!), put muffin tin in oven and set timer for 20 minutes. Do not open door!!! (The cool air will prompt the puds to deflate a bit.)

After 20 minutes, reduce temperature to 350º F and set timer for 7 minutes. Again – do not open door!!! Turn on oven light and peer through door to see if they’re well browned. If they look satisfactory, open door, pull out rack, and pierce tops with a skewer to allow steam to escape. Remove tin from oven and empty Yorkies into a bread basket.

Eat immediately – they’re at their best when fresh and hot. However, if you have leftovers, you can reheat them for a couple of minutes in a toaster oven (or standard oven, if you don’t have one).


TOFU ST. JACQUES A LA BONNIE: OoLaLa!

tofu st jacques text

Throughout our marriage, my husband’s dinner choice for special occasions has always been Coquilles St. Jacques á la Parisienne (scallops in a white wine sauce).

Being a vegetarian, once I discovered fake (or, ‘faux’, since we’re talking French here) meats, Skallops and its like were substituted. These worked well since real scallops taste kind of fake anyhow.

Don’t get me wrong, I love imitation products – at least, SOME of them (you have to experiment). They talk you off the ledge when you crave your mom’s chicken casserole or spaghetti with meat sauce. Also, they allow you to revive those recipes you thought were unusable in the vegetarian world. BUT…they are a processed food and, as such, I try and limit them to once or twice a week.

So, I decided to try extra firm tofu in place of the fake scallops. It actually works quite well. True, tofu doesn’t have the chew of imitation scallops, but it blends quite well with the mushrooms and white wine sauce, and makes a tasty alternative. I added in diced pimentos for a little extra flavor and color. (Quel horreur!)

The final change I made (which you don’t have to) is replacing the high fat, calorie laden puff pastry shells usually used to contain the St. Jacques, with mini-Yorkshire puddings. The recipe for my Mini-Yorkies will be in next week’s blogpost.

TOFU ST. JACQUES A LA BONNIE – makes about 3 cups

  • 1 block extra-firm tofu
  • 3/4 cup vermouth
  • 2 cups mushrooms (5 oz), chopped
  • 1 tsp salt
  • 1/4 tsp white pepper
  • 1 bay leaf
  • 1/4 cup shallots, finely chopped
  • 3 T butter
  • 4 T flour
  • 3/4 cup milk (I use half cream, half nonfat milk – don’t judge!)
  • 2 egg yolks
  • 1½ tsp lemon juice
  • 1/3 cup (1½ oz) Emmentaler Swiss cheese, grated
  • 2 oz jar diced pimentos, drained
  • 4 puff pastry shells or mini Yorkshire puddings

Remove tofu from package and extract liquid by sandwiching it between 2 plates for 30 minutes, at least. Pour off water periodically. Cut into 1/2″-3/4″ cubes.

Into a skillet place the tofu, vermouth, mushrooms, salt, pepper, bay leaf, and shallots. Top with about 1 cup of water. Bring to a boil, reduce flame to simmer, cover skillet, and cook 5 minutes.

With slotted spoon, remove the tofu and mushrooms to a bowl. Boil down liquid to 1 cup. Remove bay leaf and discard.

In a small bowl whisk the egg yolks. Set aside.

Melt butter in a saucepan. Turn off heat and carefully mix in flour to make a paste. It’s best to use a flat-headed wooden spoon for this to mash out all lumps. This is the only chance you have to get rid of lumps – once you add liquid, they’re there for good. When the roux (paste) is perfectly smooth, cook it over a low heat for 1 minute.

Turn heat to medium and pour milk and reduced vermouth liquid into the roux. Stir often until sauce begins to thicken. Turn off heat. Slowly drizzle about 1/2 cup of this sauce into the egg yolks, whisking constantly so they don’t curdle. Turn the flame to medium again under the saucepan, and pour the yolk mixture back into the sauce, stirring constantly until thick – about 1 minute.

NOTE: You never introduce egg yolks directly into a hot liquid – they’ll cook. Rather, you temper the yolks by slowly introducing a small amount of hot liquid into them, and then pouring them into the sauce.

Add the lemon juice, cheese, and pimento to the sauce. Taste and season, if needed. (I never do.)

Blend the tofu mixture and sauce together in the skillet – off heat.

Bake the puff pastry shells or mini-Yorkshire puddings. Just before they’re done, heat up the tofu mixture. If using puff pastry shells, remove the center holes and doughy bits inside; if using the Yorkies, split open. Pour the heated TOFU ST. JACQUES A LA BONNIE on top and serve.