CHEESY “HAM” CASSEROLE – Kids Love It!

cheesy-ham-cass-text
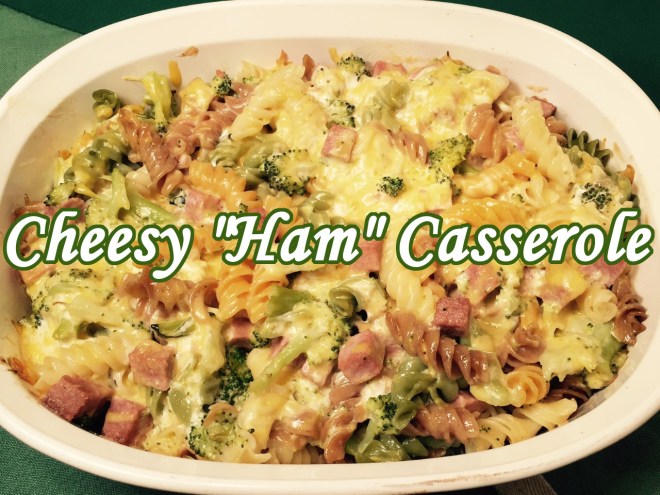
Being the mother of picky eaters, I’ve struggled to find dishes my boys would willingly eat. CHEESY “HAM” CASSEROLE became an instant favorite in our home. A bonus is that it’s loaded with broccoli, so even if they try to pick out the larger pieces, they’re still ingesting the smaller bits. (Hey, I’ll take what I can get!)

New readers may be perplexed by a vegetarian cooking blog using ham. Well, if you look carefully you notice the quotation marks around the word “ham”. That’s my shorthand for “fake”, “faux”, or “imitation”. If the idea of fake meat makes you cringe, then just leave it out and call the dish CHEESY BROCCOLI CASSEROLE. But for those of us ex-carnivores who like meat but are choosing not to eat it, the right imitation meat keeps us from falling off the vegetarian wagon.

CHEESY “HAM” CASSEROLE is quite easy to put together, plus it can be prepared ahead of time. Half an hour before dinner, just pop the casserole in the oven to bake. Use the cooking time to make your side dishes, set the table, and get the kids to make their way into the kitchen (a feat in itself).

CHEESY “HAM” CASSEROLE

  • 7 oz (204g OR 3 cups) uncooked spiral noodles (I use Wacky Mac)
  • 7.5 oz (211g OR 2½ cups) broccoli pieces
  • 305 oz (104g) fake ham (I use Worthington frozen “Ham” loaf)
  • 7 oz (257g OR 1¼ cup) mayonnaise
  • 2/3 cup (150 ml OR 164 g) milk (any kind)
  • 3 cups (174g OR 6 oz), divided, medium Cheddar cheese, shredded

Bring a large pot of water to boil and cook the noodles until they are ALMOST done – they will continue to cook in the oven. Rinse with cold water in a colander to stop the cooking process.wacky-mac-cooked
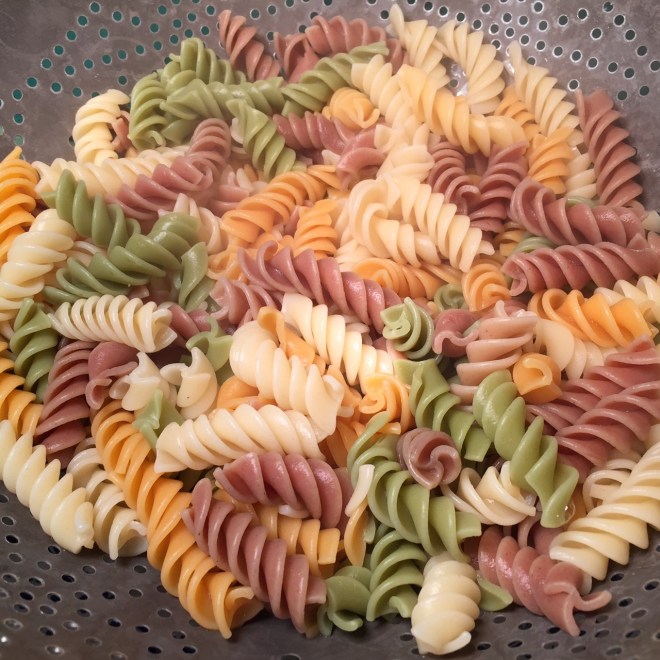
NOTE:  If you’re using colored pasta, such as Wacky Mac that I use, you’ll notice that the color, unfortunately, fades with cooking. (See photo below). I don’t think there’s anything that can be done.wacky-mac-raw-vs-cooked-textWhile the pasta is cooking, steam the broccoli. Like the noodles, you don’t want it overcooked or it will be mushy. Just steam it for about 5 minutes.steam broccoliWhile the pasta and broccoli are cooking, cube the “ham” into bite-sized pieces. ham-choppingTo save dirtying a bowl, use the empty pasta pot to combine the noodles, broccoli, “ham”, mayonnaise, milk, and 2½ cups (139g OR 5 oz) of the cheese. Stir gently, but thoroughly. Pour into a 2.5 quart casserole and sprinkle the remaining 1/2 cup (35g OR 1 oz) cheese on top. Cover and bake at 350º Fahrenheit for 30 minutes.

CORNBREAD -What A Difference Cast Iron Makes!!!

corn-bread-textSeveral months ago I jumped onboard the cast iron craze and bought a 10″ skillet that I found at a thrift store. I absolutely love it, and my fear of keeping it seasoned was for nothing. It’s quite easy, really. After washing, all one has to do is rub a bit of vegetable oil over the surface, then place on the stove using a medium/high flame, letting it dry for 1 minute.

So now that I have this fabulous skillet, I was looking forward to making cornbread in it. As expected, the cast iron produced a perfect cornbread with a nice crisp bottom, side, and top, with a delicate center.

Of course, a good recipe is essential. Not all cornbread recipes are created equal – I’ve found the results often disappointing – dry and gritty. As a fan of America’s Test Kitchen, I eagerly attempted (and tweaked) their recipe. YUMMY!

CORNBREAD

  • 2 T white vinegar
  • 3/4 + 2 T milk (I use nonfat)
  • OR 1 cup buttermilk
  • 1  1/3 cups medium grind cornmeal
  • 3 ears corn (about 1¾ cups nibblets)
  • 6 T butter, divided
  • 2 eggs
  • 1 yolk
  • 1 cup all-purpose flour
  • 2 T sugar
  • 1½ tsp baking powder
  • 1/4 tsp baking soda
  • 1¼ tsp salt

Make buttermilk (unless you’re using store bought buttermilk) by combining vinegar and milk. Stir in the cornmeal to soften it. Let stand while preparing the cornbread.

Remove corn from cobs by running a knife downwards and away from you along the cob. NOTE: You can use frozen or canned, if you’d rather.

Purée corn in a food processor for about 1 minute, stopping now and then to scrape down the sides. Pour into a saucepan and, stirring often, cook over medium heat until reduced to about 3/4 cup – about 8-10 minutes. It will become quite thick. Remove from heat and stir in 5 T butter.

Preheat oven to 400º Fahrenheit.

In a small bowl, beat together the eggs and yolk. Stir the eggs and buttermilk/cornmeal into the thickened corn.

In a medium bowl, mix together the flour, sugar, baking powder, baking soda, and salt. Add in the corn mixture, blending gently until dry ingredients are just incorporated into the wet. (Over mixing can lead to a tough bread.)

Heat remaining 1 T butter in a 10″ cast iron skillet. When skillet is hot, turn off stove and pour in cornmeal dough, smoothing top. Bake in preheated oven at 400º F for 25 minutes, until top begins to brown. Remove from oven and let set for 5 minutes before removing to a wire rack. Let cool 20 minutes on rack before slicing. (If you slice it too soon, it will fall apart.)


VEGETARIAN CHILI For Those Chili Nights!

vegetarian-chili-text
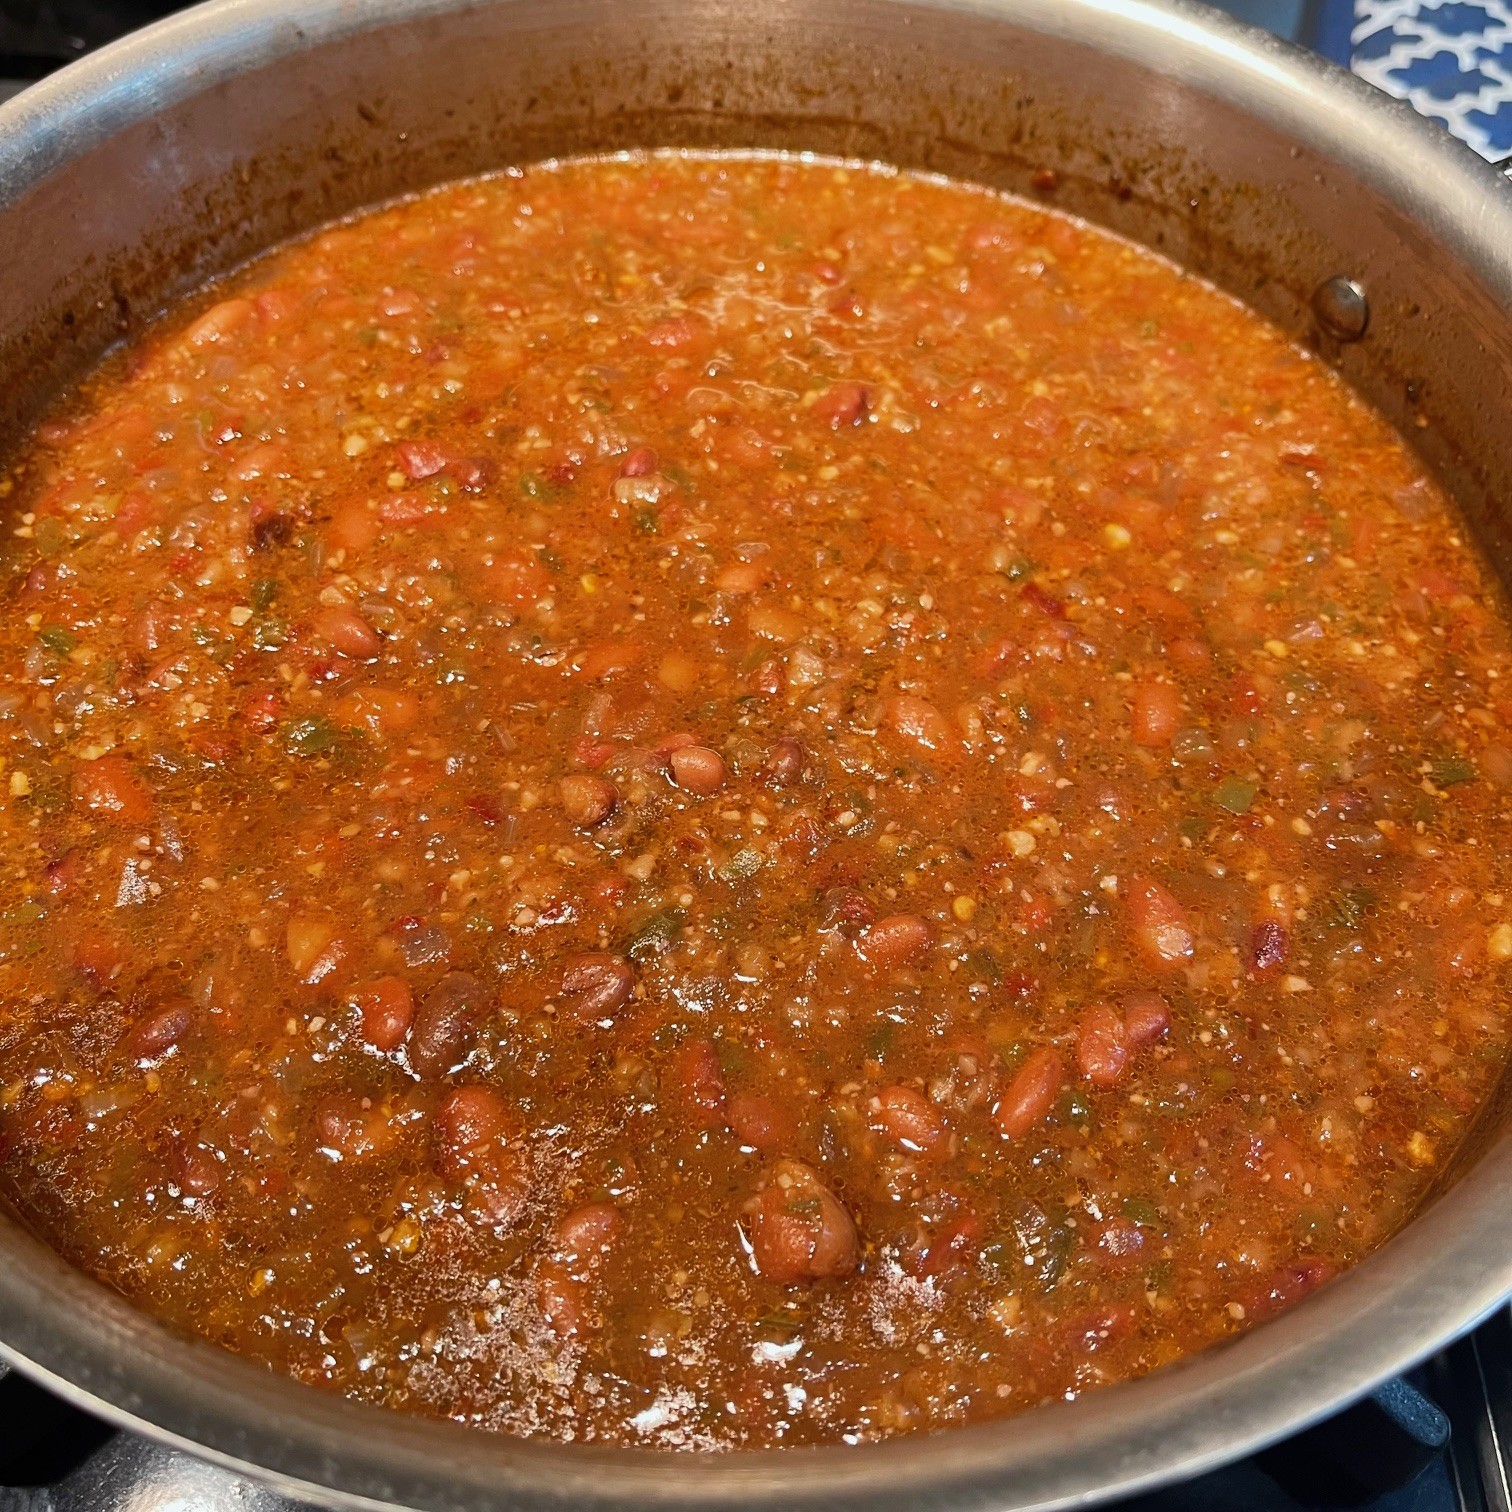
I recently watched an America’s Test Kitchen episode which featured a vegetarian chili recipe. Years ago, I developed my own Vegetarian Chili recipe, using imitation ground beef. There are many excellent fake meat products (and some really bad ones), and I use them from time to time. However, they are a processed food, so I limit my usage of them.

I decided to try ATK’s version – tweaking it, of course – to see if I could replace it for my imitation beef recipe. It was absolutely delicious!

The hands-on preparation is easy and fairly quick, but the overall cooking time is about 4½ hours, so plan accordingly.

Note: It’s best to use fresh shiitake mushrooms, if you can find them. If you can only find dried, place them in a bowl, cover with 1/2 cup water, and soak them for 20 minutes to soften, so they can be ground in a food processor. Dried shiitakes will NOT be ground in a food processor – they’re that tough!

VEGETARIAN CHILI – makes about 9 cups

  • 1 lb dry pinto beans
  • 3 T + 1¼ tsp salt, divided
  • 2 ancho chilies
  • 2 Anaheim chilies
  • 3 shiitake mushrooms, stems discarded (they’re too tough)
  • 1½ tsp dried oregano
  • 1/2 cup walnuts, coarsely chopped and toasted
  • 15 oz canned whole tomatoes
  • 3 T tomato paste
  • 2 T soy sauce
  • 1 T pressed garlic
  • 1 large jalapeño chili, stem and seeds removed, coarsely chopped
  • 1/4 cup vegetable oil
  • 2 cups chopped onions
  • 1 T cumin
  • 2/3 cup dry bulgur
  • 1/4 cup fresh cilantro, chopped

Thoroughly wash pinto beans, discarding any small stones (I’ve never found any, but recipes always say this). Place beans in a stockpot with about 12 cups of water and 3 T salt. Bring to a boil, cover, and turn off heat. Let sit for 1 hour. Drain beans in a sieve, rinsing well.

While beans are cooking, put the ancho and Anaheim chilies on a cooking sheet and bake at 300º Fahrenheit for 10 minutes. Cool 10 minutes, then discard stems and seeds. Coarsely chop by hand, then put in food processor and pulse until ground. Remove to a bowl.

Coarsely chop mushrooms, then grind in food processor with the oregano. If using dried shiitakes, process with the soaking water. Add ground mushrooms to the chilis.

In the empty food processor put the canned tomatoes (I always discard the stem end and any skin or imperfections), tomato paste, soy sauce, garlic, and jalapeño. Pulse 5 or 6 times to chop.

Grind walnuts in food processor and set aside in separate bowl.

Once the beans are out of the stockpot, heat the vegetable oil in it and sauté the onions and 1¼ tsp salt until browned – about 9 minutes. Add in the mushroom/chili mixture. Add in the cumin and cook for 30 seconds more in order to bloom the spice. Add in the beans, plus 7 cups water (if using dried shiitakes, then only add 6½ cups water – you already added the 1/2 cup soaking water). Bring to boil on stove, cover, then place in oven and bake at 300º F for 45 minutes.

Note:  Make sure your stockpot is oven-proof.

After 45 minutes, stir in the tomato mixture, walnuts, and bulgur. Cover and bake 2 hours. Remove from oven and let set 20 minutes uncovered. Stir in cilantro.


TRES LECHES CAKE – A Three Kings Day Treat!

tres-leches-cake-textIt seemed appropriate to post a Tres Leches Cake recipe for Three Kings Day, (aka, the Epiphany). Tres Leches (three milks), three kings. Yeah, okay – it may be a stretch. But it’s still a delicious recipe and you could certainly serve it on the Epiphany…or anytime, for that matter.

It needs to be made a day in advance of serving so that the three milks (evaporated, sweetened condensed, and cream), which get poured over the hot cake, can be fully absorbed. But other than that bit of planning, it’s a very easy cake to make.

TRES LECHES CAKE

  • 2 cups all-purpose flour
  • 2 tsp baking powder
  • 1 tsp salt
  • 3/4 tsp cinnamon
  • 1 cup milk (any kind – I use nonfat)
  • 8 T butter
  • 4 eggs
  • 2 cups sugar
  • 4 tsp vanilla, divided
  • 14 oz can sweetened condensed milk
  • 12 oz can evaporated milk
  • 2 cups heavy cream, divided
  • 3 T light corn syrup

Preheat oven to 325º Fahrenheit.

In a bowl, mix together the flour, baking powder, salt, and cinnamon. Set aside.

In a small saucepan, heat together the milk and butter, just until the butter melts. Remove from heat.

Into the large bowl of your electric mixer, beat the eggs for 30 seconds on low speed. After 30 seconds, slowly start pouring in the sugar (still on low speed). Once all the sugar is added, increase the mixer speed to medium/high and beat until mixture is pale and glossy – about 5-7 minutes. On low speed, slowly add in the milk/butter and 2 tsp vanilla. Mix in the flour a third at a time.

Pour batter into a greased and floured 13″x 9″ pan. Spread the batter so the center dips down lower than the sides. As the cake bakes, the center will naturally rise. By scooping down the center, this will help ensure you get a flat-topped cake. Bake at 325º F for 30-35 minutes.

While cake is baking, mix together the sweetened condensed milk, the evaporated milk, 1 cup of cream, and 1 tsp vanilla. I suggest you use a container with a spout for easy pouring.

When cake is done, remove from oven. Prick the hot cake every 1/2″ with a skewer or fat toothpick. Very slowly pour the milk mixture over the hot cake. (You’ll have to stop for awhile now and then to allow the milks to absorb into the cake.) There will probably be some pooling on top in spots. That’s okay. Let cake set for 15 minutes after you pour on the milks, then put in refrigerator UNcovered overnight, up to 24 hours.

Before serving, make frosting by combining 1 cup cream, the corn syrup, and 1 tsp vanilla together in the small bowl of your electric mixer. Beat on high until soft peaks form. Spread over cold cake.