Thick. Chewy. Chocolate Chip. Peanut Butter. Cookies. Five words (Yes – I’m counting ‘chocolate chip’ and ‘peanut butter’ as one word apiece!) that individually grab your attention. But used together, they have the ability to initiate a mighty craving, sending you running for your cookbooks or a local bakery.
I love reading author Joanne Fluke mysteries. Not only do the characters feel like old friends, but the main character, Hannah, runs a bakery and Ms Fluke includes many recipes in each book. One of the recipes in Red Velvet Cupcake Murder, a recent read, was Chocolate Covered Peanut Cookies. Yummm! Chocolate covered peanuts are a favorite of mine. (Who am I kidding – chocolate covered ANYTHING is a favorite!) Then my mind went a step further and thought that a peanut butter cookie with chocolate chips would be even better – more like a Reeses Cup.
The thing is, most peanut butter cookies are kind of dry, flat, and have those fork marks on top. I wanted a peanut butter cookie that was thick and chewy – something I could sink my teeth into. I experimented a bit with both the cookie part and the chocolate chips before coming up with the taste I had in mind.
NOTE: A walnut sized ball of cookie dough will yield a cookie approximately 1½” in diameter. If you want a larger cookie, then obviously use more dough.
UPDATE NOTE: I changed the sugar from granulated to dark brown – EVEN BETTER!!!
CHOCOLATE CHIP PEANUT BUTTER COOKIES – makes 24 cookies 1½” in diameter
56 (¼ cup) butter, soft (but not melted)
123g (½ cup) extra crunchy peanut butter (I used Jif)
127g (¾ cup) dark brown sugar, packed
1 egg
197g (1½ cup) all-purpose flour
1 tsp cream of tartar
½ tsp baking soda
¼ tsp salt
102g (2/3 cup) milk chocolate chips (you can use semi-sweet, if you like, but I didn’t think they worked as well)
Using an electric mixer, beat together the butter, peanut butter, and sugar on medium high speed until fluffy. ( If you’re doing this by hand, your upper arm will get a nice workout.)
Beat in the egg.
Add in the flour, cream of tartar, baking soda, and salt. Before turning on the mixer, mix the dry ingredients with the spatula to kind of blend them. Then turn the mixer on and mix. Recipes often have you put the dry ingredients in a separate bowl and blend them before adding to the dough. I would rather not dirty an extra bowl. My way works fine. You’re welcome. Pour in the chocolate chips and mix chips in on low.
Preheat oven to 375º Fahrenheit.
For a 2″ finished cookie, roll dough into walnut sized balls and place on an ungreased cookie sheet. Using your fingers, press them to about ½” thick. These cookies don’t spread much.
Bake 8-10 minutes – until the edges are starting to brown. Remove them from the oven, letting them set on the cookie sheet for 10 minutes to set. Then transfer the cookies to a wire rack to complete cooling.
There’s no way I can read one of Joanne Fluke’s Hannah Swensen Mysteries without trying at least one of the her recipes. My husband’s co-workers are reaping the benefit because when I make her cookie recipes, I send them to work with him…. Well, NEARLY, all of them. Hey, a girl has to eat!
Unless you’re Cool Hand Luke, you may be reaching your wit’s end trying to use up all those hard boiled eggs from Easter. Well, have I got a recipe for you! It’s my mom’s famous chicken casserole which I ingeniously call: Mom’s ‘Chicken’ Casserole. Notice the quote marks around the word ‘chicken’. That means I use faux (aka – fake, imitation) chicken. This recipe uses 4 hard boiled eggs! And, what the heck – if you’re getting desperate, throw in a couple more.
My mother was a very nervous cook. She generally stuck to what she knew. Somewhere along the line she found this fabulous chicken casserole that she made for every occasion. It always drew rave reviews so she figured if it ain’t broke, don’t fix it. No one ever tired of it.
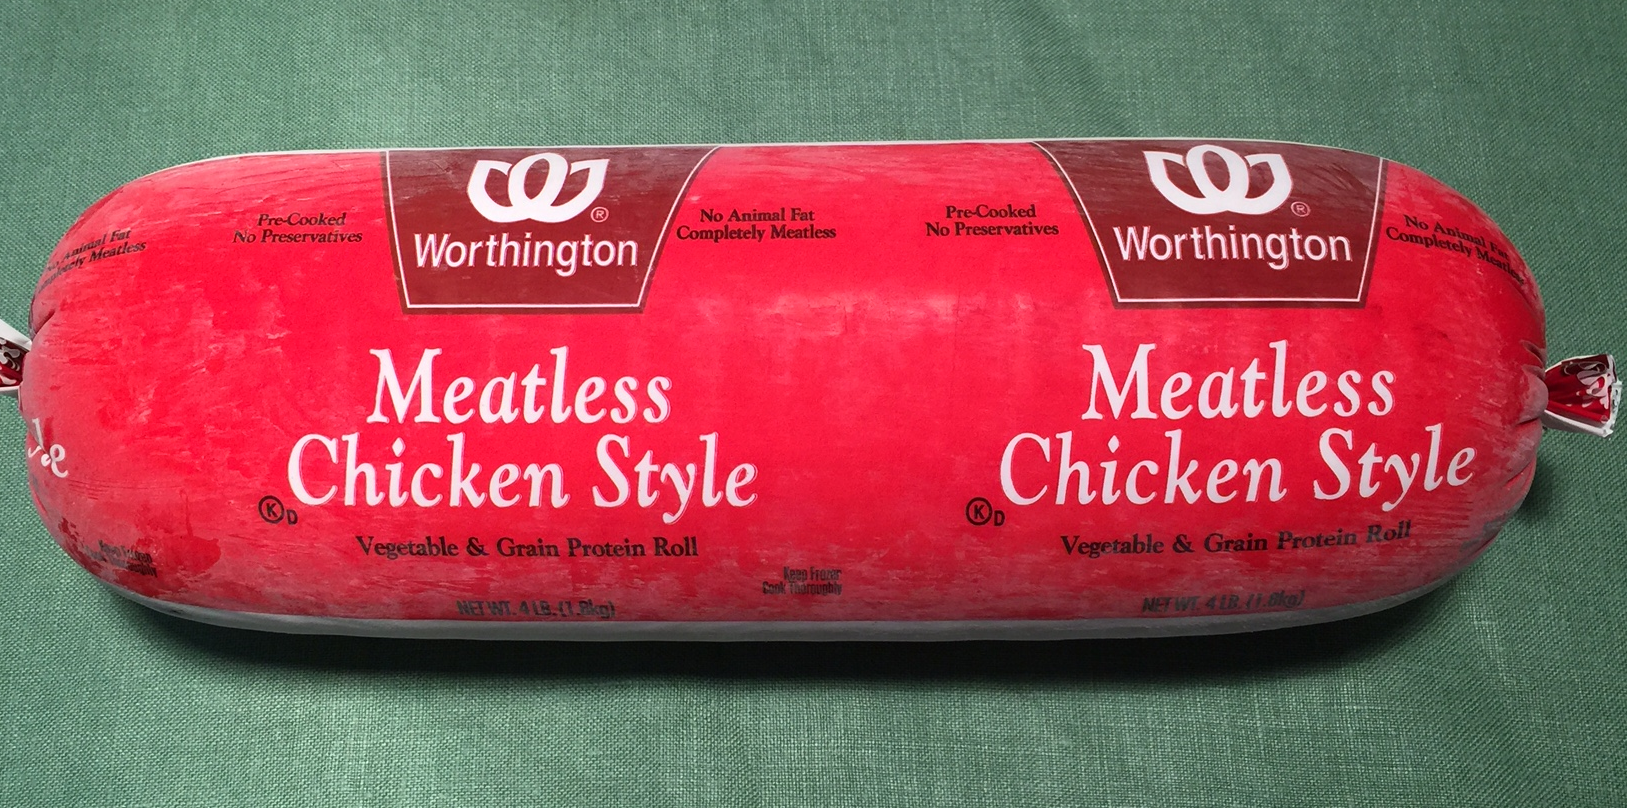
When I became a vegetarian, I figured that was the end of my mother’s casserole for me. But once I discovered there was such a thing as imitation chicken, I (with much anticipation) tried various brands. While some of them were good, they were all too dry for this recipe. Dang! Then I found Worthington’s frozen Meatless Chicken Style roll. What a difference! It’s very moist and gives the illusion that you’re actually eating chicken. So I dug out my chicken casserole recipe and tried the Worthington roll. It tasted great! Imitation meats have really expanded my vegetarian cooking repertoire.
A bit of warning (the bad news) – this roll is pricey, so don’t faint when you’re shopping. BUT it weighs 4 lbs (the good news), so you get a lot for your money. If you were to cut it into cubes, you’d get approximately 14 cups. And remember, unlike real chicken, the entire roll is edible – there are no bones, skin, fat, and gristle! Yuck!!!
Here’s my tip: Since these logs are far too much for any one meal, I let it thaw enough so I can cut it into thirds. Then I refreeze the portions on a cookie sheet and, when frozen, seal and store them in a freezer bag. (If you store and seal the portions before they’re refrozen, they’ll stick to each other.)
Mom’s ‘Chicken’ Casserole is one of those great recipes that you can make ahead of time. My mother always made it the day before – she claimed that allowed the flavors to blend. If you do make it ahead, don’t sprinkle on the potato chips (if you decide to use them) or almonds until just before you bake it. By the way, my mom used the potato chips; I never do. Of course, it’s delicious with the potato chips (why wouldn’t it be?) but I’m constantly watching my fat and calorie intake so I leave them out. Either way, the casserole is fabulous!
The original chicken casserole recipe calls for Cream of Chicken Soup. Of course, since this was now a vegetarian recipe I had to come up with a substitute. I decided on a thick basic white sauce with some herbs added in.
NOTE: You don’t have to use Worthington Chicken Style roll. If you have another brand you prefer, use that. Taste is subjective.
This recipe is made in the traditional 9½” x 13″ casserole dish. If you choose to half it (which I did this time), use an 8″ x 8″ pan. I actually have a cooking video of me making this recipe, if you’re a visual learner. Click on Mom’s ‘Chicken’ Casserole to watch.
MOM’S ‘CHICKEN’ CASSEROLE
8 cups cubed fake chicken (I used Worthington’s Chicken Style – see photo above)
2 cups celery, diced (about 6 stalks)
1 4-oz jar diced pimento
4 hard boiled eggs, chopped (throw in more, if you like)
¾ cup mayonaise
3 T butter
3 T flour
¾ cup milk (I used organic nonfat)
½ tsp salt (this is separate from the 1 tsp salt that follows)
¼ tsp each of thyme, dill, and celery salt
1 tsp salt
1 tsp dried minced onion (found with the jarred spices & herbs)
2 T lemon juice (fresh or bottled)
1 cup medium cheddar cheese, shredded
2/3 cup slivered almonds, toasted
Optional: 1½ cups crushed potato chips
The first thing to do is make a white sauce. In a small saucepan melt the butter. Add in the flour and mash it together with the melted butter to form a smooth paste (make sure there are NO lumps – if you don’t do this now, they’ll never come out). I use a flat-headed wooden stirrer for this. Once blended, cook the paste over a low flame for 1 minute. Pour in the milk, increase the heat to medium, and continue to stir until it thickens. Stir in the ½ tsp salt and the thyme, dill, and celery salt.
In a large mixing bowl mix everything together (including the white sauce) EXCEPT the cheese, almonds, and potato chips (if using).
Spread evenly into the casserole dish. If you plan on baking this later, cover with foil and refrigerate.
Preheat oven to 350º F.
To bake, layer the potato chips (if using) on top, then the cheese, and finally the slivered almonds. Cover with foil and bake for 25 minutes. Remove foil and bake another 5 minutes. Serve hot.
I’ll be the first to admit the fake chicken version isn’t quite as good as the real thing. Chicken, Cream of Chicken Soup, and crushed potato chips are all really tasty. But this is still an excellent casserole! Remember, the fake meats are geared to talk you off the ledge when you start to weaken. The imitation chicken forms a base to all those other yummy ingredients.
Thanks to imitation meats, vegetarian cooking has come a long way.
You may or may not be aware, but we Armenians love our food. I mean we LOVE our food. When I was a kid, family gatherings were centered around the preparing of the feast, the eating of the feast, the cleaning up after the feast, a brief interlude, and then the eating of the leftover feast. Yeah – we like our food.
My dad always loved telling us about how his mother made this fabulous after-school snack called ‘djash’ (pronounced ‘josh’). It was a rolled bread filled with peanut butter. With five hungry children in the house, she used to hide it – hoping to dole it out bit by bit. But hungry children can be very resourceful and they always found it. This wasn’t a food my grandmother made for holidays – rather it was an everyday kind of thing. Something to tide her offspring over between the time they came home from school and dinner.
As far as I knew, djash was just another Armenian food that my family ate, along with shish kabab, dolma, madzoon, lahmajoon, etc. When people familiar with Armenian foods asked which dishes we ate, I would rattle off a variety of foods. They nodded knowingly until I got to djash – they’d never heard of it. I didn’t really think twice about that, except even Armenians didn’t know what it was. My cousin Sue and I were talking about this (she’d experienced the same thing), and she found out why: ‘djash’ isn’t a specific food – it means ‘lunch’ or ‘little dinner’. So when my grandmother made djash, she really meant ‘snack’ – it just so happened the snack was a peanut butter bun. Now I know why I could never find it in any of the tons of Armenian cookbooks I own.
Years ago my dad had me type up (on a real typewriter – that’s how long ago this was) his mother’s djash recipe. This was years before I learned to cook anything, let alone a yeast bread, so I didn’t see anything amiss with the recipe. But recently I made djash and, while it was okay, it seemed like it was missing something. Then I realized it tasted like it needed sugar. I went back to the original recipe and there it was – the problem. Salt was listed twice on the ingredients list, in different amounts. More than likely, I just figured this was a mistake and eliminated one of the salts. Now that I’m a seasoned cook (I say modestly), I fixed the problem by reinstating the sugar.
If this is your first time making a yeast roll, fear not – I’ll walk you through it.
DJASH (PEANUT BUTTER BUNS) – makes 12 buns
½ T yeast
¾ cup water, approximately 100ºF
3 cups all-purpose flour
8 T butter, cut up and softened (NOTE: more butter is used further down the ingredients list for the filling)
1 egg
1 tsp salt
2 T sugar
½ lb peanut butter (I used the kind you grind in market yourself, made only with peanuts)
2 T butter, softened
egg wash (1 egg and 1 T water beaten together)
NOTE: If you want a sweeter peanut butter filling, you might want to use a brand like Skippy. The grind-it-yourself kind has no salt, sugar, or oil added.
Stir the yeast into the water and let proof as you prepare the other ingredients. Into the food processor put the flour, 8 T butter, egg, salt, and sugar. Pulse several times. Once the yeast water is proofed (foamy), turn on the food processor and pour in the yeast gradually through the feed tube. Soon a dough ball will form. Let the machine knead the dough for 45 seconds.
Smoosh the dough ball into a greased bowl, then flip it so the top is now on bottom. (That way the ball is completely greased). Cover and let rise for 1 hour. In a small bowl, stir together the peanut butter and 2 T butter. Don’t melt the butter – it will make the filling too runny.
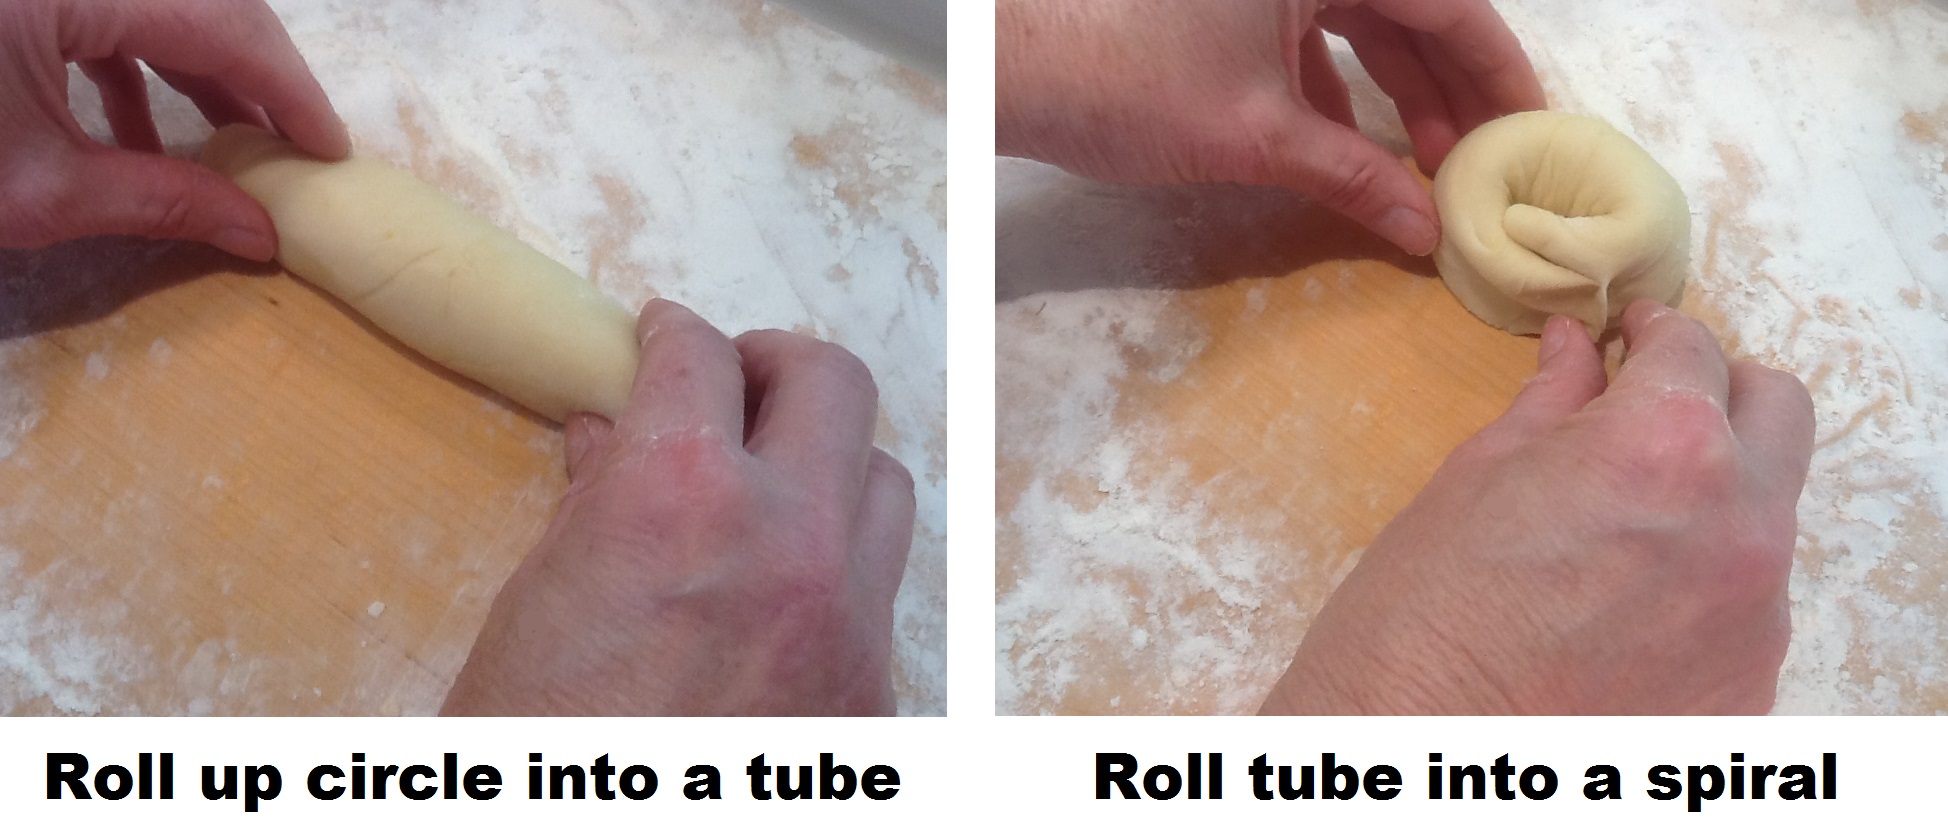
Punch down the dough and divide into 12 balls. One by one, roll each ball to a 4″-5″ circle on a well floured board. Spread a rounded tablespoonful of peanut butter over the circle to ½” from the edge.
Roll up the circle, like a cigar. Then roll up this tube sideways into a spiral circle. Pinch the end into the roll. After rolling each one, place it on a greased cookie sheet. Cover them and let rise for ½ an hour.
Preheat oven to 400º F.
Press down each risen roll to ½” thick. Paint them with the egg wash. When the oven is heated, place the cookie sheet on the middle rack, then IMMEDIATELY LOWER TEMPERATURE TO 350º F. Bake for 20 minutes, until lightly golden brown. Remove rolls to a wire rack. They’re ready to eat hot out of the oven.
One final note from my husband – they would probably taste really good topped with a chocolate frosting. But, of course, what wouldn’t?!
While bread may be the staff of life, a good stock is the foundation of a great many vegetarian recipes. It’s the little black dress of cooking (sorry men – I’m not sure if there’s a male equivalent): every woman should have at least one and you can accessorize it many ways, depending on the occasion.
Yes, it’s true, you can buy vegetable stock in cans and cartons. In a pinch, that’s a reasonable way to go. But making your own can save you money (which you should know by now is something I love), AND you can customize it to suit your own taste. I’ve found the kind you buy are a little heavy handed with the flavor. Vegetable stock should just add a little flavor to your dish, not overpower it. Finally, when you make your own, you don’t have to worry about the potential heath concern of BPA in canned foods.
Before going any further, let me point out to those of you who may not know this: ‘stock’ and ‘broth’ are NOT the same thing. I used to use those words interchangeably. Then when I was prepping for my radio cooking show episode on soups, it occurred to me that I should really look those words up so I didn’t give out misinformation. Low and behold, there was a difference. A broth takes a stock and goes one step further by seasoning it. Broth would be something you would actually drink, while stock is an ingredient in something such as a soup, casserole, or sauce.
I got this Vegetable Stock recipe from the New Recipes From Moosewood Restaurant cookbook and am quite happy with it as is. But, of course, you can adjust as you wish. I ALWAYS double this recipe and freeze it in ½ and 1 cup portions. By freezing it in the smaller amounts, I can thaw out just what I need. As you can imagine, I have a LOT of freezer containers.
VEGETABLE STOCK – makes about 8 cups
10 cups water
2 russet potatoes, unpeeled and quartered
2 large carrots, sliced into 2″ pieces (I throw the green stems in, too)
1 large onion, peeled and quartered
1 celery stalk, sliced into 2″ pieces
1 red apple, cored and quartered
12 peppercorns
1 bay leaf
NOTE: Make sure you wash your vegetables thoroughly – get in all the nooks and crannies!
Put the water into a large stockpot and begin heating it to a boil as you prepare the veggies. Just throw them in as you go. Once everything is in the pot and it’s at a full boil, cover and lower flame to keep it at a simmer. Simmer for 1 hour.
I want to stress the importance of this next step so I will use caps: Strain the stock by pouring it into a colander THAT’S SITTING ON A CONTAINER. The veggies will stay in the colander while the stock will drain into the container. You may be wondering why I emphasized this. I’m embarrassed to admit this, but one time (possibly twice) I was doing ten things at once and when the time came to strain the stock, I put the colander in the sink and emptied my stockpot of Vegetable Stock into it. I watched in horror as my precious Vegetable Stock rushed down the drain. I’m sure you must have heard the scream! Anyone who’s drained a pot of cooked pasta in the sink will probably understand how this happened.
Actually, I found a way to prevent that from ever happening again: I bought a large stockpot that has a colander insert. Now I just put the veggies in the colander as it sits in the boiling water. When it’s done simmering, I lift up the colander and let it sit askew on the pot to drain.
The only problem I have with this recipe is what to do with the cooked veggies. Currently, I put them in the green waste for composting, but I always wonder if there’s something edible I can do with them. If anyone has a solution to this dilemma, I’d love to hear your thoughts.
Don’t get me wrong – I LOVE Beer Bread. But you can only eat so much of it before you start wearing it…on your hips. You know what I’m talking about. You keep eating something because it’s going to go bad if you don’t. And, of course, it really tastes better slathered with butter (well, what doesn’t?).
I made Beer Bread the other day (click: Beer Bread – No Need To Knead) and there was still half a loaf left. I thought about freezing it – I AM the queen of freezing, after all – but wondered if I could use it for dinner somehow. I perused my recipe cards (for you young folks out there, recipe cards are what we used before the internet). When I came upon Briggs House 24-Hour Wine And Cheese Omelet I had a ‘hmmm’ moment. The recipe was an egg casserole with pieces of day-old French bread and white wine, among other ingredients. I said to myself (and, yes, I talk to myself), ‘How would this taste if I replaced the French bread and wine with beer bread and beer?’ The recipe also called for Swiss cheese. I wasn’t sure how Swiss cheese would taste with the beer flavor, but I did have jack with jalapeño. ‘Hmmmm’ (once again – this time with an added ‘m’)….’now that might give it a bit of a kick’.
The final change was made out of necessity. As the name indicates, you put together the original in advance and then let it rest 24 hours before baking it. (It’s one of those handy recipes for brunch when you won’t have time to cook.) It was coming on to the dinner hour so I didn’t have time for it to even take 40 winks, let alone a 24 hour rest. Once I put it together, into the oven it went.
The final verdict? It was good. Very good. But I have to say, I prefer the French bread and white wine taste. Maybe next time I’ll split the difference and use beer bread with white wine. My husband will appreciate that – I had to beg ¼ cup of the beer he was about to drink. The jalapeño jack was great, although so is the Swiss. The Swiss is more subtle, but the jalapeño really wakes your mouth up. I guess I’ll just have to see what I have in the fridge next time I make it.
Here’s my version of Briggs House 24-Hour Wine And Cheese Omelet. Of course, as with most recipes, tweak it to suit yourself.
BEER & CHEESE OMELETTE CASSEROLE
½ loaf beer bread, torn into 1″ cubes
3 T butter, melted
2/3 cup jalapeño jack cheese, shredded
8 eggs
¼ cup beer (I used Hefe. Use a brand you like since the flavor will come through)
1½ cups milk (I used organic nonfat)
½ T dry mustard
¼ tsp cayenne pepper
Preheat oven to 325ºF.
Butter a casserole dish. I used a 6″ x 11″ dish which makes a thicker casserole. But you can use the standard 9½” x 13″ casserole dish if you prefer a thinner omelette (or if that’s all you have). Spread the beer bread evenly in the dish, then drizzle with the melted butter. Sprinkle on the cheese.
In a medium sized bowl beat the eggs. In a small bowl put the dry mustard and cayenne pepper. Pour in a little of the beer and, with the back of a spoon, make a smooth paste. Add this paste, the remainder of the beer, and the milk to the eggs. Beat until foamy. Pour evenly into the casserole dish. Cover with foil and bake for 50 minutes covered, then remove foil and continue to bake another 10 minutes, until the top is browned. Let rest at least 10 minutes before serving.
NOTE: Next time I make this, I’m going to add in Morningstar’s Veggie Sausage Patties. They would go really well with this dish – and they’re so good, your carnivores will love it!
Home made bread is one of those things that everyone loves to eat, but most people shy away from making. Well, have I got a bread for you: BEER BREAD! It’s only got 3 ingredients and – like my extremely clever title promises – no need to knead!
Who doesn’t stop in their tracks when they get a whiff of bread baking in the oven? This is inevitably followed with an audible ‘aaaahhhhh!’ Add in the aroma of beer and people will be lining up for a slice.
This is a super fast and easy bread to make. For those of you who like to ‘watch’ recipes rather than read them, you can click on: BEER BREAD and watch my how-to video. (I like the way my hair turned out in that video, btw!)
One of the odd things about this bread is that even if you don’t like to drink beer, you may still enjoy eating Beer Bread. When I started making this bread, I couldn’t stand the taste of beer (although, oddly enough, I liked the aroma), but I really liked the bread. Over the years, I’ve grown to like drinking a pale beer now and again – especially on a hot day.
You’ll notice that the recipe calls for self-rising flour. Make sure you don’t use anything else. Otherwise your bread won’t rise. This is one of those specialty flours I keep on hand, stored in the freezer. (Did you know freezing flour prevents bugs? I store all my flours in the freezer.) As far as I know, the smallest size bag of self-rising flour you can buy is 5 lbs. That’s a lot of flour, especially when all you need is 3 cups. Just suck it up and buy the bag – you’ll eventually use it up. Once the self-rising flour is awaiting use in the freezer, you can make Beer Bread at the spur of the moment (as long as you have beer on hand….which is a given in my house). It only takes a few minutes to get it into the oven.
BEER BREAD
3 cups (453g) self-rising flour
3 T (30g) sugar
1 bottle beer, room temperature and sealed
Preheat oven to 375ºF.
With a spoon, mix the flour and sugar together in a bowl. Open the beer and pour into the flour all at once. Immediately begin incorporating the beer into the flour with the spoon. Pour the batter into a greased loaf pan. Bake for 45 minutes – until golden brown on top.
Take the loaf from oven and let sit a few minutes. Then run a knife around the sides and remove the Beer Bread to a wire rack to cool.
A word of caution: tempting as it may be to slice into the hot loaf – restrain yourself! Cutting into a hot loaf of bread causes it to fall apart. And ladies, keep your husband away from it – the aroma of hot bread combined with beer draws them like a magnet.
After my last post – Roasted Carrots – Shaking It Up A Little – I felt the need to redeem myself in your eyes – to prove to you I AM a frugal (cheap) and careful (paranoid – as in wondering, ‘Whose disease ridden hands have been touching my food?!’) cook. In that post I confessed to using bagged, ready-to-go carrots. I’m planning on buying unbagged carrots next time I shop….unless, of course, the bagged are on sale – in which case all bets are off. Cheap trumps paranoid every time.
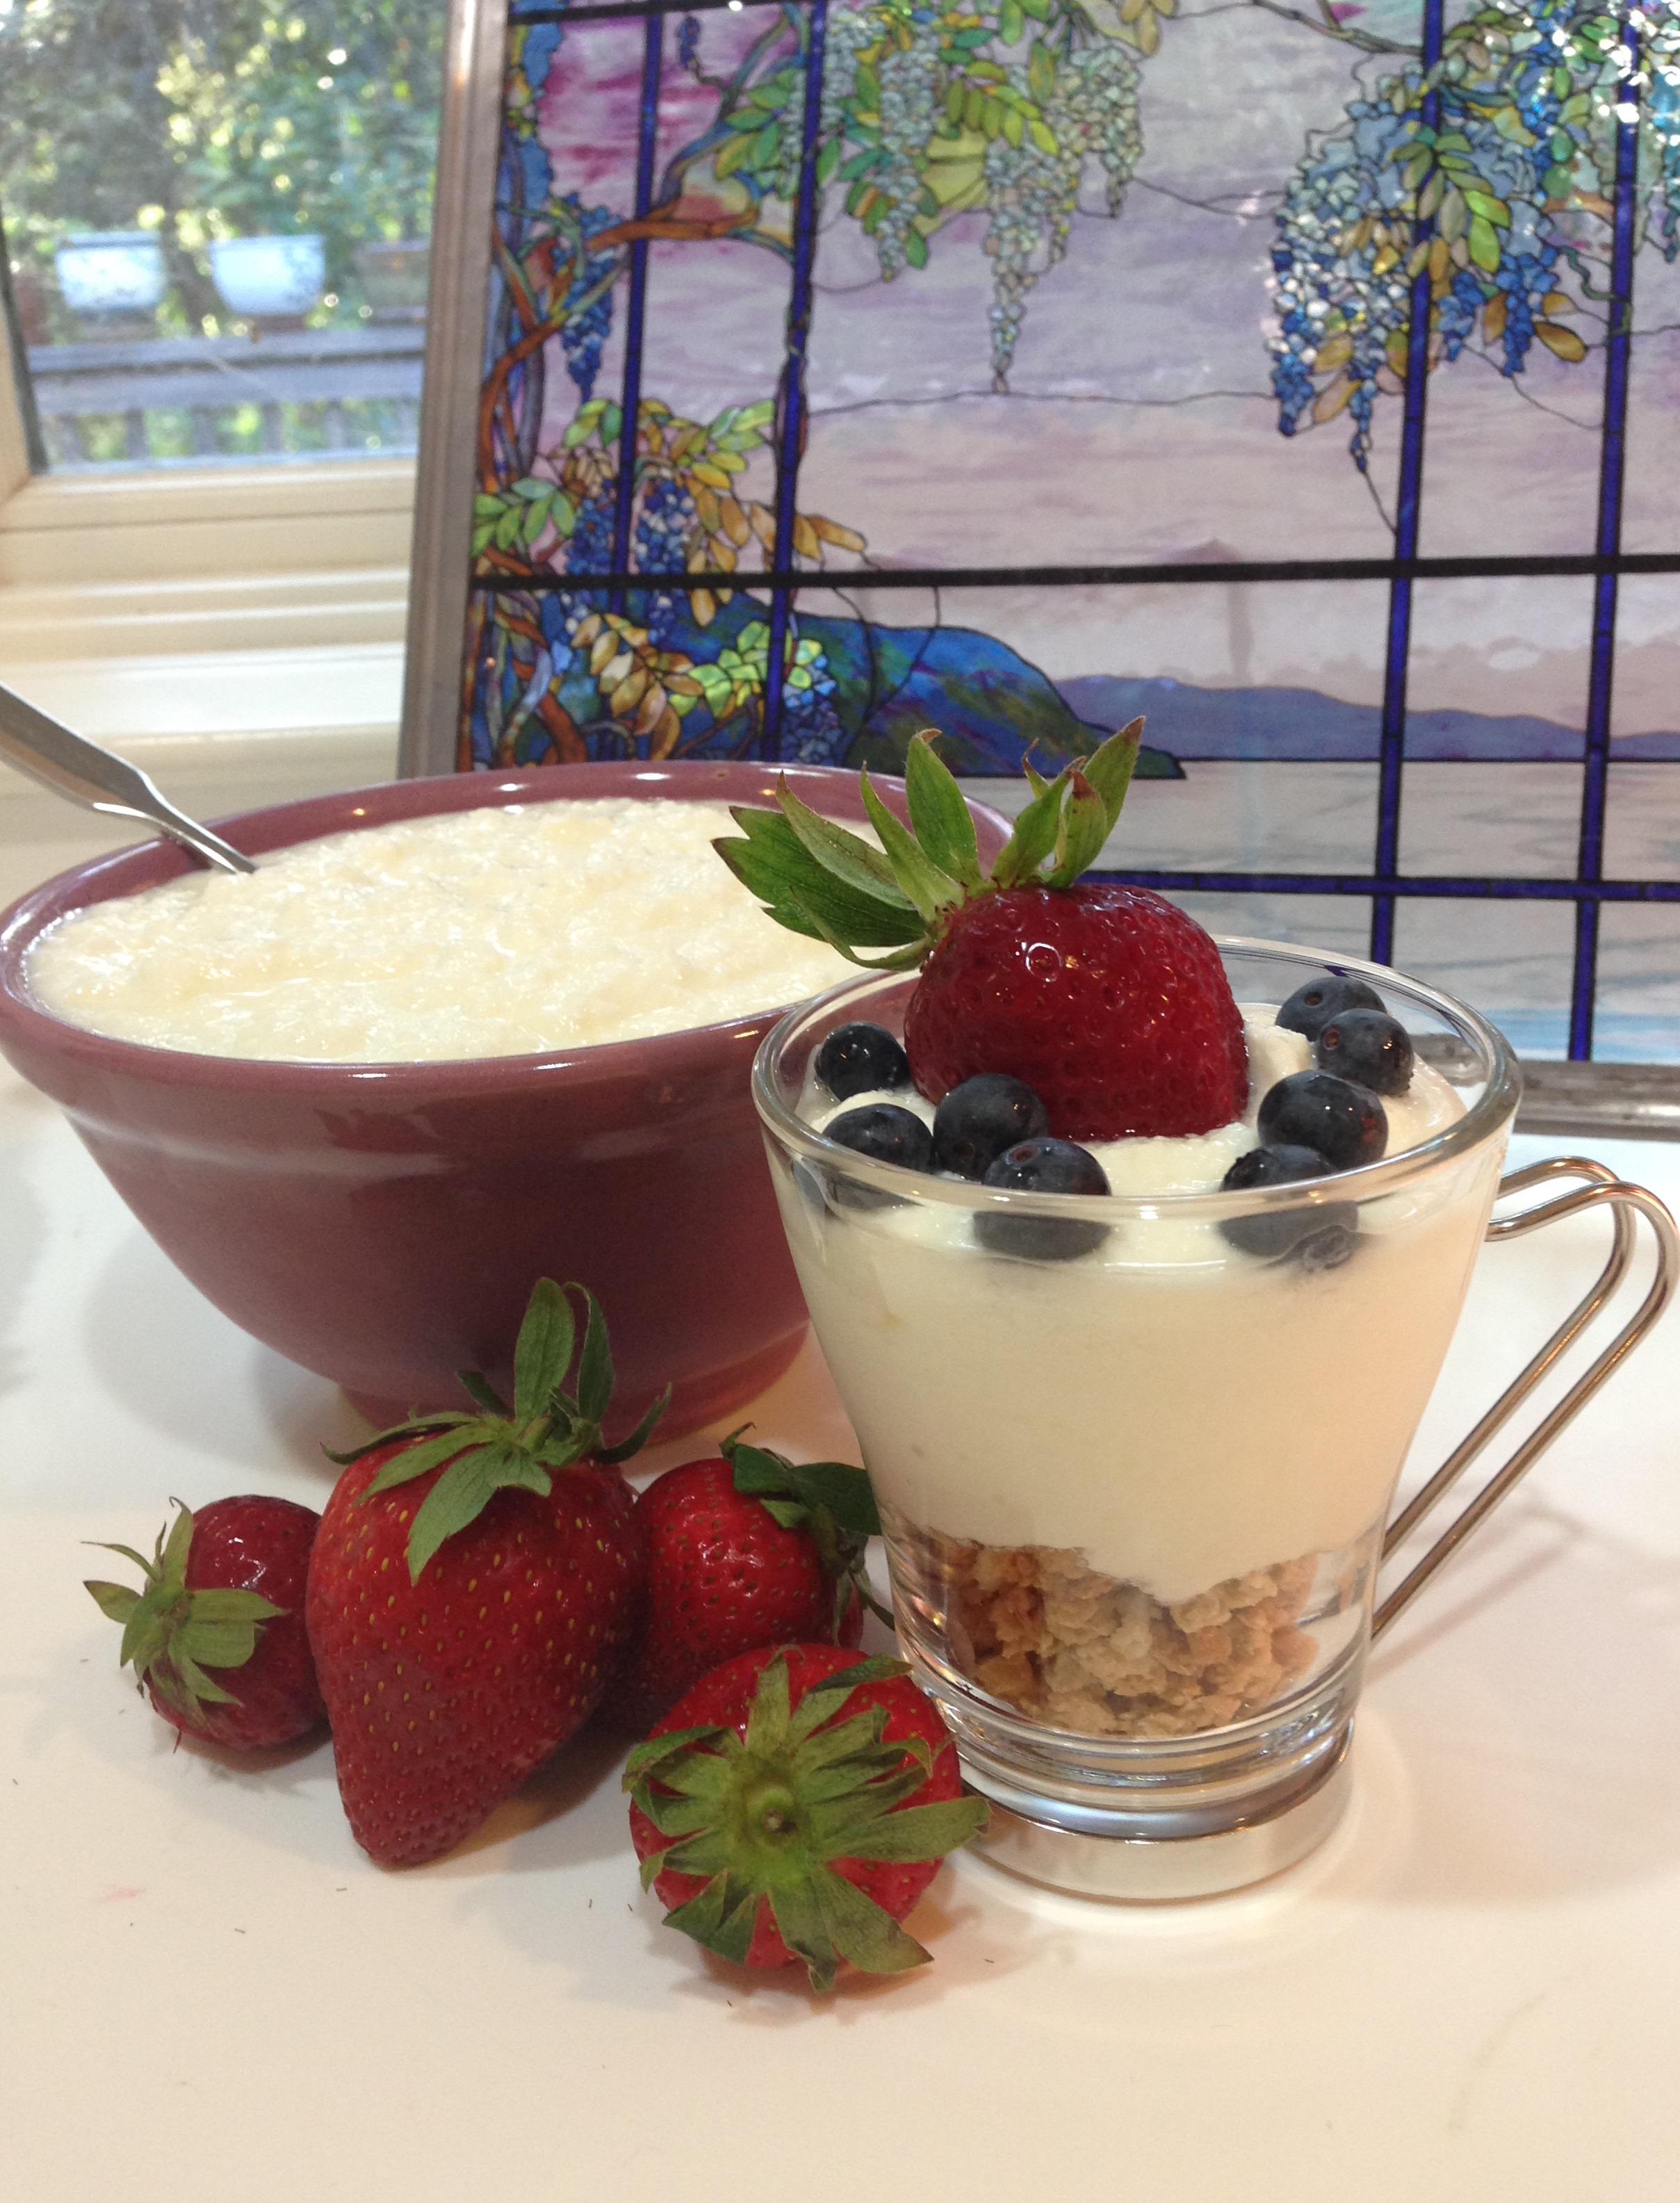
So, how about this: I make my own yogurt! And I don’t mean I buy the plain, then add in fruit. I actually grow my own. People are often astounded when I tell them that. In truth, it’s the easiest thing in the world – once you learn the secret: make it in a thermos. Crazy? Crazy like a fox!
I remember my dad making yogurt, although we called it by the Armenian name – madzoon. I can still see him opening the oven door and removing a stockpot full of fresh yogurt. We used to eat it with crushed strawberries. It was so good. And healthy! I firmly believe that’s why Armenians live to such a ripe old age even though they are often a smidge overweight (I’m trying to be tactful. Holiday dinners were always in 2 parts: Part 1 – the freshly made dinner. Part 2 – everyone had recovered from Part 1, reheated the food, and eaten again.)
When I left home, I bought the container yogurts because that’s what everyone did. You know those container brands: you turned them over and the yogurt plopped out but kept the container shape. My dad’s yogurt never did that. Then I found Yoplait and it was more like the real thing. But, it was expensive. Finally, I decided to make my own and save money (me?). I found a recipe, mixed up my yogurt, and then put it in the oven to grow, the way my dad did. Nothing happened. I threw that batch out and tried again. Again – nothing happened. I wondered if it was my oven – too hot? not hot enough? I gave up – I was throwing money down the drain, rather than saving it.
Then one day I was thumbing through a giant how-to book I’d borrowed from the library. (I love how-to books!) And there it was: make yogurt in a thermos. Now THAT sounded interesting. I tried it and – hurrah! – it worked. When I thought it through, I realized that a thermos was the PERFECT venue to grow yogurt. As Mr. Spock would say, ‘It’s only logical.’ In order for the yogurt culture to grow, you need a constant temperature and it needs to be left alone (like Greta Garbo). What could be better than a thermos?
I used to make my yogurt in a 32 oz mirrored-interior Aladdin thermos. It worked great. If you’d like to see my video for making yogurt, go to: Yogurt Made In A Thermos. Since then, however, I’ve bought a larger and wider mouthed thermos: a 68 oz stainless steel Thermos Brand thermos that I got on Amazon. (My family goes through a lot of yogurt.) With the wider mouth, it’s so much easier to remove the yogurt. Bonus! And, for some reason, the yogurt is coming out creamier. Double Bonus! Finally, the interior will never shatter if you accidentally knock it over – (yeah- I’ve done that twice). Triple Bonus!
Yogurt offers lots of health benefits: it has calcium (good for bones), bacteria (good for the gut), helps boost the immune system, and may reduce blood pressure – to name a few. Google ‘yogurt’ and read about it. It’s amazing! I eat yogurt nearly everyday. In fact, my brother lost 20 pounds and the only thing different in his life was he started eating yogurt every morning. Maybe not scientific proof… but anecdotal. And it couldn’t hurt.
Besides saving tons of money by making it yourself, homemade yogurt has no additives or preservatives or thickeners or added sugars. Take a look at the ingredients list on the side of a carton of store-bought yogurt – almost without exception, there will be things on that list that you’d be better off without. All that should be in yogurt is milk and a bit of culture from your last batch. (I’ve heard you can freeze that starter culture until you’re ready to use it – but I’ve never tried it.)
NOTE: If you’ve never eaten homemade yogurt, it might take some getting used to. Commercial yogurt has sugar to sweeten it up. The real thing is pretty tart. Since I grew up eating it, it doesn’t bother me at all. But you may need to add fruit (which is a great way to fulfill that pesky daily fruit requirement) and/or granola. Just make sure you don’t add anything to the whole batch before setting aside enough to start your next batch.
YOGURT IN A THERMOS – makes 32 oz of yogurt (recipe can be doubled – use a bigger themos)
3¾ cups milk (I use organic nonfat)
¼ cup PLAIN yogurt (if you don’t have some from your last batch, buy plain yogurt)
Optional: 1 cup powdered milk (I use this to thicken up my yogurt since I used nonfat milk)
Over a medium-low flame, heat the milk and powdered milk (if using) to 180º F – stirring often. Remove from heat and let cool to 112º F. While it’s cooling, prime your thermos by filling it with hot water – by doing this the warm milk won’t lose heat when it’s poured in. When the milk has reached 112ºF, gently stir in the yogurt starter. Empty the water from the thermos and pour in the milk mixture. I STRONGLY suggest you use a funnel when pouring so you get the milk IN the thermos instead of ON your counter. (I learned THAT the hard way!) Then, set the filled thermos aside where it won’t be disturbed.
The yogurt needs 8-12 hours to grow – the longer it grows, the tarter it gets. There’s no right or wrong – it’s all a matter of preference. I like mine to grow 12 hours or a little less. When time is up, empty the yogurt out of the thermos and into a container. Store in the fridge. If your thermos has a narrow mouth, you’re going to need to be a little creative because the yogurt won’t pour out. I’ve taped a narrow spatula to a long wooden spoon and, also, used the stick end of a really long wooden spoon.
For those of you Greek yogurt fans out there, all you have to do is drain the whey from your homemade yogurt. Let the newly made yogurt cool in the fridge first, then line a large sieve or colander with a tea towel or coffee liners and pour in the yogurt. Make sure you have a container to catch the whey – it starts dripping out immediately. And save the whey for future use (google it) – it can be frozen. You know me – I hate waste!
NOTE: Make sure you have a thermometer that registers as low as 112º F. I used to use a glass candy thermometer, but after breaking two of them, I finally bought a metal digital. I love it!!!
You may have already worked out the math, but if you haven’t, let me warn you: DON’T START MAKING YOUR YOGURT AT A TIME WHEN THE YOGURT WILL BE DONE WHEN YOU’RE ASLEEP OR NOT HOME! It takes about an hour to heat and cool the milk, then the growing time is 8-12 hours. So add up the hours before starting. Yogurt doesn’t shut off when it’s done – you have to remove it from the thermos and cool it in the refrigerator to stop the process.
I’ve been feeding my dog the exact same food everyday since the day we adopted her over 10 years ago. And I don’t mean just the same brand – I mean the exact same flavor of canned and dry. Don’t feel bad for her. Every now and then I’ve given her something new – just to mix things up. She won’t eat it. And she’s a gal who loves to eat. So I gave up. I’ve decided that unless she comes to me and complains, she will continue to get the same old, same old.
One day my husband was watching me dish out my dog’s food and, with pity in his voice, remarked how boring it must be for her to eat the same thing everyday. I couldn’t believe my ears. This from the man who’s been eating Quaker Instant Raisins and Spice Oatmeal EVERY MORNING for as long as I can remember. Our cupboards are filled with boxes of it so we don’t (God forbid) run out – even though I go to the market several times a week. (And don’t get me started about how much money we could save if he’d just buy the big canisters of plain oatmeal and add in his own raisins and spices.) Of course, I pointed out the irony of his concern.
You may be wondering what my dog’s and my husband’s meal proclivities have to do with a vegetarian cooking blog. I’m glad you asked. Almost without fail, my family has broccoli with our dinner. We all love it (except for my youngest son, who hates pretty much all vegetables), it’s healthy, and steaming it is a snap. My husband sometimes even has it at lunch, too. What can I say – he’s a man who knows what he likes. (Thank goodness I’m on that list.) I suppose people are creatures of habit, but we were in very deep rut.
Back in my carnivorous days, I used to make roasts surrounded by carrots and potatoes. The fat from the roast, combined with the long roasting period, would caramelize the surrounding veggies. They were SO good! But once I stopped roasting meat, I stopped roasting veggies. I do have a delicious recipe for carrots with pistachio nuts in a Cointreau/butter sauce – but that’s too much work for an everyday dinner. So it was steamed broccoli, with asparagus or cauliflower – when I thought about it – for variety.
But, did it have to be so? I asked myself. (I have a tendency to talk to myself – I pretend it’s to my pets, but I’m not fooling anyone.) What if I coat carrots with vegetable oil and bake them, as I would with the roast. Hmmmm! I wondered. The skies cleared! The angels sang! It was a joyous moment when I took that first bite. Yes! They were sweet; they were tender; they were pretty. And thus began a new go-to side dish in our home: roasted carrots.
Roasted carrots are super fast to put together and take 20-30 minutes to bake, depending on the oven temperature. If I want them as fast as possible, I bake them at 400ºF, maybe even 425ºF. But if I’m baking a main dish at a lower temperature, I’ll put the carrots along side it in the oven, and just roast them longer. I haven’t noticed a different in taste between roasting fast at a higher temperature, or slower at a lower one. They’re always good.
ROASTED CARROTS
carrots cut into 2″ pieces (I buy the bags of cut carrots)
oil (I use canola)
Use a baking pan with sides (such as a jelly roll pan or a broiler pan) so the carrots don’t roll off over the side when you stir. Pour a little puddle of oil in the middle of the pan – I don’t measure, but for 2 people I use approximately 1 T oil. Then pour the carrots onto the pan and roll them in the oil, so they’re completely coated. Roll the carrots around on the pan to grease the bottom, then spread them out so they don’t touch. Bake at 350ºF – 425ºF, depending on how fast you need them and/or whether you’re baking something else at the same time. Stir the carrots every 10 minutes, until they’re DARK brown on the parts that touch the pan bottom. Best served right away.
NOTE: As you know, I’m a fan of making things from scratch, and avoiding pre-made items. That being said, I do buy the bags of pre-cut carrots. I’m not recommending this, though. It’s just that it’s so darned fast to open the bag and pour the already prepared carrots onto the jelly roll pan. But SOMEDAY – I swear – I’m going to start buying whole carrots and clean and cut them myself. I will! But for now, at least I’ve expanded our side dish repertoire. Baby steps.
Thank goodness my onion hating brother doesn’t read my blog. He’s had an aversion to onions since….well, forever. I did, too – when I was a kid. But I grew out of it; my brother didn’t. My sister-in-law and I just roll our eyes at this because he actually DOES like onions – he just doesn’t know it. If he sees them in food, he won’t eat it. But if he doesn’t know they’re there, he gobbles down the dish. (Of course, I don’t mean an actual DISH.)
So my brother and his wife came to dinner the other night and I planned on making dolma for him, since it’s his favorite. I decided to make my ‘Bacon’-Onion-Cheese Quiche for the rest of us. There were plenty of sides dishes, as well: mushy peas (see my post – Mushy Peas: A Super-Food Disguised As A Side Dish), steamed broccoli, seasoned roasted potatoes, and a green salad. Two desserts were upcoming, as well. (Two desserts for 4 people? Oh, yeah – cause that’s how I roll!) There was no dearth of food.
I never actually named the type of quiche – I wasn’t hiding anything…I was just busy. Food was being passed and consumed, compliments were forthcoming (if I do say so myself), and at least two conversations were going on at once. This was a family dinner, after all. Then I hear my brother say, ‘This is really good quiche.’ If you know me at all by now, you’ll know I’m rarely at a loss for words. But I was then because I censored myself in the nick of time from saying, ‘It’s an ONION quiche. It’s full of ONIONS! Why are you eating that? I made dolma just for you!’ I stared at him for several seconds as I was deleting those words, before filling in said deletion with a brief, ‘Thanks’ and changed the subject quickly before anyone could ask what was in it. Knowledge may be power, but in this case ignorance was bliss. If my brother found out about the onions, he would have re-thought his compliment and stopped eating the quiche. Not to mention that the bacon topping was fake bacon. Vegetarian food is of no interest to him.
You may or may not know, but I have an online video cooking show called, VEGETARIAN COOKING FOR CARNIVORES. Yes, it’s the same name as this blog – but if it ain’t broke, don’t fix it. (Or maybe I’m just too lazy to come up with another name.) I actually have an instructional video about making ‘Bacon’-Onion-Cheese Quiche which you can view at: ‘Bacon’-Onion’Cheese Quiche. I even show you how to make the pie crust. To see the entire list of my videos, complete with links, go to my website at VegCookingForCarnivores.com and click on the Episode Guide in the toolbar.
But here’s the written recipe, for those of you who prefer to read it:
‘BACON’-ONION-CHEESE QUICHE
157g / 1¼ cups flour (I used organic all-purpose)
1/8 tsp salt
90g / ½ cup shortening (I used Crisco)
4 T ice water
2 yellow onions, chopped
42g / 3 T butter
1 tsp salt
1 tsp dried dill
¼ tsp ground pepper
5 strips fake bacon (I used Morningstar brand)
225g / 1 cup plain yogurt, drained
4 eggs
2/3 cup (152g) milk (I used nonfat – use what you have)
1 cup (86g) Swiss cheese, shredded
While you can’t assemble this quiche ahead of time, you can do many of the steps early (even the day before) and assemble it when you’re ready to bake it. I love recipes like that. Dinner time always seems to catch me by surprise. Then I’m like a mad woman – flying around the kitchen. Don’t even think about getting in my way!
It’s really best to make the pie crust early – that way it’s nice and cold when you roll it out. ‘Roll out the crust?’ you say. ‘ Can’t I just buy pre-made?’ Yes. Yes, you can. But compare the cost of pre-made to the meager ingredients in making your own. AND, look at the ingredients list on the pre-made. I suspect there are words you don’t understand and can’t pronounce. (If you get nervous, watch my video.)
Into a medium sized bowl put the flour and salt – briefly mix these with a pastry cutter (or fork). Add in the shortening and, using your pastry cutter, mix everything together until the consistency of the dough becomes like little peas. Sprinkle in the ice water. Then using a fork, gently blend the water into the dough. DON’T OVER MIX! And DON’T USE YOUR FOOD PROCESSOR! Over working dough leads to a tough crust. Been there, done that! Gather the dough into a tight ball, lay it back in the bowl, and refrigerate.
Drain the yogurt in a sieve lined with a coffee filter. It takes at least an hour. BTW, save the drained whey – that’s the liquid – to use in place of water in various recipes. Google it! Remember, I hate waste. (Cheap!)
Fry the onions in butter until they’re golden brown. Caramelizing onions (that’s what you’re doing) makes them sweet and SOOOO good! Stir often, especially once they start to brown. (A flat headed wooden stirrer works really well for this.) Stir in the salt, pepper, and dill. Let sit until room temperature.
Bake the ‘bacon’. Follow package directions. For Morningstar, bake at 375ºF for a total of 15 minutes, turning once. Let cool completely so the ‘bacon’ gets nice and crispy.
All of those steps can be done ahead of time, if you want.
To assemble the quiche, first roll out the pie crust. On a well floured FLAT surface (I use Tupperware’s pastry sheet), and with well floured hands, take your chilled dough ball and start to flatten it with the palm of one hand, while pushing in the raggedy edges with the other. You want a smooth perimeter. Now take your well floured rolling pin and start rolling back and forth one way, then 90º the other way. Push in the edges again, as needed. Continue to flour the rolling pin, and roll in all directions to keep the circle round. Once it’s big enough to line the bottom and sides of your 10″ quiche pan (with a little extra for crimping), fold the dough circle in half. CAREFULLY, lift up the dough and let it dangle over one hand. With the other hand brush off the excess flour. Set the folded edge along the center of the quiche pan. Unfold the dough. Go around and crimp the edges by rolling it towards the center and pinching it. Crimping give the crust a finished touch.
Preheat the oven to 375ºF. Do this now – the oven will be ready when you’ve assembled the quiche.
In a medium bowl beat the eggs with a fork. Beat in the milk and yogurt.
Layer the onions on the crust, then sprinkle on the cheese, pour on the egg mixture, and crumble on the ‘bacon’. It’s going to look like you don’t have enough egg mixture, but don’t worry – it puffs up while baking. Bake for 45-50 minutes – until the top is golden brown. Remove carefully from the oven (don’t jiggle it) and let set for at least 15 minutes before slicing. It will be a mushy mess if you try to cut it sooner – it needs time to firm up.
You can bet I’ll be serving this quiche to my brother again. However, I’m going to have to come up with another name for it so he doesn’t know what’s in it. Any ideas? I’d love to hear them!
Toasted Corned ‘Beef’ Sandwich with Swiss & sauerkraut
My mouth still waters at the memory of the mile high corned beef sandwiches my parents would buy from our favorite deli when I was a kid. My poor mother had to brave the disapproving glare from the server because I insisted on ordering mine on white bread. Somewhere in my late teens, I finally made the transfer to rye. Everyone breathed a sigh of relief.
The victory was short lived, however, because I became a vegetarian soon thereafter. Ah, well! It was nice while it lasted. Goodbye corned beef, hello….corn.
But, never fear. This story has a happy ending. Over the last several years, more and better tasting imitation meats have hit the markets. Including corned ‘beef’. (When I use quotes around a meat, I’m talking about faux – aka, fake – meats). I’ve mentioned before, and will continue to do so – there are all kinds of imitation products out there. Some inedible, some excellent. And taste is subjective – what I like, you may hate. So experiment with the various products and decide for yourself. Experimenting is important in vegetarian cooking.
The thing about most fake meats is they work best when they’re the base for other ingredients (such spaghetti sauce, or a casserole). On their own….well, no meat-lover will be satisfied. So boiled corned beef, cabbage, and potatoes is out of the question. But a toasted corned ‘beef’ on rye with melted Swiss, sauerkraut, and mustard….now you’re talking! The marriage between the corned beef essence of the fake stuff, and the flavors of the rye, sauerkraut, Swiss, and mustard are enough to pull off this sandwich. Now, I’m not gonna lie – it’s not exactly the same as the real thing. But, for me, it’s enough to talk me off the ledge when I’m tempted to sneak the real thing. Add to that some Mushy Peas (see post: Mushy Peas: A Super-Food Disguised As A Side Dish), roasted carrots , and a green salad, and my Irish half is quite content.
CORNED ‘BEEF’ SANDWICH
Imitation corned beef (I used Cedar Lake brand, but I’ve tried others I liked, too)
rye bread
sauerkraut
Swiss cheese
yellow mustard
Drain the sauerkraut in a sieve. Fold several slices of fake corned ‘beef’ in half and lay them on one slice of rye bread. Lay Swiss cheese on another slice of rye. Put them in the toaster oven (or big oven if you don’t have one) and toast on high setting (I used the highest setting). Once toasted, pile the sauerkraut on the corned ‘beef’ half, squeeze on the mustard, then top with the cheese half. And, VOILÀ – a vegetarian corned ‘beef’ sandwich.