Fast And Easy FETTUCCINE PRIMAVERA: Molto bene!!!

Fettuccine Primavera

FETTUCCINE PRIMAVERA

Think “fettuccine” and the word “fattening” probably comes to mind. Well, if you want fettuccine alfredo, then “heart attack on a plate” is an appropriate leap. But the high calories and cholesterol come from the butter and cream, not the pasta. The noodles themselves are only about 210 calories per 1½ cup of cooked fettuccine.

Fettuccine Primaverde is one of those dishes I make when I want something light and/or fast. Washing and chopping the veggies is the longest part – cooking is done in about 5 minutes. If you make the pasta noodles (which I do), then it takes a bit longer. The last time I made Fettuccine Primaverde I used leftover fettuccine pasta from the night before, so I enjoyed the benefit of homemade noodles without the effort. Dinner was ready in 20 minutes!

This recipe makes enough for 3-4 people, depending on how large the portions are. If you purchase the pasta, cook the amount you’ll need. If you’re making the pasta, use 1½ cups flour and 2 eggs.

FETTUCCINE PRIMAVERA – makes 3-4 servings

  • 3 T butter
  • 3 T olive oil (I use extra virgin)
  • 3 garlic cloves, pressed
  • ½ tsp cayenne pepper
  • 12 mushrooms (about 7 oz), coarsely chopped
  • 10 stalks asparagus, sliced into 1″ pieces
  • 1 red pepper, chopped
  • 1/3 cup kalamata olives
  • ½ cup vegetable stock (I use homemade: Homemade Vegetable Stock)
  • about ¼ cup Romano cheese, shredded
  • 1½ T pine nuts, lightly toasted
  • 3-4 servings fettuccine pasta, cooked

Melt butter and oil together in 10″ skillet. Add in garlic and cayenne pepper. Sauté for 1 minute.

Add in mushrooms, asparagus, and red pepper. Sauté about 2 more minutes.

Add in vegetable stock and olives. Bring to a low boil. Let cook another couple of minutes. Test the asparagus – when it can be pierced with a fork, but is NOT mushy, it’s finished.

To serve, pile fettuccine pasta in a bowl or on a plate and ladle veggies over it. Sprinkle on cheese and pine nuts.


When Life Sends You Lemons…Make LEMON ZINGER CUPCAKES!

Lemon Zinger Cupcake

LEMON ZINGER CUPCAKE

My friend, George, thoughtfully bestowed upon me a bagful of lemons from his garden. As most of you know, once nature’s bounty has been picked, there’s only so long before those fresh and flavorful fruits and veggies turn into mushy fodder for the compost heap. So I needed to come up with some ideas to take advantage of these luscious lemons.

There were the usual options of lemon cream pie, lemon bars, the obvious lemonade, and, of course, as self-proclaimed Queen of Freeze, I realized I could have just frozen the juice in ice cube trays and dealt with the dilemma later.

Then it came to me:  Lemon Zinger Cupcakes.

I knew exactly what I wanted:  a delicate cake crumb that packs a lemony wallop. I tried a couple of recipes that I found online, but they were rubbery, sticky, and didn’t have the lemon punch.

So I set about creating my own lemon cupcake recipe. I’ve been baking my whole life – how hard could it be? Oh – it be hard! Believe me, creating a cupcake recipe isn’t exactly….well, a piece of cake. With cooking, you can change a recipe by adding this or that in the amount you want. Baking is a whole different world! There’s a science to baking that must be respected or your recipe will be a dismal flop.

For the past week I’ve been learning about what makes a cake wet, dry, sink in the middle, rubbery, and have an even crumb rather than tunnels. The flour has to be in the right proportion to the sugar, the eggs to the fat, and the eggs and liquid to the sugar. Then there’s the baking soda versus baking powder dilemma. Finally, with a lemon cupcake, I needed to get the most flavor I could without over-wetting the cupcake. Yikes! So much to learn!!!

Since I was creating this Lemon Zinger Cupcake recipe to post on my blog, I wanted it to be user friendly. My criteria was:

  1. Use melted butter rather than softened. Who can remember hours ahead of time to remove the butter from the fridge? Most cake recipes use softened, but I tested the same recipe with melted and softened – there was no difference.
  2. Use salted butter. This is what’s in most of our refrigerators. When you buy unsalted, you have to buy at least 2 cubes – what do you do with the other if you normally don’t bake?
  3. Use all-purpose flour. Not everyone keeps cake flour around. There was no difference in my taste test.
  4. Use whole eggs rather than yolks or whites. It’s wasteful to throw out the unused part, and you can only freeze whites – unused yolks have to be used within a day or two.

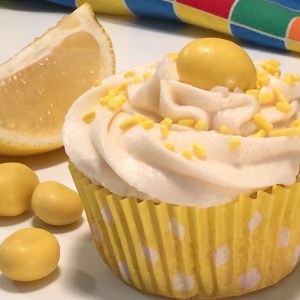
I was a woman on a mission! So this past week I took one for the team (because I’m that kind of gal) by baking and sampling batch after batch of evolving LEMON ZINGER CUPCAKES recipes. But it was worth it because I finally came up with exactly the texture and flavor I wanted. I topped them with a vanilla buttercream frosting. While some people choose a lemon frosting, I think the buttercream better complements the powerful lemon zing.

Sliced Lemon Zinger Cupcakes

Sliced LEMON ZINGER CUPCAKE

It should come as no surprise that my freezer is loaded with lemon cupcake rejects to be used in some future recipe. They all tasted good, but the texture flavor wasn’t what I wanted for this recipe. Waste not, want not!

Speaking of freezing, cupcakes – frosted or not – freeze really well. Honestly! My LEMON ZINGER CUPCAKES recipe yields 9 cupcakes, which is kind of a skimpy number. If you need additional, double the recipe, then freeze the extras (if any). Don’t try to triple or more – the batter needs to be baked as soon as it’s mixed.

LEMON ZINGER CUPCAKES – makes 9-10 cupcakes

  • 1¼ cup (157g) (5.5 oz) all-purpose flour
  • ¼ tsp baking soda (NOT powder)
  • ¼ tsp salt
  • 6 T (84g) salted butter
  • ¾ cup (147g) granulated sugar
  • 2 eggs
  • 3 T lemon juice
  • 1 T lemon zest, packed in the measuring spoon (don’t be stingy)
  • ¼ cup (58 ml) milk (I used nonfat)
  • ½ tsp vanilla extract
  • optional (but not really necessary) for extra zing – ½ tsp lemon extract

NOTE:  Ingredients must be at room temperature.

Mix together the flour, baking soda, and salt in a small bowl.

Melt the butter. Remove from heat just before it’s completely melted – it will continue to melt. (You don’t want butter too hot or it will cook the eggs.) Pour into the mixing bowl of an electric mixer. Add in the sugar and beat at medium high for 4 minutes.

Add in the eggs one at a time, beating well with each.

Add and mix in the lemon juice and zest (and lemon extract, if using).

Add in about half the flour mixture and VERY GENTLY mix in. It’s okay if there’s still flour unincorporated. You don’t want to over mix cupcakes or they’ll be tough. You can use your electric mixer, but keep it at the lowest speed and beat for just a few seconds.

Add in the milk and vanilla, and VERY GENTLY mix in.

Add in the rest of the flour and (you guessed it) VERY GENTLY mix in.

Preheat oven to 375º Fahrenheit.

Fill muffin cup liners 2/3 full with batter. Put a little water into the empty cups so they don’t scorch.

Bake for 13-18 minutes. DON’T OPEN OVEN DOOR BEFORE 13 MINUTES! Test for doneness by lightly pressing center with your finger. If it springs back, it’s done. Do this fast – you don’t want the oven to cool from the open door.

When done, take pan from oven and let sit for 1 minute before carefully removing cupcakes to a wire rack to cool completely before frosting.

VANILLA BUTTERCREAM FROSTING – makes about 2 cups, enough for above recipe plus extra

  • ½ cup salted butter, softened
  • 4 cups (388g) confectioners sugar (I never sift, but you can, if you want)
  • ½ tsp salt
  • 2 tsp vanilla extract
  • 5-6 T milk (I used nonfat)

Put the butter out to soften when you start the cupcakes (or earlier, if you can remember). Cut it in small pieces to soften quicker.

Cream together the butter and sugar at medium high speed of an electric mixer. Add in the salt, vanilla,  and 2 T milk, and beat at medium high. Continue to add milk one tablespoon at a time, beating well with each addition, until you get the consistency you want. If you add too much milk, the frosting will be too thin, especially if you’re piping it. If this happens, just add more confectioners sugar. If it gets too thick, add more milk.

You can freeze leftover frosting. It’s always nice to have some extra on hand.

NOTE: I decorated the cupcakes with yellow sprinkles and a lemon coated almond.

Beurek – A “Handy” Little Treat

Cheese Boerg

Cheese Beurek served with Armenian Salad.

Like all ethnic families, our Armenian family gatherings centered around food. Stops were pulled, and a feast was enjoyed by all – generally twice in the same day.

A favorite amongst the children was Cheese Beurek (pronounced ‘burr-egg’). They’re similar to the Cornish pasty and Italian calzone. Admittedly, these tasty delights are a bit of work – they’re not difficult, just time consuming.

Now here is the issue of utmost importance with Cheese Beurek:  to ooze or not to ooze. Unless you’re very careful, some of the cheese filling oozes out midway through the baking process, forming a crispy cheese appendage. (See photo below.)

Oozy Beurek

Oozy Beurek

To be honest, I quite like this cheesey bonus disc, and there’s still plenty of cheese inside. But they don’t look very nice and, of course, when they’re completely enclosed, there are no greasy fingers.

I embarked on a mission to discover why the bursting forth of cheese so I would know how to counteract this situation if I wanted to serve Cheese Beurek for company. Oddly enough, the leakage comes from the folded side, not where the edges meet, like you might expect. This is probably because I crimp the heck out of the dough.

So I made countless Cheese Beurek, experimenting with different methods including slitting the top, using less filling, keeping the filling away from the center of the fold, and brushing the dough with egg before placing the filling. What finally worked was using a piece of floured waxed paper to assist in folding the dough, rather than my hands. I guess I was stretching the dough with my palm even though I tried to be careful. The paper keeps the dough stable.

So there you have it!

One thing I should mention is that sometimes beurek is made using a filo or puff pastry dough, rather than bread dough. It’s just a matter of preference.

NOTE:  This recipe involves a rising dough, so allow time for it.

CHEESE BEUREK – makes 12 beurek

  • 2 tsp dry yeast
  • 1¼ cups water, 100º – 104º Fahrenheit
  • 3 1/3 cups all purpose flour, approximately
  • 1 tsp sugar
  • 1½ tsp salt
  • ¼ cup shortening (I use Crisco)
  • ½ lb Muenster cheese, shredded
  • 1 egg, beaten and divided
  • ½ tsp black ground pepper
  • ¼ tsp garlic salt
  • ½ tsp salt

Stir yeast into the water and let proof (foam) for about 5 minutes. Put 2½ cups of flour into the work bowl of your food processor.  Add in sugar, salt, and shortening.  Turn on the machine and slowly pour in the yeast water. Turn off machine and sprinkle in a few more tablespoons of flour. Turn on machine. The goal is for the dough to form a ball. Keep adding in flour a little at a time until the ball forms – you may not need all the flour. If you don’t have a food processor, you’ll have to mix in a bowl and knead by hand. (Start saving your pennies, you really should have one!)

Pour the dough onto a floured bread board. Pick up the ball from the flour-y bottom and fold the dough onto itself, so now floured dough surrounds it and the sticky dough is encased. (I HATE touching sticky dough with my hands.) Gently toss the ball to dislodge excess flour. Plop the dough into a greased bowl, press down, then flip the dough. Now the ball is greased on both sides and your hands should still be clean. Cover with a tea towel and let rise for about an hour.

Prepare the filling while the dough is rising. Into a mixing bowl blend the cheese, half of the egg, the pepper, garlic salt, and salt. Into a smaller bowl make an egg wash by beating the other half of the egg and 1 tablespoon water.

When the dough has risen, pour it onto a well floured board and cut into 12 pieces. Form each piece into a ball, then flatten with the palm of your hand. Let the dough rest about 10 minutes so it’s easier to roll out.

One by one (unless you’re doing an assembly line with helpers) roll out a dough circle to be about 5½” in diameter. Place this on a lightly floured square of waxed paper. Spread about 2½ tablespoons of the filling on one half of the dough, leaving a 3/8″ border from the edge. Dip your finger in water and run it around the entire border to moisten dough. Put your palm under the waxed paper and fold the dough in half.  (See picture below.)

Fold dough using waxed paper.

Fold dough using waxed paper.

UPDATE: I’ve just discovered an even better method to prevent leakage:  form 12 oblong cheese balls from the filling, place on waxed paper, and freeze. Place frozen balls on dough circles, wet edges with water, and fold dough over cheese ball, being careful not to poke the frozen cheese through the dough.

Press edges together, then crimp well with a fork.boereg crimped

Place on a greased or non-stick cookie sheet – don’t crowd. One standard sheet will hold 6. With a dry pastry brush, whisk away excess flour.

Preheat oven to 450º Fahrenheit. Do this after beureks are assembled to give them a bit of a rest as the oven is heating.

When the oven is heated, brush the tops of the Cheese Beurek with egg wash. Bake for 12 minutes, until top is golden brown. Serve hot.


Brussels Sprouts Amandine – Try It, You’ll Like It!

FullSizeRender (3)

In a recent post, I made mention of Beaver Cleaver’s (from tv’s Leave It To Beaver) successful encounter with a Brussels sprout. It reminded me of a delicious Brussels sprout recipe I had tucked away. As a creature of habit where vegetables are concerned, I tend to serve the usual broccoli, mushy peas, carrots, and cauliflower. For some reason, I forget about these mini cabbage morsels.

So I rifled through my recipe box and found the Brussels Sprouts Amandine recipe card. To those of you under the age of 25, a recipe box is where index cards with recipes printed on them are stored. (Yes, I’m that old)

Every time I make this recipe, I wonder why I don’t make it more often. It’s one of those hater-converters. Never heard the term? That’s because I just made it up. A hater-converter is a recipe so yummy that it alters your negative view of a certain ingredient, such as Brussels sprouts, into something you love…or, at least, like enough to tolerate because it’s good for you.

TIP: Brussels Sprouts Amandine taste best when freshly made. So prepare the sauce ahead of time, leaving it in the saucepan for a quick reheat. Have the Brussels sprouts cleaned, halved, and sitting in the steamer basket ready to be cooked. They only take about 5 minutes. This way, you can turn on the burner as your meal preparation is winding down, quickly dress them, and they’re ready to go.

BRUSSELS SPROUTS AMANDINE – makes 2 cups

  • 2 cups Brussels sprouts
  • 2 T slivered almonds, toasted
  • ½ T butter
  • ½ T Dijon mustard
  • 1 T red cider vinegar
  • 1½ T dark brown sugar, packed

Trim the base of Brussels sprouts and remove loose leaves.  Slice them in half lengthwise and place in steamer basket.  DON’T FORGET THE WATER UNDERNEATH!  (Been there, done that.)

In a small saucepan, melt together the butter, mustard, vinegar, and sugar.  Turn off burner and set sauce aside.

When it’s about 5 minutes until meal time, steam the Brussels sprouts.  You want them cooked, but not mushy.  They’ll become vibrant green just before they’re ready – test with a fork.  Remove from heat.

Quickly reheat sauce and mix with sprouts and almonds.  Serve immediately.


Potato Cheese Soup = A United Family Meal

You know those kids who happily eat (or, at least, TRY) any food that’s put before them? Well, unfortunately, none of them lives in my house. My children have never exactly been culinarily curious.

I suppose I should have insisted like June Cleaver did on Leave It To Beaver when The Beav refused to try his Brussels sprouts. Mom & Dad made him stay at the table until he took a bite. Naturally, he grudgingly sampled one, loved it, and everyone rejoiced in the glow of Brussels sprout bliss.

Often times I’ve felt like a short order cook – making one meal for my husband and me, and one for the kids (sometimes each child even got his own selection). This may sound like a lot of work, but for me it was just simpler to crank out the food so I could enjoy dinner without the wheedling, bribing, threats, and anger.

There were, thankfully, a few meals that satisfied the entire family. It goes without saying that I prepared those frequently.

Potato Cheese Soup is high on the preferred list. Not only is it easy to prepare, but because it’s creamed in a blender (or food processor), you can add in a little spinach, etc., and the kids will never know. (We moms have to be a bit sneaky – it’s for their own good….they’ll thank us later.) Also, you can plop in broccoli or cauliflower – the soup is kind of like a cheese sauce.

As noted, this recipe requires a blender or food processor. I haven’t nagged about owning one or both of these appliances in awhile, so with the after-holiday sales, I’ll suggest these items go on your purchase list, if you don’t already own them. Both are invaluable in the kitchen. I use my food processor and blender nearly everyday.

POTATO CHEESE SOUP – makes  7 – 8 cups

  • 42g (3 T) butter
  • 264g (2 cups) onions, coarsely chopped
  • 1 tsp garlic, minced
  • 917g (2 lbs) russet potatoes, unpeeled and coarsely chopped
  • 82g (1 large) carrot, unpeeled and coarsely chopped
  • 710g (3 cups) vegetable stock, purchased or homemade (recipe:  https://vegcookingforcarnivoresblog.com/2014/04/14/back-to-basics-vegetable-stock/)
  • 1 tsp dried dill
  • 245g (1 cup) milk (I use nonfat)
  • 1 tsp salt
  • ¼ tsp pepper
  • 144g (5 oz) cheese, shredded (I use medium cheddar)

Melt butter in a stockpot. Sauté onions over a medium flame for about 7 minutes, stirring often.

Add in the garlic, potatoes and carrots, and continue to sauté another 10 minutes.

Add in the stock, dill, salt, and pepper. Bring to a boil, then turn down flame to simmer the soup. Cover and cook until the vegetables are tender – test if carrots are easily pierced with a fork.

Remove the lid and let cool about 10 minutes – you don’t want to put boiling liquid in your blender.

Add milk to the pot, then pour into a blender or food processor.  Puree until smooth. (Depending on the size of your blender, you may have to do this in batches and, because of this, a second pot will be needed into which you empty the puréed batches.)

Place shredded cheese in the empty pot.

Pour the pureed sauce on top. Heat to melt the cheese and blend into the soup.

This soup is delicious served with homemade French bread – https://vegcookingforcarnivoresblog.com/2014/05/18/ooo-la-la-les-baguettes-tres-simple/

Necessity Is The Mother Of Inventing CRAN-YAM MUFFINS!

Cran-Yam Muffins

Cran-Yam Muffins

Although I’m generally not the most organized person around the house (open any closet or drawer in my home and you’ll know what I’m talking about), there is one area in which I do excel: I keep scrupulous records of holiday menus. Who attended, what was served and the quantity, if the amount was adequate, and how long things took to cook are all jotted down in my 3-ring binder.

Every year after Thanksgiving dinner I write the same note – that very little cranberry sauce and yams were eaten, and NOT to make them again. And every year I get guilted into making them because “it’s tradition”.

This year, in a vain attempt to be thrifty, I only used half the bag of cranberries to make my sauce, and didn’t use all the yams I bought. A wise move, but not wise enough. The majority of both dishes still went untouched. “I swear, I will never make cranberry sauce and yams for Thanksgiving again!” (You have to imagine me doing a Scarlett O’Hara impersonation while saying that.)

So post-Thanksgiving I had half a bag of cranberries and a yam unused. As you may know by now – I hate waste! Although I’m the self-proclaimed Queen of Freeze, I decided against freezing the cranberries – I knew they would get lost in the frigid abyss and I’d forget all about them. But what else could I do with cranberries?

Pulling out my trusty Joy Of Cooking (a must-have for any kitchen!), I looked up ‘cranberry’ in the glossary. There they were: cranberry muffins. Yes! “What if I added shredded yam and spices to the muffins?” I pondered. Perfect!!!

It took several batches to produce the look and flavor I’d envisioned. (And, yes, I actually had to buy more cranberries and yams. Oh, the irony!) But I’m now ready for future leftover cranberries and yams….even though I WON’T be making them next Thanksgiving. Really.

NOTE:  While paper liners for the muffin tin make life easier in the sense that you don’t have to grease the muffin cups (a job I kind of hate), I suggest you forego the liners for this recipe. The paper (and even foil liners) tend to stick to muffins, making it difficult to remove them without losing a good portion of the muffin. Again: hate waste! So bite the bullet and grease the cups.

CRAN-YAM MUFFINS – makes 12 muffins (standard size)

  • 1¾ cups all-purpose flour
  • 2/3 cup granulated sugar
  • 1 tsp salt
  • 2 tsp baking powder
  • 1 T cinnamon (notice the measure is tablespoon)
  • ½ tsp nutmeg
  • 1 tsp ginger
  • 2 eggs
  • ¾ cup milk (I used nonfat)
  • 4 T salted butter, melted
  • 1¾ cups chopped raw cranberries (measure AFTER chopping), divided
  • 1 cup yam, shredded (I used garnet)

In a medium sized bowl put the flour, sugar, salt, baking powder, cinnamon, nutmeg, and ginger. Mix well with a large spoon.

In another bowl (it can be a little smaller) beat the eggs well. Stir in the milk, cups of the cranberries, and the yams. Add in the melted butter and mix.

Pour the liquid ingredients into the dry. Using the large spoon mix together, working with as FEW strokes as possible. Over mixing will yield tough muffins. It’s fine if there’s some flour not incorporated. The batter will be thick.

Preheat oven to 400º Fahrenheit.

Spoon the batter into the greased muffin cups, dividing the batter equally. Sprinkle the reserved ¼ cup of chopped cranberries on top.

Bake at 400º F for about 23 minutes – the top will be starting to brown. Remove from oven and let cool in tin for 2 minutes. Run a dull knife around each muffin, lifting them up at the end of the circle to loosen. Remove to wire rack.

Let cool at least 15 minutes before eating so they’ve had time to set, but are still warm. Delicious with a cold glass of milk, hot tea, or coffee. To reheat, toast in toaster-oven for 1-2 minutes.


Macadamia Cheese Biscuits -Tasty Tidbits

Macadamia Cheese Biscuits

Macadamia Cheese Biscuits

Go into any furniture shop and artfully placed amongst the tables, dressers, and credenzas, you’ll find tchotchkes (pronounced: choch’-keys).  You’re probably not even consciously aware of them – they’re the bits and bobs that decorate a room, turning a house into a home.  A crystal bowl filled with colorful balls. A hand-painted glass plate. A ceramic vase.

Why am I talking furniture in a vegetarian cooking blog? Because I see this week’s topic, Macadamia Cheese Biscuits, as the tchotchkes of the food world. They’re not the main event, but they add to the overall effect of the party.

What I love about these biscuits is that you can nibble at them discreetly as you converse with friends and colleagues. They’re not messy, so you won’t be embarrassed when taking a bite and the remainder somehow ends up on the front of your outfit, or worse – the host’s freshly cleaned carpet. Rather than enjoying yourself, your evening suddenly becomes about stain removal.

While they’re not exactly low in calories (I figure each one is about 58 calories), if you nurse at a Macadamia Cheese Biscuit in one hand and a drink in the other, this can keep you occupied enough so you don’t reach for the mini-quiches and bacon wrapped hot dogs.

Preparing the biscuit dough is a snap. Then roll into a log and refrigerate until it’s time to bake. Yay! I love party foods that are done ahead of time. I don’t know about you, but I turn into crazy-woman about 2 hours before guests arrive. The dough can even be frozen, so keep one on hand for drop-in guests.

MACADAMIA CHEESE BISCUITS – makes about 36 biscuits

  • 1½ cups all-purpose flour
  • ½ tsp salt
  • ½ cup butter
  • 8 oz Swiss cheese, shredded
  • 1 egg
  • 1/3 cup macadamia nuts, chopped and lightly toasted

In a food processor pulse flour, salt, and butter several times to break up butter. Add in cheese, egg, and nuts. Whirl until the dough forms a large ball.

With your hands roll the dough ball into a long log, 1½” in diameter. Wrap in waxed paper and refrigerate.

slice dough into 1/4" discs

slice dough into 1/4″ discs

When ready to serve, preheat oven to 400º degrees Fahrenheit. Slice log into ¼” discs and place on greased or non-stick cookie sheet. They don’t spread, so you can place them fairly close together. Bake about 14 minutes – until lightly brown. Let set on cookie sheet for a minute or two, then remove to serving plate or wire rack.


SAVORY MUSHROOM GRAVY – Vegetarians Give Thanks!

Savory Mushroom Gravy

Savory Mushroom Gravy

My husband and I have always had this unspoken agreement regarding the distribution of household duties. For example: I do the weeding and pruning, he mows the lawn. I make the home repairs, but when it’s something I can’t do, he calls the service people and deals with them. I do all the cooking, but he handles the barbecue. It’s a system that’s evolved over the course of our marriage, and works for us.

But here’s the kicker: Even though I plan, shop, and prepare the massive amount of holiday dishes, my husband is hailed with accolades for his one contribution:  gravy. Apparently, gravy is THAT important to my family.

So this year, I’m fighting fire with fire. Sharing the table with hubby’s giblet gravy will be Bonnie’s Savory Mushroom Gravy, which is my tweaked version from The Taste For Living Cookbook. Onion, shiitake mushrooms, and soy sauce form the base. Throw in a little sage and thyme for flavor. Then thicken with rice flour. You now have yourself a creamy, savory brown gravy with no fat! Add to this the fact that it’s the easiest gravy EVER, and this recipe will be on your table every time you serve mashed potatoes…or rice…or vegetables. (Can you see where I’m going with this?)

NOTE: This gravy is also vegan friendly.

Bonus:  Mushroom Gravy freezes well. Take it from the self-proclaimed Queen of Freeze (that would be me), if you like this recipe – double or even triple it next time, and freeze in portion sized containers.

SAVORY MUSHROOM GRAVY – makes about 2½ cups

  • ½ T oil
  • 1 cup (110g) onions, coarsely chopped
  • 1 cup (95g) shiitake mushrooms, coarsely chopped (cleaned well)
  • 3½ (811g) cups water
  • ¼ (60g) cup soy sauce
  • 1 tsp dried thyme
  • ¼ tsp dried sage
  • 1/3 (42g) cup rice flour, tamped down

Heat oil in a saucepan over low flame. Add in onion, mushrooms, thyme, and sage. Cover and cook for about 10 minutes, stirring often. Towards the end of the 10 minutes the mushrooms will have exuded moisture and the onions will have separated.

Mix in water and soy sauce. Cover and cook 10 minutes.

Sprinkle in rice flour, using a whisk or fork to blend.  Don’t worry too much about lumps since they’ll be strained out. Bring to boil, then lower flame to simmer gravy for 10 minutes uncovered, stirring often.

Pour through a sieve and either serve immediately or save for later. Can be made a few days in advance.

Barbecue Pulled “Pork” Sandwiches – Oh, Yeah!

BBQ "pork" sandwich with roasted carrots,  mushy peas, and a nice cool beer.

BBQ “pork” sandwich with roasted carrots, mushy peas, and a nice cool beer.

I’m NOT a southern gal, but after trying this Barbecue Pulled “Pork” Sandwich, all I can say is ‘hoo-weee!’

As an ex-carnivore, one of the things I miss most is BBQ – shredded pork or beef sandwiches, to be specific. It occurred to me that maybe there was something I could substitute for the meat. Thanks to the internet, I discovered that people were using jackfruit. What the heck was a jackfruit, I wondered? (Yes, aloud.) I learned it was an ugly looking fruit, popular in the Asian community, and you can buy it canned.

Off I went to the Asian market. Apparently, canned jackfruit is VERY popular because there were numerous brands, most of them in syrup. YOU DO NOT WANT THAT KIND!!! Look carefully, possibly in another section, and you’ll find jackfruit in brine. That’s what you want.

I began this Pulled “Pork” journey with Blissful Basil, a vegan blog, who posted about a jackfruit barbecue sandwich. Naturally, I had to put my own spin on it after trying her recipe. I opted to make my own barbecue sauce, which gave those sandwiches quite a kick. My nose was a-runnin’ and perspiration was a-beadin’ (sorry – it’s the spices a-talkin’)…but, I liked it! This Barbecue Pulled “Pork” Sandwich really satisfied that hankerin’ (I’ll stop now, I promise) for BBQ.

NOTE:  You can use bottled barbecue sauce, if you’d like, instead of making it.

BARBECUE PULLED “PORK” SANDWICH – makes 6-7 sandwiches

  • 2 cans jackfruit in brine, drained
  • 1 T oil (I used canola)
  • 1½ cups onions, chopped
  • 1½ T chili powder
  • 1 tsp cumin
  • ¼ tsp cayenne pepper
  • 1½ cups barbecue sauce, recipe follows below

Cut off and discard any tough core bits from the jackfruit. Slice the pieces into thin strips.

In a large skillet, sauté onions in oil for  several minutes. Stir in chili powder, cumin, cayenne powder, and continue to cook another minute to bring the spices to life. Add the jackfruit and barbecue sauce and bring to a low boil. Cover and simmer for 25 minutes, stirring now and then. As this cooks, the jackfruit will soften and you can break it up even more with a flat wooden stirrer.

Pour mixture onto a jellyroll pan and bake at 350º Fahrenheit for 20 minutes, stirring once or twice.

Spoon onto whatever you fancy and serve.

BARBECUE SAUCE – makes 1½ cups

  • ¼ cup oil (I used canola)
  • 1 T garlic, minced
  • 1 cup ketchup
  • ¼ cup red cider vinegar
  • 2 tsp hot sauce (use more or less, depending on your spiciness preference)
  • 4 tsp dark brown sugar, packed
  • 4 tsp dijon mustard

Sauté garlic in oil until you can smell it but it hasn’t browned – about 1 minute. Add in ketchup, vinegar, hot sauce, brown sugar, and mustard. Bring to a low boil and cook for 10 minutes, stirring frequently. At first, the oil will be floating on top, but by the end of cooking time it will be incorporated.

This sauce freezes well, so if you like it make a lot and freeze. It’s excellent on pizza!


Vegetable Curry Stew – A Winter Warm Up!

Curry Stew

Vegetable Curry Stew

There’s nothing better on a chilly evening than a nice savory stew. If you’re a curry lover, you’ve got to try my Vegetable Curry Stew. The combination of coconut milk, spices, and vegetables is the stuff of which dreams are made.

Besides warming the cockles of your heart (and stomach), this stew has the benefit of being low in calories. Who couldn’t use THAT as we begin our journey down Weight Gain Road. Even though Halloween is behind us, leftover candy certainly isn’t. Coming up are the food related holidays of Thanksgiving, Christmas, Hanukkah, New Year’s Eve, and the parties that go along with them.

You may be wondering how Vegetable Curry Stew could possibly be low in calories when coconut milk is involved. As always, it’s all about portion control. Instead of using canned coconut milk, I buy powdered. That way, I can use less but still get that luscious coconut milk flavor. If your store doesn’t carry powdered, just buy it online. I use Maggi brand, but I expect they’re all good.

Next, you may be wondering if you can just use part of the can and dilute it with water. While I’ve never done it, I see no reason why you can’t. But the reason I don’t is the powdered is so much easier to use, and it takes up less space in the pantry (always a plus.) Also, I don’t have to worry about what to do with the leftover (you know how I hate waste!). I’m not sure how well coconut milk freezes. Of course, you can double the recipe and use up the can that way.

Finally, you may be wondering how I know what you’re wondering. It’s a gift!

NOTE:  Don’t get frightened by the long list of ingredients.  Most of them are spices – all of which a well-stocked kitchen should have. The thing about herbs and spices is that they’re initially expensive.  BUT once you’ve bought them they last a long time.  Don’t believe those people who say you have to throw them out after a year. Buy the spices and cook from scratch – you are going to save money in the long run.

VEGETABLE CURRY STEW – makes 4 to 5 cups

  • 3 T butter
  • 1 cup onions, chopped
  • 2 garlic cloves (about 1½ tsp), minced
  • 1 tsp coriander
  • ½ tsp dried ginger
  • 1 tsp cumin
  • ½ tsp cardamon
  • ½ tsp dried mustard
  • 1/8 tsp ground cloves
  • ½ stick cinnamon
  • 1/8 tsp cayenne pepper
  • ½ tsp tumeric
  • ½ tsp salt
  • 1/3 cup coconut powder (or half can coconut milk)
  • ¾ cup water (eliminate this if you’re using canned coconut milk)
  • 1 cup carrots, chopped
  • 1 T lemon juice (fresh or bottled)
  • 1 cup potatoes, chopped (I use Yukon)
  • 1 cup yam, chopped (I use garnet)
  • 1 cup cauliflower, chopped
  • 2 mushroom, chopped
  • 1 cup broccoli, chopped

WHEW!  That’s a lot of typing. If you’re one of those cooks that likes to have everything prepared before you start cooking, go for it.  But I’m going to give you instructions for the fastest way to prepare this stew. There’s a lot of down time when various ingredients are simmering, so that’s when I prepare the next lot.

Melt the butter in a large pot. As it’s melting, chop the onions and skin the garlic. Add the onions and press the garlic into the pot. Sauté for 10 minutes.

As the onions are cooking (make sure you stir them now and then), assemble your spices, measuring spoons, coconut powder, water, and lemon juice. Chop the carrots.

When the 10 minutes are up, turn off the burner and add the spices. Sauté over a low heat for 2 minutes. Add in the coconut milk, water, carrots, and lemon juice. Bring to a simmer. Cover and let simmer for 10 minutes.

While this is simmering (stir now and then), prepare the potatoes, yam, cauliflower, and mushrooms.

When the 10 minutes are up, add in the chopped potatoes, etc. Cover and simmer 10 minutes.

As this is simmering, prepare the broccoli.

When the 10 minutes are up, add in the broccoli. Simmer 5 minutes.

Serve immediately or reheat later.