YAM-CRAN SALAD – Pretty, Fast, & Easy!

IMG_7200

YAM-CRAN SALAD

Sometimes I want just one more side dish for my holiday meal. The problem is time management. Everything needs to be done at the same time, but there is only so much time and oven availability to get things prepped and cooked.

That’s why I often turn to YAM-CRAN SALAD. It’s fast to prepare, no oven is involved, and, with the exception of tossing in the walnuts, can be prepared the day before. Bonus:  it’s very festive looking!

BTW, I make this salad throughout the year – often as a last minute thought when I have a bag of yams I need to use up. I always have walnuts, dried cranberries, and dressing on hand.

YAM-CRAN SALAD – makes 2½ cups

  • 1 lb yam or sweet potato, cubed (I use garnet yams)
  • 1/3 cup walnuts, chopped and lightly toasted
  • 3 T dried cranberries
  • Ginger Mandarin dressing

GINGER MANDARIN DRSG


Boil yam cubes until you can pierce them with a fork.  Be careful not to overcook! It takes about 5 minutes. Drain in a sieve and rinse with cold water to stop the cooking process. You want them bite-able (is that a word?), but not crunchy nor mushy.

Mix together the yams, cranberries, and dressing. Refrigerate at least an hour.

At serving time, stir in the walnuts.

WILD RICE & MUSHROOM SOUP – Mmm Mmm Good!

WLD RICE & MUSHROOM SOUP

WLD RICE & MUSHROOM SOUP

We’re getting into serious holiday indulgence time. It’s hard to resist that luscious piece of fudge, cheesy hors d’oeurves, and cups of eggnog. But those calories add up, producing unwanted pounds and New Year’s resolutions.

Since I don’t like to deprive myself at social gatherings, I try to make low calorie meals at home to keep things balanced. Soup is always a winner. It’s filling, warms you up, and often is low in calories.

WILD RICE & MUSHROOM SOUP is such a soup. It does take some time to make since wild rice needs about 45 minutes to soften, but is well worth it. I, actually, find this soup addictive – often going back for seconds and sneaking in a third later in the evening. But at about 170 calories per cupful, why not?

NOTE: In scanning the ingredients list below, you may be leery about the butter and cream involved. Don’t be! This recipe makes a LOT of soup, so the fat is diluted per cupful. The butter and cream add richness.

WILD RICE & MUSHROOM SOUP – makes 11 cups

  • 8 oz (about 1 cup) wild rice, raw
  • 8¼ cups water, divided
  • 2¼ tsp salt, divided  (I use kosher)
  • 1 clove garlic, whole & peeled
  • 1/4 tsp baking soda
  • 1/4 tsp dried thyme
  • 4 T butter, salted
  • 1 lb crimini mushrooms, chopped
  • 1 onion, chopped
  • 4 cloves garlic, pressed
  • 1 tsp tomato paste
  • 1 tsp ground pepper
  • 2/3 cup sherry
  • 1 T soy sauce
  • 1/4 cup dried shiitake mushrooms
  • 1/4 cup cornstarch
  • 1/2 tsp lemon zest, packed
  • 1/4 cup chives, chopped
  • 1/2 cup heavy cream

Into an ovenproof saucepan or tall sided casserole bowl, stir together 4 cups of the water (you can boil it first to speed things along), rice, 3/4 tsp of the salt, the whole garlic clove, baking soda, and thyme. Cover and cook in the oven at 375º F for about 40-45 minutes. Taste test the rice after 40 minutes to see if it’s done. Remember, it’s not like soft white rice – there’s a chew to wild rice.

While the rice is cooking, prepare the mushrooms. In a skillet, melt butter. Turn flame up to medium high and add the mushrooms, pressed garlic, tomato paste, pepper, and the remaining 1½ tsp of salt.  Uncovered, bring to low boil, and cook off all the liquid. This takes about 15 minutes.

When rice is done, pour through a strainer that’s placed over a container. You want to save the water. Add enough additional water to equal 3 cups total. Remove and discard the garlic.

When mushrooms are done, pour in the sherry and cook for 2 minutes.

Put the dried shiitake mushrooms into a blender and grind them into a powder on high.

Into a large saucepan (this could be the saucepan you used to cook the rice), combine the mushroom/sherry mixture, ground shiitakes, soy sauce, 4 cups water, and the 3 cups rice water. Cover and simmer for 20 minutes.

Make a slurry by stirring together the cornstarch and 1/4 cup water to make a paste. (Don’t do this ahead of time – it becomes hard). Slowly whisk slurry into the soup. Add in drained rice, lemon zest, chives, and cream. Correct seasoning, if needed. Cover and let rest for about 20 minutes.

Heat and serve.


CRANBERRY SAUCE: Don’t buy – MAKE!

HOMEMADE CRANBERRY SAUCE - Easy!

HOMEMADE CRANBERRY SAUCE – Easy!

Thanksgiving is coming up in the United States and grocery lists are being compiled for the big feast.

Is cranberry sauce on your list? The jarred kind, or – yikes! – that jellied canned stuff? Cross it off RIGHT NOW! Instead, write down bagged whole cranberries (they’re in the produce section).

If you can boil water, you can make cranberry sauce because all you have to do is boil water, cranberries, and sugar together for 5 minutes. Done!

IMG_0218 (1)

Even non-cooks can make this. Remember, every time you buy prepared food, you give power over what goes inside your body to someone else. It’s time to take control!

CRANBERRY SAUCE – makes about 2 cups

  • 8 oz whole cranberries, rinsed
  • 1/2 cup water
  • 1/2 cup dark brown sugar, packed (or, white sugar, if you prefer)
  • optional: zest from one orange (I never do this)

Put all the ingredients into a saucepan and bring to a boil. Cook for 5 minutes, stirring often. When cranberries begin to pop, remove from heat. Refrigerate until serving time.

Deck The Halls With OLIVE CHEESE BALLS!

OLIVE CHEESE BALLS
OLIVE CHEESE BALLS

When planning for company, hors d’oeurves often take a backseat to the main course and dessert. Open a bag of chips or buy a party platter and you’re good to go, right? WRONG! You can do better than that!

You want yummy tidbits that whet the appetite and, more importantly, keep hungry guests from hovering around the kitchen asking how much longer.

My mother was a very unadventurous cook. I’m not sure if it was because she lacked interest or confidence. But she did have a knack for accumulating good recipes that she served for company. Olive Cheese Balls were a constant when she entertained. While they have to be baked just before serving, they can be prepared well ahead of time. The uncooked balls can even be frozen.

They’re easy to prepare, but do take a bit of time. When I was a child, this was my job. So put the kids to work! Olive Cheese Balls are a great recipe to introduce them to cooking.

OLIVE CHEESE BALLS – makes 22-24, depending on size

  • 1 cup sharp cheddar cheese, shredded
  • 1/4 cup butter, softened and cut into cubes
  • 1/2 cup all-purpose flour
  • 1/4 tsp salt
  • 1/2 tsp paprika
  • 24 pimento stuffed green olives

Into the workbowl of a food processor, pulse the flour, salt, and paprika 2 times, just to blend. Then add the cheese and butter. Pulse several times until mixture is blended. If you don’t have a food processor, blend the cheese and butter together in a bowl. Stir in the flour, salt, and paprika. Then make a mental note to put “food processor” on your holiday wish list!

Transfer dough into a bowl and divide dough into 22-24 pieces. Roll into balls. One by one, flatten each ball, place an olive in the middle, pimento side down, and wrap dough around olive, pinching it closed. Use the liquid from the olive to help facilitate this.

Squeeze the ball to compact it, then roll into a smooth ball. It works best if you wash your hands after every 4th or 5th to prevent the dough from starting to stick to your fingers.

They can be refrigerated at this point, if you like.

To bake, place on a greased, baking paper lined, or nonstick cookie sheet. They spread, so don’t crowd them. Bake in a preheated 400ºF oven for 10-15 minutes. Let rest 5 minutes on cookie sheet before removing. Serve immediately.

ORANGE TOFU – Tangy Goodness!

ORANGE TOFU

ORANGE TOFU

There are a few things I miss from my carnivorous days. Orange chicken is one. I love the tangy orange sauce clinging to the deep fried batter surrounding luscious tender chicken pieces.

Now, as a vegetarian, I’m always searching for recipes that fulfill those cravings but don’t make me feel like my food is ‘less than’. If you start feeling like you’re eating second rate, that’s when you fall off the vegetarian wagon.

Unless you’re eating a plain steak, pork chop, or turkey slice, most meat dishes use meat as a foundation – the majority of taste coming from sauce, spices, and toppings. Using that knowledge, my challenge is to find a substitute that allows the essence of the original. Sometimes I use imitation meats (such as fake sausage, hot dogs, and chicken), and sometimes I find a similarly textured food (such as jack fruit in place of pulled pork).

In the case of Orange Tofu, I’m not trying to fool anyone – clearly, this is tofu, not chicken. My very first blogpost was THE ORANGE CHICKEN DILEMMA, in which I use imitation chicken (or turkey) to give the texture of the real thing.

However, there are people out there concerned about using imitation products. “What’s in it?” is a common question. While my family prefers Orange “Chicken” (quotation marks denote “fake”), I decided to make an Orange Tofu for those leery of faux foods.

So, donning my lab coat, I began to experiment with tofu. What I found was the longer you cook it, the more rubbery it becomes. Unfortunately, this rules out batter dipped deep frying because of the time it takes to get that golden brown crispy coat. Rather, a quick fry in a teeny bit of oil on a nonstick skillet worked best for taste. I will grant you, it doesn’t look as pretty as the deep fried version, but it’s delicious.  (And your arteries will thank you!)

ORANGE TOFU – makes about 3 servings

  • 453g (1 lb) block of tofu, extra firm
  • 60g (4 T) fresh orange juice
  • 116g (1/2 cup) water
  • 35g (3 T) rice wine vinegar
  • 22g (2 T) lemon juice
  • 17g (4 tsp) soy sauce
  • 1/2 T orange zesty, packed (don’t be stingy!)
  • 64g (1/2 cup) dark brown sugar, packed
  • 1/2 T fresh, 1/4 tsp dry,ground ginger
  • 1/4 tsp garlic powder
  • 15g (1½ T) cornstarch
  • 29g (1 T) water

Remove tofu from package and press with heavy plate for 1/2 hour to remove water.

Meanwhile, prepare orange sauce. In a small saucepan bring the orange juice, 1/2 cup water, vinegar, lemon juice, soy sauce, zest, sugar, ginger, and garlic powder to a boil. In a small bowl blend together the cornstarch and 1 T water until smooth. Slowly stream it into the boiling orange juice mixture, stirring as you pour, until sauce is thickened.

NOTE: As Queen of Freeze, I would be remiss if I didn’t tell you this orange sauce freezes well. So, if you like it, double or triple the recipe next time and freeze in portion sized containers for future use.

Slice tofu into pieces 3/8″ in width. Heat about 1/2 T oil in a nonstick skillet. Fry tofu a couple of minutes on each side, until lightly browned. Be careful of oil spatter! If you don’t have a nonstick skillet, use a regular one and increase the amount of oil. Drain on paper towel.

Serve tofu on sticky rice, topped with orange sauce.

BROCCOLI & RAISIN SALAD: Addictive!

BROCCOLI & RAISIN SALAD: Addictive!

BROCCOLI SALAD

BROCCOLI SALAD

Broccoli is a staple in our home – we have it nearly every night with dinner. I put very little thought into it – at some point during meal prep I wash a liberal amount of broccoli, place it in a steam basket (attempting to put enough water underneath), and 14 minutes before meal time, I turn on the burner. It’s fast, easy, and healthy.

But every now and then I kick it up a notch and do something special with this green member of the cabbage family… just to show my family my wild side. One of our favorites is Broccoli & Raisin Salad. Even though it’s a little more work than just tossing it in a steamer, there is the advantage that I can make it ahead of time. I love those foods!

Broccoli & Raisin Salad keeps well, so go ahead and make extra. It’s good for packing in your lunch the next day, or to snack on during that late afternoon tummy growling time.

BROCCOLI & RAISIN SALAD – makes about 4½ cups

  • about 380g (4 cups) bite-size pieces of broccoli, measure after chopping
  • 1/2 cup red onion, chopped
  • 50g (1/2 cup) raisins
  • 114g (1/2 cup) mayonnaise
  • 1½ tsp apple cider vinegar
  • 21g (2 T) dark brown sugar, packed
  • 1 tsp Dijon mustard
  • 48g (1/2 cup) walnuts, chopped and lightly toasted
  • optional:  3 strips of fake bacon (I use Morningstar brand), baked crispy & crumbled

Put broccoli in a steamer basket fit inside a saucepan (don’t forget the water). Turn on burner to medium high and immediately set timer for 3 minutes. When timer goes off, check to see if broccoli has turned vibrant green (See photo).

steam broccoli

Once it achieves this color, remove broccoli from the steam basket, place in a bowl, and refrigerate. Otherwise, it will continue to cook – you don’t want mushy broccoli! Add in the raisins and red onions.

Whisk together the mayonnaise, vinegar, brown sugar, and Dijon. Pour over broccoli and mix. Refrigerate until serving time.

Add in the walnuts and fake bacon (if using) at the last minute to keep them crisp.

SPLIT PEA SOUP – Perfect For Chilly Nights!

SPLIT PEA SOUP

SPLIT PEA SOUP

It’s Fall. Days are getting shorter; nights are getting colder. Suddenly, a steamy bowl of soup sounds like the perfect meal.

Not only does soup make you feel warm and toasty, it fills you up without a lot of calories. This is important as we approach the holidays – also known as Weight Gain Road.

One of my favorite hearty soups is Split Pea. It’s fast and easy to make IF you plan ahead. If you don’t, then it’s just easy. This is because split peas take a long time to soften, which means hours of simmering.

You can drastically speed up the process by soaking the peas overnight, thereby whittling cooking time down to half an hour (seriously!). So before you go to bed, put the dried split peas in a large bowl and pour the allotted water over them. I boil the water first to give a boost to the softening process, but I’m not sure it really matters.

SPLIT PEA SOUP – makes 4 cups

  • 1 cup dried split peas
  • 5 cups water
  • 1 tsp salt, divided
  • 1/2 cup carrots, chopped
  • 1/2 cup celery, chopped
  • 1 cup onion, chopped
  • 1/4 tsp cayenne pepper
  • 1/4 tsp thyme

Soak peas overnight (or, early in the morning) in the water and 1/2 tsp of the salt.

To cook, pour the peas and soaking water into a pot and bring to boiling. As this is heating up, prepare the vegetables. Add them to the pot.

When soup is boiling, reduce to simmer, cover, and cook for about 1/2 an hour. Taste test to see if peas are softened. Add in cayenne, thyme, and remaining salt. Adjust seasoning, as desired.

Ladle 2 cups of the soup into a blender and purée. Pour back into the pot. If the consistency is too thin for you, simmer the soup UNCOVERED another 15 minutes or so, stirring now and then.

NOTE: If you didn’t soak the peas, put the dried peas and water into a pot, bring to boiling, reduce to simmer, cover, and cook for about 2 hours. Then proceed with instructions above.


CURRIED SORGHUM SALAD – An Ancient Grain Revisited

CURRIED SORGHUM & CARROT SALAD

CURRIED SORGHUM SALAD

On a recent trip to Los Angeles, I was perusing a dinner menu the size of a short novel. As I skimmed through the titles and descriptions of various items, I noticed ‘sorghum’ was repeatedly listed. Sorghum? Not only was sorghum listed as an ingredient in wraps, salads, and soups, it was also made into breads.

We whispered between us (embarrassed by our ignorance) as to what this ingredient might be. A vegetable? A cheese? Some kind of soy product?

It turns out sorghum is an ancient grain, popular in Africa. It can be used like rice, but requires far less water to grow – an important fact in drought ridden California. It’s round, like barley, and has a pleasing chew to it. Also, for those concerned with gluten, it’s gluten-free.

RAW SORGHUM

RAW SORGHUM

Being a gal who treads on the cutting edge (or, at least, nearby), I decided to prepare a sorghum dish and see for myself what LA folks already know. It took 3 tries to find a store in my area that carried this grain – even Whole Foods was a bust. I ended up locating it at a local natural food store, purchasing their one and only bag.

I found a curried sorghum and carrot salad recipe, then promptly adjusted it to suit myself (because that’s what we cooks do). Very tasty!

NOTE:  I prefer to use powdered coconut milk so I can make exactly what I need.That way I don’t have to find a way to use up the leftover milk from the canned coconut milk. I order it online.

CURRIED SORGHUM SALAD – makes about 3 cups

  • 1 cup raw sorghum
  • 4½ cups water
  • 1 tsp sea salt, divided
  • 2/3 cup coconut milk (if using powdered, put 3 T powder in measuring cup and add water to the 2/3 cup mark)
  • 2 T red wine vinegar (or apple cider vinegar)
  • 2 tsp curry powder (either purchased in the spice dept or your own blend)
  • 1/3 tsp chili powder
  • 1½ tsp sugar
  • 2 cups carrots, shredded
  • 1/2 cup dried cranberries
  • 1/4 cup scallions, sliced
  • 1/4 cup pumpkin seeds, toasted

Bring sorghum, 1/2 tsp salt, and water to a boil. Turn burner down, keeping water at a simmer. Cover with lid slightly askew to allow steam to escape until most of the water has been absorbed – then you can put the lid completely on. Start taste testing after about 50 minutes. Once the sorghum is chewy, but not crunchy, it’s done. It can take as much as an hour or more to cook. Pour through a sieve to remove excess water.

While sorghum is cooking, prepare the dressing. Combine the coconut milk, vinegar, curry, chili, 1/2 tsp salt, and sugar.

Blend together the cooked sorghum, dressing, carrots, cranberries, scallions, and pumpkin seeds. Refrigerate. Can be served room temperature, but I think it’s best chilled.


HAUPIA & MACADAMIA SHORTBREAD CUPS – Aloha!!!

MANGO TOPPED HAUPIA & MACADAMIA SHORTBREAD CUPS

MANGO TOPPED HAUPIA & MACADAMIA SHORTBREAD CUPS

Hello.  My name is Bonnie and I’m a chocoholic.

It was destined to happen – my mother consumed some form of this delectable treat everyday of her pregnancy with me. My fate was being written with each chocolate doughnut she vowed she wouldn’t eat…but did.

However, now and then I feel the need to broaden my dessert horizons – not everyone likes chocolate. (It’s a fact – I looked it up!)

I decided to make haupia – a coconut jello-like pudding, in memory of my Tahitian dancing days. As with most ethnic groups, food plays a central role in the Polynesian world. The first potluck I attended, I was asked to bring haupia. Not realizing there was such a thing as canned coconut milk, I actually bought coconuts, cracked them open, removed the meat, and made my own coconut milk. It took hours of life threatening work with a hammer and a sharp knife. The haupia was delicious, but definitely not worth the effort. Years later, I saw canned coconut milk in the market. It was a slap-palm-to-forehead moment.

In keeping with my portion control doctrine (everyone over 40 knows why), I made the haupia in custard cups. One cup = one portion. No nibbling those odd pieces in the pan that “no one else will eat and it’s sinful to waste.” Just to add a little substance, I poured the haupia over macadamia nut shortbread. And, then, because I can never let things alone, I made a mango sauce topping.

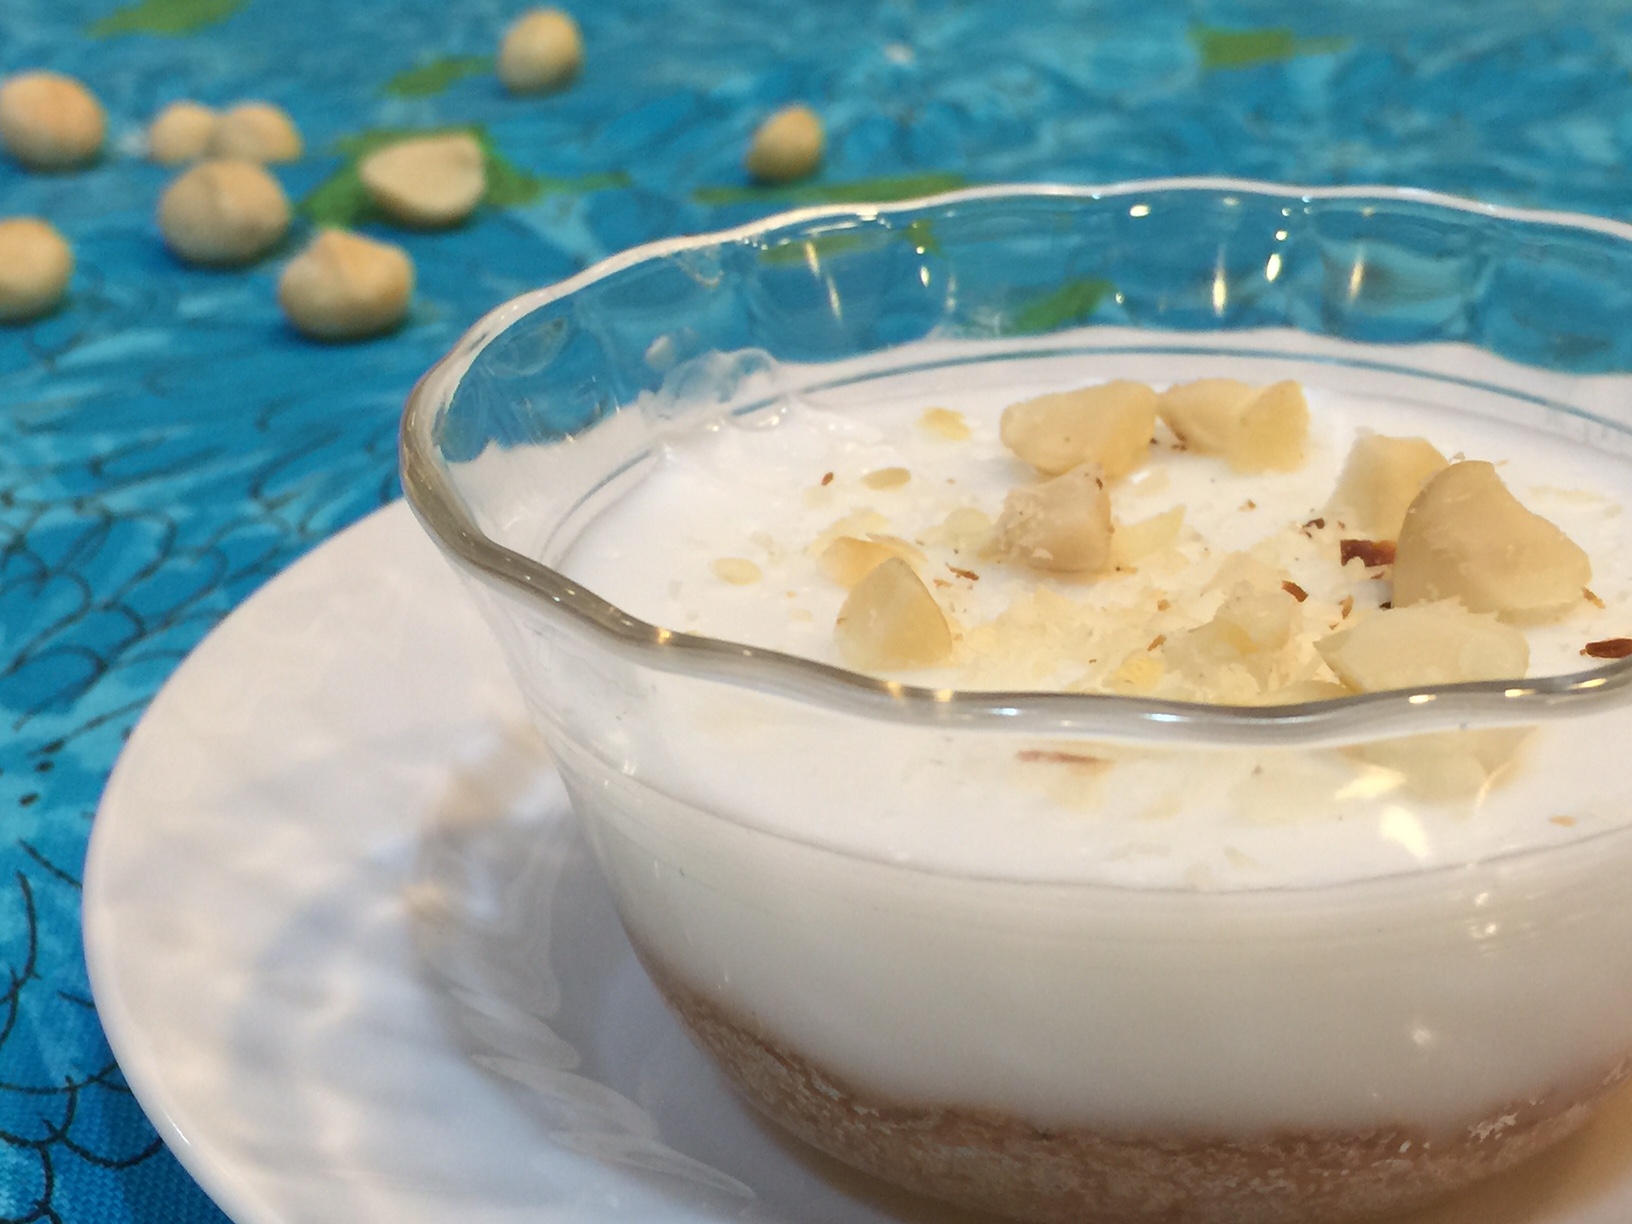
The mango sauce was delicious and extremely pretty, but I confess I prefer HAUPIA & MACADAMIA SHORTBREAD CUPS sprinkled with just some toasted chopped macadamia nuts. Without the scene-stealing mango, the flavor of the toasted macadamia nuts bursts forth, complementing the subtle coconut flavor.

Haupia & Macadamia Shortbread

TOASTED MACADAMIA NUT TOPPED HAUPIA & MACADAMIA SHORTBREAD CUP

Topped simply with chopped toasted macadamia nuts or perked up with Mango Sauce, HAUPIA & MACADAMIA SHORTBREAD CUPS are an easy, light dessert.

Who can decide?

Which will I choose?

NOTE: It’s important to toast the macadamia nuts – I put the word “toasted” continuously in front of the word “macadamia” to remind you (I’m a mom – it’s what we do!). Toasting brings out the flavor and gives a better crunch. Just make sure you keep an eye on them – they go from lightly browned to black in an instant.

ADDITIONAL NOTE: I now use powdered coconut milk – that way I can use exactly what I need instead of opening a whole can for a small amount.

HAUPIA & MACADAMIA SHORTBREAD CUPS – makes 4 servings

     Macadamia Shortbread – enough for 4 custard cups

  • 3 T macadamia nuts, chopped and toasted (measure and toast after chopping)
  • 1/8 tsp salt
  • 1 T sugar
  • ¼ cup all-purpose flour
  • 1/8 tsp vanilla extract
  • 2 T butter, soft

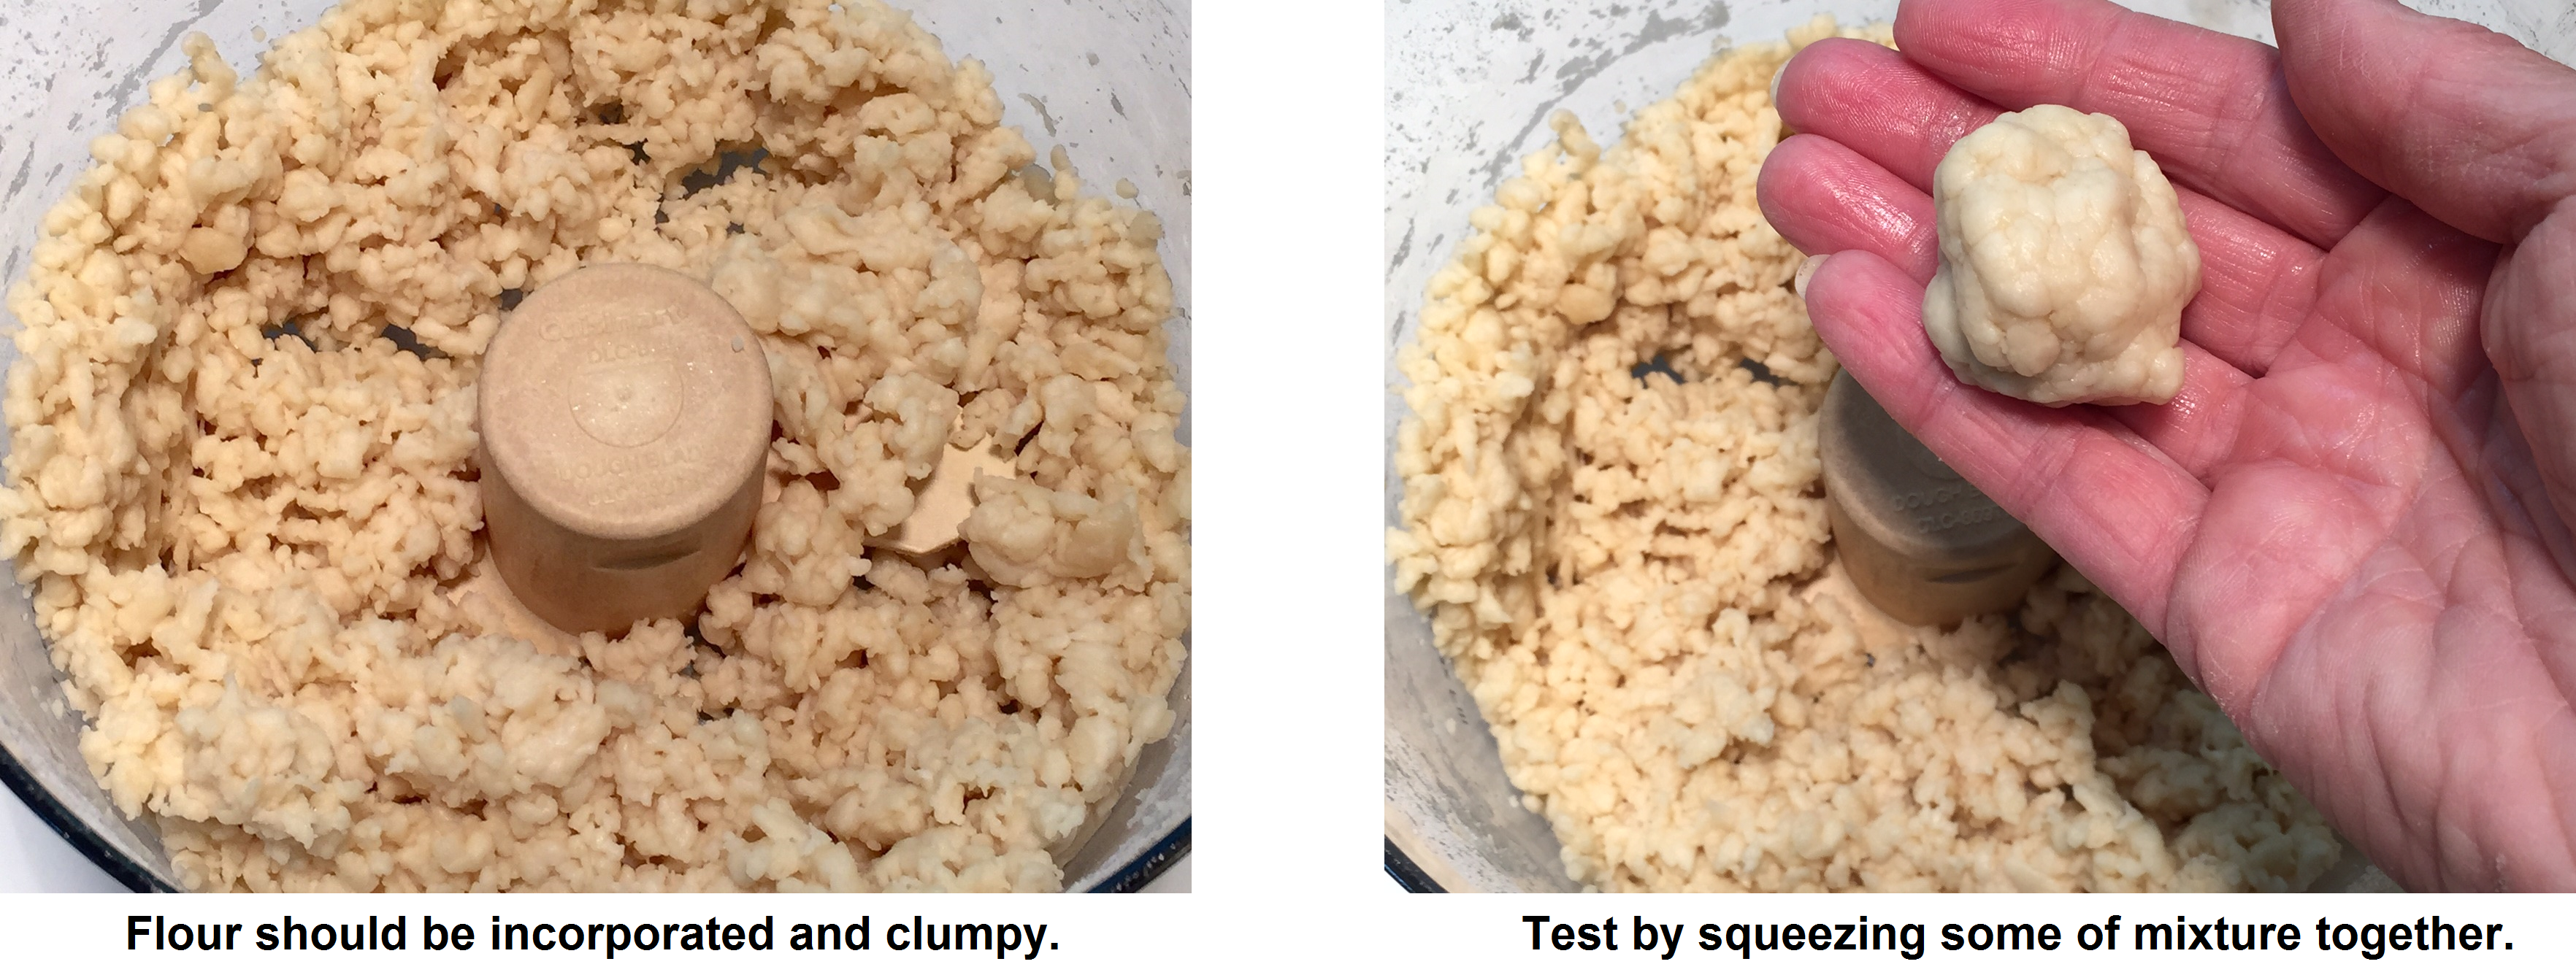
Put toasted macadamia nuts, salt, and sugar in a food processor. Whirl until nuts are tiny bits. Add in flour, vanilla, and butter. Blend until batter is creamed.

Preheat oven to 350º Fahrenheit.

Pat dough into into the bottom of 4 ungreased custard cups (or muffin tins). It comes out to about 1 tablespoon of dough per cup. Bake for approximately 15 minutes, until tops are golden brown. Remove from oven and cool in cups on a wire rack.

     Haupia

  • 1  13.5 oz can of coconut milk  OR  put ¼ cup coconut powder in measuring cup and add warm water to 1¾ cup mark
  • 3 T cornstarch
  • ¼ cup sugar
  • dash salt

Put the cornstarch, sugar, and salt in a small saucepan and mix. Pour in some of the coconut milk and make a smooth paste. Add in the rest of the milk and heat over a medium flame, stirring constantly. Continue to stir until the liquid is thickened – about 5 minutes total.

Pour evenly onto the shortbread in custard cups. Let cool, then refrigerate at least 5 hours to set.

     Mango Sauce – optional

  • ¾ cup mango chunks (fresh or frozen)
  • 1½ tsp lime juice
  • ½ tsp lemon zest
  • 1 tsp lemon juice

Purée all ingredients together in a blender or food processor. Serve on top of haupia, if desired.

NOTE: If you’re using a muffin tin instead of custard cups, add the Mango Sauce after plating. To remove the HAUPIA & MACADAMIA SHORTBREAD CUPS from the tin, carefully run a dull knife around the edge, working your way to the very bottom to release the shortbread. Carefully, lift out and transfer to plate.


HOMEMADE FLOUR TORTILLAS – ¡Muy Buenas

HOMEMADE FLOUR TORTILLAS

HOMEMADE FLOUR TORTILLAS

Last week I posted about Breakfast Burritos and it occurred to me I should post about making homemade flour tortillas.

You may be wondering why I bother making tortillas. Of course, there are the usual reasons: it’s cheaper (although it’s pretty cheap to buy them), and I have control over what goes in them.

But, the main reason I make them is because the purchased packages contain at least 8 tortillas – which is way more than I generally need. Yes, I realize I’m the Queen of Freeze, but, unfortunately, tortillas don’t freeze well. Since I hate waste, I would find myself snacking on them just so I didn’t throw them out. Those are empty calories I DON’T need!

Flour tortillas are surprisingly easy to make, once you get the hang of it. Just roll them out on a floured board and quickly cook on a dry, heated skillet.

NOTE: Even if you have a tortilla press (which I do), you really need to roll them out with a rolling pin on a floured board first, then you can cook them on the press. With the heated press, they stop spreading before they’re the proper size. If you press really hard so they spread to full size before they’re cooked, they’ll shatter. I speak from experience!

FLOUR TORTILLAS – makes about 5  8″ tortillas, depending on how big & thick they are

  • 2 cups all-purpose flour
  • 1/2 tsp salt
  • 1/4 cup vegetable oil (I use corn oil)
  • about 1/2 cup water

Into a food processor put the flour, salt and oil. Pulse a few times, then press the ‘on’ button. Slowly add the water through the pour spout until the mixture forms clumps. Depending on your flour, you may use a little more or less water than the 1/2 cup listed. (You’ll probably need to stop machine and scrap the flour from the side.)

Squeeze some of mixture together to form a small ball. If it doesn’t hold together, turn on processor and drizzle in a tablespoon of water. Run machine another minute to knead.

flour tortilla mixture

If you don’t have a food processor, the holidays are coming – put it on your wishlist! In the meantime, put the ingredients in a bowl and mix with a fork. Then knead for a several minutes on a floured board.

Once the dough is the desired consistency, form tight balls in the amount for the size tortilla you want. I make 5 balls for 8″ tortillas.  Cover in an air-tight container (I just put them in the food processor with the lid on) and let rest for at least 30 minutes.  This decreases the elasticity of the dough and allows them to be rolled easier.

On a floured board, flatten each ball with one hand while pushing in the sides with the other. This helps keep the edges from being too jagged. Then start rolling your dough with a rolling pin, from the center of the dough outwards, forming a circle.

IMG_8298

Heat a dry skillet (no oil or butter) over a medium flame, then place your rolled dough. It will stick initially, so don’t try to move it. After 20 seconds or so, shake the skillet and, when the tortilla scoots around, you can flip it. You don’t want to brown the tortilla (that will make it crispy), just gently cook it through. A couple browned spots on the bubbles are okay. Keep flipping and turning to cook it evenly.

IMG_8299

It should take about 1-2 minutes total. Use your eyes as a guide, not a timer. While the first one is cooking, roll out the second, etc.

Immediately place the cooked tortilla into a plastic bag to keep it soft. If I’m making burritos, I also roll the bag to prevent the tortillas from cracking when I form the burritos.

IMG_8300

They’ll keep a couple of days in the plastic bag, but the point of making them is so you don’t have an abundance of extras. Otherwise, you’ll find yourself tearing off bits and snacking. Unfortunately, the myth that if you eat only a portion of an item the calories don’t count isn’t true. Dang!