Armenian Salad

Armenian Salad

Armenian Salad

Anyone raised in an Armenian home, like I was, knows that food is a central part of our world. Family gatherings were abuzz with endless food preparation and overlapping conversations.

We were a traditional group – men cooked the shish kabab and women did everything else. Whoops, I almost forgot – the men did suggest it was time for leftovers as soon as the last plate was dried and put away.

Generally speaking, Armenian foods are labor intensive. Dolma, lahmajoun, boereg, and kufte take quite a bit of time to produce, especially for a large family with hearty appetites. But, believe it or not, there are one or two dishes that are easy, nonfat, and meatless – something that’s sure to tug at your vegetarian heartstrings.

Armenian Salad is a favorite, particularly during the summer when bounty from the garden (or your local farmer’s market) can be chopped, tossed, and chilled in no time.  The flavor of these few ingredients awakens your mouth with an explosion of freshness – a perfect foil to the heaviness of many Armenian dishes.

ARMENIAN SALAD

  • 4 cups tomatoes, coarsely chopped (I use Roma tomatoes)
  • 1 red pepper, chopped
  • ½ cup scallions, thinly sliced, using white and green part
  • 2 cucumbers, skinned, seeded, and chopped
  • ¼ cup lemon juice (fresh or bottled)
  • 2 tsp salt

Toss everything together and chill briefly.  The longer it sits, the soupier it gets, so lessen the chill time by using cold ingredients.


Nutty “Meat”loaf

NUTTY "MEAT"LOAF

NUTTY “MEAT”LOAF

Every time I make Nutty “Meat”loaf, I ask myself why I don’t make it more often – it’s THAT good!

For those of you new to my site, you might be wondering why a vegetarian cooking blog has a recipe for “meat”loaf.  First of all, welcome!  Second, look carefully – there are quotation marks around the word meat.  That’s my special code for “not real meat”. Often times I’m using purchased imitation (aka, fake) meat. But in this case, the “meat” is a cornucopia of ingredients that individually are good, then blend together symbiotically to create a delectable dish, even tastier than the sum of its parts. (Whoa – creative moment!)

What I love about Nutty “Meat”loaf is that, unlike other veggie loafs, it has a meaty bite to it. This is helpful for those of you still weaning yourself from your carnivorous ways. Temptations lurk everywhere – like a siren beckoning the hapless sailor (Have I mentioned I write poetry?), enticing us with adverts for burgers, chicken, and steak.  We must fight these tactics with creative vegetarian dishes so satisfying, we won’t miss the meat.

Nutty “Meat”loaf is another weapon in my arsenal of recipes  to combat the proverbial fall off the vegetarian wagon. (How did I veer from poetry to battle so quickly?) But be warned: this is NOT one of those 30 minute recipes – the prep can take as long as 30 minutes (unless your rice is already cooked), cooking time is 60 minutes, and then it needs to set for about 15 minutes.  But I beg you – don’t be daunted! This recipe is worth the time. And, if you like, you can prepare the ingredients ahead of time and set the ‘delay bake’ button on your oven (if you have this feature). Just make sure you’re home when the loaf is done so it doesn’t overbake.

NOTE:  I highly recommend using Trader Joe’s Brown Rice Medley (and, no, they’re not paying me to say that) for the rice. I’ve used other rices before in this recipe, but I love the taste and texture of this blend best. It’s a combination of long grain brown rice, black barley, and daikon radish seeds.

ADDITIONAL NOTE: This Nutty “Meat”loaf makes crazy good sandwiches the next day. (Crazy. Nutty. Get it?)

NUTTY “MEAT”LOAF 

  • 1/3 cup (53g) uncooked rice
  • 1 cup (250ml) water
  • ¾ cup (65g) walnuts, finely chopped, lightly toasted
  • ¼ cup (40g) cashews, finely chopped, lightly toasted
  • 1 cup (112g) onion, chopped
  • 1 T butter
  • ½ tsp salt
  • 1 clove garlic, pressed
  • 2 common mushrooms, finely chopped
  • 3 oz  fresh shittake mushrooms, finely chopped (or ½ oz dried – make sure you soak them in water)
  • ¼ tsp dried thyme
  • ½ tsp dried marjoram
  • ¼ tsp dried sage
  • 2 eggs
  • 118g (½ cup) cottage cheese (I use lowfat)
  • 170g (6 oz) medium cheddar cheese, shredded (or use whatever cheese you have on hand)

Cook the rice in water. Cool. This can be done ahead of time.

Sauté onions in the butter for a few minutes. Add in the salt, garlic, mushrooms, thyme, marjoram, and sage. Continue sautéing until liquid is released from the mushrooms and then is reduced but not gone. Cool. (This can be done ahead of time, too.)

In a large mixing bowl beat the eggs.  Add in the rice, cottage cheese, nuts, onions, and cheese. MAKE SURE YOU’VE INCLUDED ALL THE INGREDIENTS (I have a tendency to forget something, then have to remix everything.) Pour into an oiled loaf pan. An 8″ square pan works, too.

Bake at 375º Fahrenheit for 1 hour. Let set for at least 15 minutes.

When Is Dessert Not A Dessert? When It’s A Yogurt Shake!


Yogurt Shake

Yogurt Shake

Hold onto your hats, Ladies and Gents: I have a recipe so yummy you’ll swear it’s a dessert!!!

(Insert trumpet fanfare.)

YOGURT SHAKES!!!!

(Insert cheers and applause.)

It all started years ago when my children were very young. They were adorable. They were smart…And (big sigh!) they were picky eaters.

My challenge was to find healthy foods that they would actually eat.  I was bound and determined not fall prey to Tired Mom Syndrome.  Never heard of it?  That’s because I just made up the term.  But the symptoms of TMS are well known: exhaustion due to chronic chauffeuring, cleaning, cooking, refereeing, helping with homework, and on and on.  So when mealtime comes around, all we want is for them to eat.

Tired Moms often go for the easy fix: fish sticks, tater tots, Happy Meals, boxed mac ‘n cheese, and peanut butter in which sugar, oil, and salt have been added.  These foods (and I use the term loosely) taste great – which is all they’re meant to do. A cycle develops wherein the kids have gotten used to preservative filled, sugar laden, nutritionless (I made that up, too) meals and refuse to eat the healthy foods over which mom labors. It becomes a math equation: hungry child = cranky child = cranky adults = junk food = happy child.

So I looked for ways to apply the substitution principle (See what I’m doing?  I’m keeping the math metaphor going!) by replacing “junk food” with “healthy food”.  NOT AN EASY TASK!

One food I desperately wanted my children to eat was yogurt. My Armenian father made it when I was growing up, and I carried on the tradition – although I make mine in a thermos as opposed to the oven, where he did. Click on YOGURT MADE IN A THERMOS to watch my video. Yogurt is a multifaceted superfood. Studies have shown that people who regularly eat yogurt live longer and healthier.

However, unlike store bought,  homemade yogurt has a bite to it, so it takes some getting used to. This is something for which kids have no patience. Sadly, touting the health benefits of foods falls on deaf little ears, followed by “I wanna go to McDonalds!”

So I started making yogurt fruit smoothies as our evening beverage BUT, since perception is everything, I called them Yogurt SHAKES. My kids were quite familiar with the word “shake” – associating it with other words such as “ice cream”, “dessert”, and “delicious”. No need to bother them with facts. (We moms sometimes have to be a little sneaky…. but the kids will thank us later.)  Continuing with my crafty ways, I did make a point to leave the word “yogurt” – I wanted them to have positive thoughts about it.

One of the things I love about Yogurt Shakes is that they’re an easy way to fulfill those pesky daily fruit requirements. If you’re adventurous, you can even throw in spinach or kale. (I’m not that brave. I live by the motto: if it ain’t broke, don’t fix it!) Use any fruit you like but, unless you have an aversion or allergy, a banana is a must. There’s something magical about the interaction between the ice cubes and a banana that produces a creamy shake instead of one filled with annoying ice chunks.

Yogurt Shakes are made in a blender. If you have one of those jet-engine blenders (like I do), you’ll have no problem getting a creamy chunk-free shake. But if you have a cheapy one (I have one of those, too), you might want to invest in an inexpensive ice crusher….or a hammer and a sturdy plastic bag, and break up the ice cubes before putting them in the blender. Even with a banana, the motor just isn’t powerful enough to completely purée  the ice. If you don’t mind the odd ice chunk, don’t worry about it.

Although I occasionally change up the fruit, this is my go-to Yogurt Shake recipe.  I always add a packet per person of Emergen C – I’ve found it not only enhances the flavor, but it’s another way to add vitamins into our diets.

YOGURT SHAKE – for 1 person

  • 1 large spoonful nonfat plain yogurt
  • 4 strawberries
  • 1 large handful blueberries
  • 1 banana
  • splash pomegranite juice
  • splash orange juice
  • optional: 1 packet pomegranite-cranberry Emergen C
  • about 6 ice cubes – more ice cubes will yield a thicker shake

Mix everything in the blender on medium/high.  Serve immediately.

Yogurt Shakes are easy, nonfat, frosty, creamy, and nutritious. But more importantly, they’re something you and your children can enjoy guilt free.  How often does THAT happen?!


The Evolution Of My “Chicken” Crescent Sandwiches

"Chicken" Crescent Sandwiches
“Chicken” Crescent Sandwiches

I’m one of those people always trying to build a better mousetrap.  (Perhaps that’s not the best metaphor for a vegetarian cooking blog!) No matter how tasty a dish is, I ask myself (and, yes, I do this audibly), ” What would make this recipe even better?”

Years ago, while still a carnivore, I made chicken sandwiches encased in crescent rolls (called Savory Crescent Chicken Squares), using a recipe I found in one of those ladies club cookbooks. (By the way, that genre of cookbook generally has the BEST recipes!) But when I said ‘goodbye’ to meat, I also had to bid a fond farewell to some fabulous recipes, including those tasty chicken sandwiches.

Then I discovered (drum roll, please):  IMITATION MEATS!!! I revisited my old carnivore recipes, adapting them to my vegetarian lifestyle.

Obviously, the first thing to change in the chicken sandwich recipe is Chicken to “Chicken”. Do you see the quotation marks?  That’s my special code for fake (aka, imitation …or faux – for you posh people)  Newbies often cringe, asking, ‘What’s in it?’  (Oddly enough, these same people will eat salami, hot dogs, and sausage.) Well, there are MANY fake meat products, so there’s no quick answer – you’ll just have to check the ingredients list on the packages.  But I assure you, there isn’t anything inedible or weird.

That being said, imitation meats are a processed food.  Like any processed food, I don’t believe they should be eaten everyday. I permit myself two meals per week in which some sort of fake meat is used.  For me, these foods serve two functions.  One, they’ve vastly expanded my vegetarian recipe repertoire. And, two, they talk me off the ledge when I’m tempted by a KFC or Burger King commercial.

The original chicken sandwich recipe used real chicken, canned crescent rolls, store-bought cream cheese, onions, diced pimento, and was topped with crushed croutons.  I put on my thinking cap, rolled up my sleeves, and began the arduous process of refining that mousetrap.

Being the compulsive person I am (some might think that’s an understatement) I decided to make the crescent rolls from scratch. Then I figured I may as well make the cream cheese, too.  Yes, this added to the amount of work, but I like to know what’s in my food. Of course, you can purchase said items, if you like, but I encourage you to give them a try.

The next thing to tackle was modifying the filling to make a more flavorful sandwich – it was a little bland for my taste. I felt it needed something sweet, so I added pineapple. Dried pineapple worked best – fresh made the sandwich too soggy.  Then the diced pimentos were increased to add more color and seasoning. A little crunch was needed, so I threw in chopped celery and toasted slivered almonds. The last task was to swap the crushed crouton topping for shredded asiago cheese.

By the time I was done revamping the original chicken sandwich, the only thing remaining of the recipe was the idea: a chicken sandwich encased in a crescent roll.

A big THANK YOU to my family for not complaining about the numerous meals of  “Chicken” Crescent Sandwiches as my recipe evolved. There was a lot of trial and error.

Here’s a picture of my preferred fake chicken for this recipe:

It’s made by Worthington, comes frozen, weighs 4 pounds, and appears pricey (about $26.00) until you realize that it cuts up to 18 cups cubed. When I haul (and I mean haul) these rolls home, I let them thaw just enough so I can cut them into meal sized pieces. Then I refreeze them.

Just as beauty is in the eye of the beholder, taste is in the mouth of the diner. You may not like the brand I suggest.  That’s fine. My feelings won’t be hurt if you use a different product. As always, I encourage you to tweak recipes to suit your own preference.

“CHICKEN” CRESCENT SANDWICHES – makes 24 small sandwiches

Crescent Rolls

  • ½ cup water
  • ½ cup milk (I used nonfat)
  • 2¼ tsp dry active yeast (1 packet)
  • ½ cup (1 stick) butter, room temperature
  • ¼ cup sugar
  • ½ tsp salt
  • 1 egg
  • 3½-4 cups all purpose flour

Heat the milk and water to 104ºF. Stir in the yeast and set aside to proof (about 5 minutes).

Into your food processor put 3 cups of the flour, the butter, sugar, salt, and egg.  When the yeast is proofed, turn on food processor and slowly pour in the yeast liquid through the pour spout. Add more flour in small increments until the dough forms a ball. Let the machine run for 45 seconds to knead. Remove the dough and press into a greased bowl. Flip the dough and press down again. Cover and let rise 1 hour.

Filling

  • 2½ cups “chicken”, cubed
  • 4 oz jar diced pimentos
  • ½ tsp dried dill
  • ½ tsp salt
  • 1 tsp dried minced onion
  • ¼ tsp garlic salt
  • 2/3 cup celery, chopped
  • ½ cup slivered almonds, toasted
  • 4 dehydrated pineapple rings, chopped
  • 1 cup cream cheese (to make it click on How To Make Cream Cheese)

Mix all filling ingredients together.

NOTE: Dried cranberries would make a yummy substitution or addition to the pineapple rings.

To assemble sandwiches:

Cut crescent roll dough into 24 pieces. One by one, roll each piece into a circle approximately 4″ in diameter. Place ½ cup of filling on one side of circle. Run a wet finger along the rim of the dough, fold the dough in half to encase filling, then press the edges together with a fork. Place on a greased cookie sheet.

Preheat oven to 350º Fahrenheit.

Once they’re all assembled, brush the tops with milk and sprinkle on asiago cheese.

Bake at 350º F for 23 minutes, until golden brown.


CHOCOLATE RICE CEREAL BARS – What’s Life Without A Little Treat?!

choc-rice-krispies-textI know it can be a little confusing.  One minute I’m touting soups for lunch to help keep the weight down, the next I’m tempting you with chocolate desserts.  But, hear me out!

No one says you can’t have the fattening foods you love! You can. I, for one, HAVE to have dessert everyday. If I don’t, I feel deprived and it’s all I can think about. Then, in the vain attempt to fill the void an absent chocolate chip cookie leaves, I start eating pretzel sticks – lots of them. Or raisins, followed by pretzel sticks. I think you see where I’m going. I end up eating more calories trying  to avoid eating calories.

The key, of course, is portion control. We dessert lovers have to find a method to outsmart our sneaky ways. What sneaky ways, you ask? Let me paint a picture:  You make a pan of brownies. You decide to store them in the baking pan so you don’t have to dirty a Tupperware. And you also decide not to pre-slice them so everyone can cut out the size brownie they want. You cut yourself a piece that’s about 1½” square – a reasonable size, right? But, gee – another ½” would just hit the spot. Oh, no! That last slice was not quite straight – let’s just fix that up (brownies should be at 90º angles, shouldn’t they?). But now the rest of the row is too big for one person, but not enough for two – might as well fix that, too. Whoops – you broke off a piece when you were removing that last bit. No one’s going to want that. Pretty soon you’ve rationalized eating the entire row.

Been there, done that!

I’ve been around this earth long enough to get to know myself. As stated previously, I need my dessert everyday. I just do.  BUT, I’m also very vain and have always prided myself on my slim physique. It never came easy, but I always managed to keep my weight stable. Unfortunately, as time went on it got harder and harder.  Before I knew it I was wearing nearly 10 extra pounds. That’s 2 sacks of flour! Something needed to be done.

Besides being vain and needing dessert everyday, I’m also basically lazy. So instead of cupcakes I’d make a layer cake, instead of muffins I’d make a loaf, instead of individual pudding cups I’d make a large bowl, and so on. The problem was I always knew there was more when I took my serving. If I cut a ½” slice of cake, it was kind of flimsy, and I felt like I was short-changing myself. So I’d go back for a wee bit more. BUT, if I have a cupcake I feel complete – even though if you cut a cupcake in half and place one half on top of the other it becomes a VERY thin slice of cake.  Crazy! The mind is a funny thing. I guess when I grab a cupcake (or pudding cup, or pre-cut cookie bar) I know this is my dessert. But when face to face with a whole dessert, I can take as much as I want. And that’s where will power comes into play…..or doesn’t. Sigh!

So now I either make individual portions (such as cupcakes or pudding cups), or I pre-cut the dessert and remove them to a storage container. I’ve found if I leave it in the baking pan – even if I pre-cut – I’m tempted to cut off a little more.

This brings me to the No Bake Chocolate Rice Cereal Bars pictured above. The last time I made them I left them in the pan and didn’t pre-slice. I think I polished them off in 3 days BY MYSELF. I made my latest batch 6 days ago. There are still 2 left and I’ve had my husband and son to help me  eat them. So, ladies and gentlemen – PORTION CONTROL! It works for me.

CHOCOLATE RICE CEREAL BARS

  • 2 cups milk chocolate chips (I used Nestle’s)
  • ½ cup (1 stick) butter
  • ½ cup light corn syrup
  • 1 cup powdered sugar
  • 2 tsp vanilla
  • 4 cups rice cereal (I used Rice Krispies)

Melt together the chocolate chips, butter, and corn syrup in a large pot over a low/medium flame.  Stir often so it doesn’t burn. Add in the powdered sugar and vanilla and mix until blended. Turn off burner. Pour in the rice cereal and stir gently stir (you don’t want to crush them) until well coated.

Pour into any size pan you want, depending on how thick you want you bars to be.  If you want to make individual cookies, you can drop blobs onto waxed paper.  Either way, put them in the refrigerator to set.  You may want to store them in the fridge, depending on how hot it is in your house.

NOTE:  I line my pan with waxed paper – that way I can remove the entire slab and make nice clean cuts with a long knife. If you have trouble removing the bar with the waxed paper,  hold the pan WEARING OVEN MITTS and quickly run it over the stove flame to slightly melt the bottom. It’ll come right out.

Following the theme of this blogpost, cut the bars into whatever size pieces you want and store them in a covered container.


CREAMY SWEET POTATO SOUP – Without The Cream!

CREAMY SWEET POTATO SOUP

CREAMY SWEET POTATO SOUP

Cream soup without the cream? What?  How can this be?

Oh – it be!  Thanks to your handy-dandy blender.

Wait – you say you don’t have a blender?!  As many of you know, I don’t like to throw money away on frivolous things (cheap!). There are many kitchen gadgets that are one trick ponies – you can only use them for one thing (such as a bread maker). I’m not a fan.  BUT, I do believe in stocking your kitchen with tools that will ease the task of cooking, thus making it more likely you WILL actually cook. Items such as a food processor, toaster oven, a wide assortment of pots, and a BLENDER!

Please note, that I put food processor AND blender on the list.  That’s because they are both useful in different ways. The food processor is great for shredding carrots & cheese, chopping tomatoes and onions, kneading dough, finely grinding nuts. The blender uses a funnel action and is great for puréeing soups, pesto, and yogurt shakes. By the way, you can find these items at thrift shops if you’re on a tight budget.

A couple of weeks ago I wrote a blog about eating soup for lunch (click on Slim Down With Vegetable Soup) to help lose those extra pounds one accumulates during the winter months and (let’s be honest) just plain life. I based the idea on that old Campbell’s Soup commercial where the girl wanted to fit into her itsy bitsy bikini so she replaced her calorie laden lunch with soup.

I decided to add another soup to the list:  Creamy Sweet Potato Soup. Which brings us back to the blender. (See how I did that?  I returned us seamlessly to the beginning of the blog.) Did you know if you purée soup in a blender it gets creamy, even if there’s no cream in it? It makes you feel like you’re indulging in something decadent when, in reality, it’s low in calories. Plus, soup fills you up pretty quickly which satisfies you long enough to get you away from the table.

The last time I was in London, I had a wonderful Sweet Potato Soup made with coconut milk and coriander. It was a lovely blend of flavors. I decided to try to duplicate the essence while ditching a lot of the calories.  Also, to make sure it met vegetarian criteria (this is a vegetarian blog, as you know), I used vegetable stock in lieu of the suspected chicken broth.

So I started throwing ingredients together until I came up with a taste I was happy with. (OR, ‘of which I was happy’, for you English majors). A little tip for those of you who like to either create your own recipes or just tweak other peoples’:  write down the ingredients and the amounts you use.  Then make notes about the taste and possible suggestions for future attempts.  You don’t have to write a novel – just a quick, ‘try oregano instead of basil next time’. I’m a firm believer in not reinventing the wheel. When you find something that works (or doesn’t) keep track.  That way you’ll save yourself time in the future AND be able to make it again. No matter how good your memory is, over time one forgets minutia such as ‘was it 1 cup or 1½?’ or ‘did I use garlic SALT or POWDER?’.  Once you write it down, it frees your mind and you don’t have to worry about it again.

As far as the coconut milk goes, you can use either canned or powdered.  Canned is more accessible in my town, but I prefer the powdered so I just order it online. If you use the canned, you’ll need to decrease the amount of vegetable stock since there’s water in it already. By using the powdered, I can play around with how much coconut goes in the soup. Also, I can half the recipe and don’t have to worry about what to do with the unused half. Plus the powder takes up less cupboard space. But, at the end of the day, it doesn’t really matter as far as taste is concerned which you choose.

SWEET POTATO SOUP – makes 10 cups

  • 9 cups sweet potatoes or yams, chopped
  • 1 large onion, coarsely chopped
  • 2 T olive oil
  • 1½ tsp dried cumin
  • 1½ tsp dried coriander
  • 1/3 tsp dried ginger
  • 1/3 cup coconut milk powder (or 1  14 oz can)
  • 4 cups vegetable stock (or 2¼ cups if using canned coconut milk)
  • 1 tsp salt
  • few twists of pepper
  • 1 bay leaf

Heat the olive oil in a very large stockpot and sauté the onions about 5 minutes – until they begin to brown. Add in the cumin, coriander, ginger, bay leaf, salt, and pepper. Stir for another minute to bring out the flavors. Pour in the sweet potatoes, coconut powder, and vegetable stock. If you’d like to make your own stock (which I ALWAYS do), you can find my recipe by clicking on BACK TO BASIC: VEGETABLE STOCK. Bring to a boil, then cover and simmer until the sweet potatoes are tender – about 20-30 minutes.

Let the soup cool down a bit, REMOVE THE BAY LEAF (notice the caps – this is important!), then pour into your blender (in batches, if need be) and purée. Serve either hot or cold.

NOTE:  Toasted pumpkin seeds are a tasty topping – and they’re visually appealing.

If you’re in a hurry (and who isn’t?!), you can make this soup even faster by skipping the sauteing onions part and just throwing everything into the stockpot. I’ve done this many times, and the soup is still excellent.


Spicy Walnuts – Score A Twofer!


Spicy Nuts

Spicy Walnuts

Who doesn’t love a bargain?!  Twofer, BOGO (buy one, get one free) – such a deal.

I make no secret of the fact that I am quite fond of making my money stretch (yes, I’m cheap!).  That’s one of the reasons I like to make things from scratch.  Every time you buy a convenience food (shredded cheese, bagged lettuce, jarred spaghetti sauce), there’s a price to pay.

Along this same line, I’m ecstatic (Yes, ecstatic – I’m an actress. I’m overly dramatic!) when a food I make can be used more than once – and I’m not talking leftovers. I mean you make a dish, change it up a bit, and voilà – a brand new dish.

I would now like to introduce to you my Spicy Walnuts recipe. When you use walnut halves you have a snack food to set out in a bowl at parties or to chomp on watching TV.  When you chop the halves into 4 or 5 pieces, you have a tasty add-in to salads and casseroles.

As the name implies (SPICY Walnuts), they have a kick to them.  If it’s too much for you, ease off on the cayenne pepper. Also, since this is a vegetarian blog, I’m recommending vegetarian Worcestershire sauce – there are several brands.  Spicy Walnuts are easy to make, but they do take about 20 minutes to bake.

NOTE:  You aren’t obligated to use walnuts.  Try almonds, peanuts, cashews – whatever you fancy!

For you visual learners (or those just curious to see me in action), click on SPICY WALNUTS and I’ll show you how to make them.

SPICY WALNUTS

  • ¾ pound walnuts, halves or broken into large pieces (break them by hand rather than chopping to prevent unusable bits)
  • 3 T butter
  • 3 T vegetarian Worcestershire sauce
  • ¾ tsp salt
  • ½ tsp ground cinnamon
  • ¼ tsp garlic powder
  • ¼ tsp cayenne pepper (also called red pepper spice)
  • about 4 drops Tabasco sauce (shake bottle well)

Heat oven to 350º Fahrenheit.

In skillet or saucepan, melt butter.  Add in Worcestershire sauce, salt, cinnamon, garlic powder, cayenne, and Tabasco.  Stir over low heat to blend. Pour in walnuts and coat with sauce. Spread walnuts onto a jelly roll pan (a cookie sheet with 4 sides).  If you use a regular cookie sheet, you’re more than likely going to have to retrieve fallen nuts from the oven bottom.  Not fun!!! (Believe me!)

It takes a total of 16-25 minutes for the walnuts to brown, stirring every 5 minutes.  Please heed this advice:  set 2 timers!  One for the total of 20 minutes, and one to set every 5 minutes.  Five minutes is just enough time to find one ‘quick’ thing to do. Either this thing ends up taking longer than expected, OR we find another ‘quick’ thing to do and suddenly it’s 10 minutes later. I think you get my point. It’s important to stir them every 5 minutes so they brown evenly.

It’s worth noting, I use a dark jelly roll pan.  Dark pans cook things faster, so my Spicy Walnuts took 17 minutes.  That’s why I put a wide cooking range (16-25 minutes).  The cooking time will vary depending on your oven and the type of baking pan you use. You want the nuts browned and crispy, but not blackened.

WARNING:  These Spicy Walnuts are very addictive.  Like the old Lays Potato Chip advert – I bet you can’t eat just one!


Slim Down With Vegetable Soup

Vegetable Soup

Vegetable Soup

For those of us in the Northern Hemisphere, the sun is making its clothes-shedding presence known. Spring is melting into summer and bulky sweaters are being replaced by sleeveless tops.  Goodbye bulge hiding parkas; hello bathing suits.

It’s about this time of the year we start to regret not keeping up with that annual New Year’s resolution we make every January 1st. You know the one – to get into better shape by eating healthier and exercising more. Oh, the best laid plans.

Well, it’s never too late!

Years ago there was a Campbell’s Soup commercial showing a young woman whose goal in life was to fit into her itsy bitsy teeny weeny yellow polka dot bikini. She devised a plan to eat Campbell’s Soup for lunch instead of her presumably usual calorie laden meal.  She also had said bikini hanging on her wall for inspiration.  I’ve never forgotten that commercial – not only because they had that fun yellow polka dot bikini song playing throughout, but because the premise made sense.

It’s been proven that it takes about 20 minutes for the brain to figure out that the stomach is full. This is why diet experts always tell us to eat slowly. What’s so great about soup is that because of its high water content it fills us up quickly. Of course, because of it’s high water content, we get hungry again sooner.  But, at least, the soup got us away from the table unscathed.  With a little planning we can have a low calorie snack (such as another bowl of soup, a banana, or some yogurt) mid-afternoon to tide us over until dinner.

Of course, if you have a soup made with cream and/or butter, you’re defeating the purpose. I’ve been making a vegetable soup that’s super easy (just throw everything into the pot) and varies depending on which veggies I have on hand or feel like buying.  Sometimes, when I’m in a decadent mood, I even sprinkle on a little shredded cheese – just for the protein, of course. It’s also a great way to get those daily servings of vegetables – especially for the kids.  For some reason they seem to eat them in soup.

VEGETABLE SOUP – makes about 7 cups

  • 1  28 oz can whole peeled tomatoes, remove stem ends and chop
  • 1½ cups vegetable stock  (for recipe, click on VEGETABLE STOCK)
  • 1 cup onions, chopped
  • 1 cup carrots, sliced
  • 1 zucchini, halved and sliced
  • 3 mushrooms, coarsely chopped
  • 1 stalk celery, diced
  • 3 small white potatoes, chopped
  • ½ tsp dried oregano
  • ½ tsp dried thyme
  • 1 tsp salt
  • optional suggestions:  spinach, quinoa, barley, green beans, cauliflower, kale

Clean and prepare all veggies.  Throw everything into a large pot and bring to a boil.  Cover and turn down heat. Simmer until vegetables are cooked – I always judge by the carrots. EASY!!!

The nice thing about making your own soup (sorry Campbell’s) is that it’s so much cheaper and you can tailor it to suit your taste.  Also it’s a great way to use up those leftover veggies that you just can’t bring yourself to throw out.

Apologies to those of you who now have the itsy bitsy bikini song running in your head!


Think Outside The Box Spaghetti

Spaghetti with 'Meat' Sauce

Spaghetti with ‘Meat’ Sauce

I’ve mentioned before that my mother was NOT the most adventurous cook. It wasn’t that she was a bad cook – she was just a nervous cook.  Afraid to try new things.  Plus, she was a product of the modern world of boxed, canned, and frozen foods. She bought into the idea of why take the time and trouble to make something yourself when a large corporation (whose only concern was to make a profit) could do the work for you.

We kids didn’t mind.  After all, we could pick out specifically what frozen dinner we each wanted – some of them even had a little dessert! The only fresh vegetable we ever had was corn on the cob – when it was in season. The rest of the time we had canned green beans or peas. I’d never even heard of broccoli or cauliflower before I left home.

Which brings me to my spaghetti story.

As probably most of you know, when you have to start paying your own bills you really take notice of how much things cost. Fortunately, I was born with a dominant frugal gene (yeah- cheap, okay?). I figured out pretty quickly I was going to have to learn how to cook.

One thing my mother made was spaghetti. She used Kraft Spaghetti, which came in a box, and she added ground beef. It was good, and all I knew. So I decided to make spaghetti and bought the box of Kraft, the ground beef, and made my spaghetti. It was good – again, it was all I knew.

Then one day in the supermarket I happened to notice plastic bags full of dried spaghetti noodles.  What the heck was this? Why are these spaghetti noodles all by themselves and not packaged in a box with a can of sauce?, I wondered.  (You’ll be happy to know this was only said in my head…THAT time, anyway.) It took awhile, but it eventually dawned on me:  I could make the sauce FROM SCRATCH and buy as many noodles as I wanted. (It took many more years to figure out I could actually make the pasta, too.) It honestly never occurred to me people made spaghetti sauce.

Once enlightened, I tried various spaghetti sauces through the years. When I became a vegetarian, the problem became that without the meat, it was really just a marinara sauce.  Having grown up with a nice hefty meaty sauce, plain old marinara sauce just seemed kind of empty. It was tough being a vegetarian in the early days.

Fast forward to my discovery of fake meats (‘faux’ to you posh people), which greatly expanded my vegetarian recipe repertoire.  I’d already started using Loma Linda’s Redi-Burger in my ‘Beef’ Salsa Burritos (remember, quote marks denotes FAKE) and my Navajo Tacos. But it didn’t seem like a good choice for my spaghetti sauce.

I guess good things come to those who wait because, low and behold, in the frozen food section I found Morningstar’s Griller’s Recipe Crumbles.  They come in a pouch and are like ground beef that’s already stir fried (minus the fat).  So it’s a snap to use – no frying, no wondering what to do with all the grease.  Just open the pouch and pour out the ‘ground beef’.

Thanks to these Crumbles, my family can now enjoy a delicious Spaghetti With ‘Meat’ Sauce. I’ve come up with a recipe in which I  simply throw everything in the stockpot and cook for an hour.  As always, when I make something that freezes well, I make a vat of it and freeze it in meal sized portions.  No point in cleaning the pot and utensils more than once.  Making a multiple batch is not that much more work.  Once I’m done, I have enough spaghetti sauce for months!

I’ll give you the recipe for both one batch and six batches (that’s what I make).  I would suggest you make the one batch version first, just to make sure you like the recipe.  If you’d like to see my video of me making this dish, click on: Spaghetti With ‘Meat’ Sauce.

NOTE:  If you want to save about 20 minutes, and are NOT obsessive and paranoid like I am, then buy the canned tomatoes diced instead of whole.  I buy the whole so I can inspect each one and cut off any imperfections and the stem end. Also, you can buy garlic already minced in a jar. It took me 35 minutes to put all the ingredients in the stockpot. You can see where most of the time was spent.

ADDITIONAL NOTE:  It doesn’t matter what kind of red wine you choose.  Just make sure it’s a wine you would actually drink because the flavor will come through.  I usually use Black Mountain cabernet sauvignon – it’s reasonably priced and has a nice taste.

WILL SHE EVER STOP TALKING ADDITIONAL NOTE:  You can either buy vegetable stock OR do what I do and make your own.  Click on: Back To Basics: Vegetable Stock for my recipe.

SPAGHETTI WITH ‘MEAT’ SAUCE 

1 BATCH VERSION – makes 3 cups

  • 1 pouch (12 oz / 340 grams) Morningstar Griller’s Recipe Crumbles
  • 1/3 cup (80g) extra virgin olive oil
  • ½ cup (125 ml) vegetable stock
  • 1 clove garlic, pressed
  • 1 tsp each of dried oregano, dried basil, and salt
  • 1 bay leaf
  • ½ cup (122g) tomato paste
  • 2 cups (528 g) canned whole tomatoes
  • ½ cup (125 ml) red wine
  • 1/2 tsp red pepper flakes

6 BATCH VERSION – makes 18 cups

  • 6 pouches (each pouch is 12 oz / 340 grams) Morningstar Griller’s Recipe Crumbles
  • 2 cups (475 ml) extra virgin olive oil
  • 3 cups (720 ml) vegetable stock
  • 2 T minced garlic
  • 2 T each of dried oregano, dried basil, and salt
  • 6 bay leaves
  • 4   6 oz (170g) cans tomato paste
  • 4   28 oz (793g) cans whole peeled tomatoes, chopped
  • 1 bottle red wine (YES – a whole bottle!)
  • 1 T red pepper flakes

Throw everything in a stockpot and bring to a boil. Lower flame enough so the sauce continues simmering. Cook for 1 hour, stirring often – you don’t want the bottom to burn. Done!!!

IMPORTANT NOTE (this is the last note, I promise):  Make sure you remove the bay leaves before serving the ‘Meat’ Sauce.  Actually, I kind of enjoy the fishing expedition I go on trying to find my 6 leaves. (Shows you how exciting my life is!)  The last leaf is always the hardest to find.

Ooo La La! Les Baguettes: Tres Simple!!!

French Bread

French Bread

The smell of freshly baked bread is an attention grabber like no other. It’s universal.  At first whiff, people the world over fall into a Zen-like state…. followed immediately by a growling tummy.

Basking in that intoxicating aroma, we imagine the warmth as we break open a piping hot baguette, slowly pulling it apart, and bringing it up to our eagerly awaiting mouth.  We can taste the melting butter as it oozes into the nooks and crannies.  The crunchy outside, the soft insides. They call it the staff of life for a reason.

And, of course, it looks pretty cool when it’s sticking out of your shopping bag.  Note my photo above.

I have to admit, when my kids were growing up, I MAY have gone a little overboard.  Since I was a stay-at-home mom I decided to make as much from scratch as I could. Including bread. Including yogurt. Including pasta. I thought if they were indoctrinated with homemade everything, the taste of preservatives, sugar, and salt laden foods (like store bought cookies, box mac and cheese, and sugary cereals) might not appeal to them.

Yeah, well – it seemed like a good idea.  Unfortunately, I didn’t anticipate the pull of peer pressure.  Not to mention that sugary/salty foods just plain taste good.  After all, that’s what they’re meant to do to keep people eating them.

It was on the job training for me – my mother was not exactly an adventurous cook.  Lots of roasts, burgers, frozen dinners.  She had no culinary words of wisdom to impart to me, her only daughter. So I read cookbooks and just jumped in. There were surprisingly few failures – cooking really isn’t as difficult as one might think – if you follow the instructions!

The first bread I tried making was whole wheat. What with having kids now, I knew that would be the most important since sandwich making was going to be a daily activity for years to come.  It was a bit tricky and I had to constantly revise my recipe.  The problem was, the healthier the bread, the more it tended to fall apart.  Not a good thing! It got better through the years, but it was never like the OroWheat bread I, admittedly, buy now.  In my defense, I hardly eat sandwiches anymore so I keep a loaf frozen….just in case.

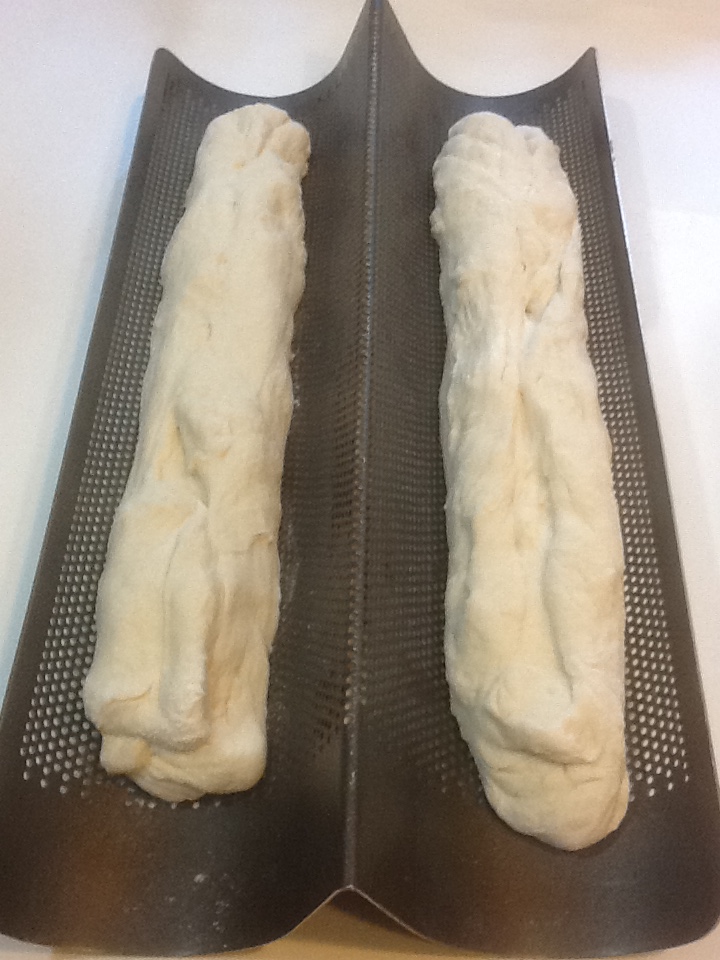
Next, I tried my hand at making French bread.  Ah, ha!  (Or should I say – Voilà!) This was a success from the start. It’s quite easy to make and there are very few ingredients.  I did allow myself the luxury of buying a French bread baking pan.  You can see it in the photo below.  It’s a perforated metal, curved double loaf pan.  The curved sides keep the bread in the traditional round shape, and the perforated metal allows for air circulation. It’s not a necessity, though.  Your loaves will still come out delicious just using a cookie sheet.

Bread dough rising in a perforated French bread pan

Bread dough rising in a perforated French bread pan

NOTE:  I actually bought two bread pans. Back in the days when I was baking lots of French bread, I would make four loaves at once, then freeze what we didn’t eat.  While freshly baked baguettes are best (unintentional alliteration), they still freeze well. You know me – use that freezer!  If you’re going to the trouble of cooking something, make multiple batches and freeze the extras so you can have homemade food even on days you can’t/don’t want to cook AND you only have to wash the cookware once.

YES, French bread is a yeast dough. NO, it’s not difficult.  I promise!!! And, YES, it takes time because the dough has to rise.

BAGUETTE – makes 2 loaves

  • 2¼ tsp dry active yeast (or 1 packet)
  • 1½ cups water
  • 1 T sugar
  • 2 tsp salt
  • 3½ – 4 cups all-purpose flour
  • ½ tsp cornstarch
  • ¼ cup water (separate from water mentioned above)

The first thing to do is to activate the yeast.  To do this, simply heat the 1½ cups of water to about 100º Fahrenheit (hot tap water will do) and stir in the yeast.  Set it aside to proof – it will begin to foam-up.

Into your food processor put 3 cups of the flour (we’ll add the rest as needed), the sugar, and the salt.  Attach the lid. When the yeast is proofed (it takes about 5 minutes and will be foamy on top), turn on the processor and slowly pour in the yeast water through the feed tube.  Once all the water is in, continue to let the machine run for 30 seconds or so to incorporate the flour.

More than likely you’ll need to add more flour.  What you want is the dough to form a ball. With 3 cups of flour, it’s probably still all over the workbowl.  Add in ½ cup more flour and run machine again.  If it still doesn’t form a ball on it’s own, add more flour 1 tablespoon at a time until it does. Give it some time to run when you add in more flour – it takes a few seconds for the new flour to incorporate.

When the dough ball forms, continue to run the machine for 45 seconds to knead it.

NOTE:  If you don’t have a food processor, you’ll have to do all the above steps in a bowl and knead for 10 minutes by hand.  But, honestly, think about buying  one.  I use mine nearly everyday!  It’s a great time saver.  Plus, I HATE sticky dough on my hands. Letting the food processor run for 45 seconds is so much better than kneading dough by hand for 10 minutes!!!

Take the dough ball out of the food processor and smoosh it down into a greased bowl. Then pick up dough ball, flip it, and smoosh down the other side into the bowl.  This greases the whole ball.  Cover with a tea towel and let rise for about 1 hour.

Punch down the dough. If you’ve never heard this term before, you may be thinking I’ve gone a little crazy. Punching down dough simply means taking your fist and punching the risen dough to deflate it. This is my favorite part of bread making. But mind if you’re having a bad day – DON’T punch the tar out of the dough. (He’s not the one who wouldn’t let you in when you forgot you wanted to turn left and were in the wrong lane.) Just a quick love tap will do. Then divide the dough in half.  Take each half and stretch it to the length of baguette you want. Obviously, the longer the bread, the thinner the loaf.  Whichever way you like it is fine.

Lay each stretched out loaf on a groove of your French bread pan or a cookie sheet that been greased and sprinkled with cornmeal. Cover the loaves and let rise for 30 minutes.

In a small saucepan, heat together the ¼ cup water and cornstarch over a low/medium heat.  Stir constantly until the liquid becomes less murky.  This will happen at the boiling point.  Remove from heat.

Preheat oven to 425º.

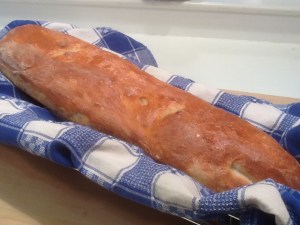
When dough has risen and oven is preheated, make 2 or 3 diagonal slashes in the raw loaves with a sharp knife or pair of scissors. Brush with cornstarch glaze and bake for 10 minutes.  Brush with glaze again, and continue to bake an additional 15 minutes.  Remove from pan and serve!

Added bonus:  The aroma of freshly baked bread will linger in your house for awhile, reminding your family just how hard you work for them!