
 Is it possible to have too much chocolate cake? I ask this because in the last 2 weeks I’ve baked 4 chocolate bundt cakes.
As many of you know, I’m a from-scratch baker. So I’ve been on a quest to adapt the Chocolate Bundt Cake my mother made from my youth. This was a recipe floating around back then, calling for, among other ingredients, boxed chocolate cake mix and boxed chocolate pudding mix.
The original cake was known for its moistness. And therein lay the problem. I found America’s Test Kitchen recipe, which required butter for the fat. While it tasted good, the crumb was very fine and dry. Since my mom’s recipe used oil, I thought I’d try half the butter and half the oil from each recipe. I, also, used dark brown sugar thinking the molasses would add extra moisture. Better, but still not there.
Since I was moving in the right direction, I omitted the butter altogether and used all oil, increasing it a little since I wasn’t using the boxed products. Much better.
My final tweak was to switch Dutch processed cocoa for the natural cocoa. Dutch processed cocoa tends to produce moister bakes plus an extra chocolatey flavor. By jove, I think I’ve got it! However, if you only have natural cocoa, that works just fine.
So, in answer to my opening question: NOOOOO! It’s not possible to have too much chocolate bundt cake. To be honest, the hard part is restricting myself to one slice per day. (Thank goodness I have a coffin-sized deep freezer which is now full of frozen portions of chocolate bundt cake!)
Note: If you don’t have an electric mixer, you can mix by hand. Don’t use a food processor, though – it’s too powerful.
Additional Note: You experienced bakers out there may be surprised to notice that I’m using baking soda with Dutch processed cocoa. Normally, one would use baking powder as the leavener with Dutch processed. But since this recipe has sour cream and dark brown sugar (both acidic), the baking soda will be activated.
Final Note: I strongly encourage you to weigh the ingredients – particularly the brown sugar and cocoa. These ingredients tend to clump, so measuring in a cup will yield vastly different amounts. Invest in a digital scale – it will give you consistent results.
CHOCOLATE BUNDT CAKE
- 173g (6 oz) 60% bittersweet chocolate (use bar chocolate, not chips) (I use Ghirardelli)
- 3/4 cup (57g / 2 oz) + 1 T Dutch processed cocoa powder, divided
- 1 tsp instant coffee crystals
- 3/4 (172g / 6 oz) cup boiling water
- 1¾ cup (8+1/8 oz) (231 g) all-purpose flour
- 1 tsp baking soda
- 1 tsp salt
- 3/4 cup (160g) vegetable oil
- 11 oz (312g / 2 cups, packed) dark brown sugar
- 1 T vanilla extract
- 5 eggs
- 8 oz (230g / 1 cup) sour cream
- 2 cups (330g / 11.75 0) semi-sweet chocolate chips (I use Nestle’s)
- 1 T butter
Preheat oven to 350º Fahrenheit.
Chop bittersweet chocolate into 1/2″-ish or less sized pieces. If you’re using a thin bar such as Ghirardelli, then you can break it by hand. Place pieces in a medium sized bowl. Sift the 3/4 cup cocoa into the bowl. (Cocoa tends to clump. Sifting will make for a smoother chocolate mixture.)  Add in the coffee crystals and pour in the boiling water. Cover with a plate and let sit for 5 minutes to begin the melting process. After 5 minutes, stir. It probably won’t be completely melted yet. Cover with plate and let sit another couple of minutes. Stir again and let sit uncovered to cool. Stir in sour cream.
 Into another bowl stir together the flour, baking soda, and salt. Set aside. (In the picture I’ve not stirred yet.)
 Crack all 5 eggs into a tall glass. You’ll be adding the eggs one at a time, beating after each addition. Rather than cracking them one by one (and maybe getting bits of shell into the batter) as you beat the batter, you can just pour them from the glass – they’ll pour out one at a time quite easily. Set aside.
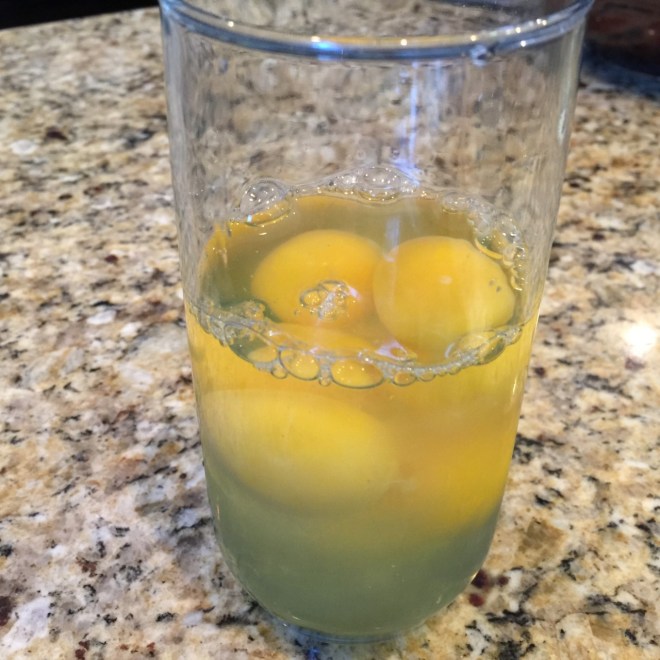 Into the large bowl of your electric stand mixer put the brown sugar and oil.
 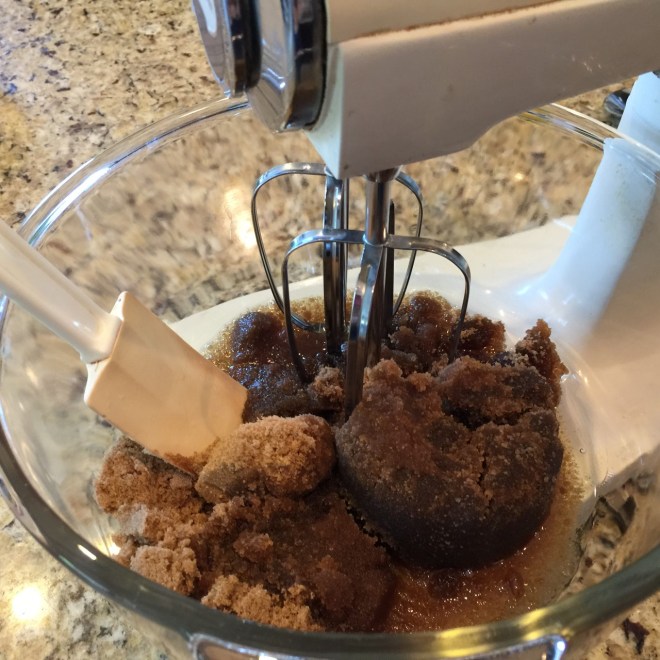 Turn on low to start (so the sugar doesn’t fly out), increasing to medium speed. Beat for 1 minute on medium.
  Add in vanilla and 1 egg. Beat for 20 seconds. Continue adding eggs one at a time, beating 20 seconds after each.
 Dump in about 1/3 of the flour mixture (you can just estimate) and beat on low to blend.
 Add in 1/2 of chocolate mixture and beat on low to blend.
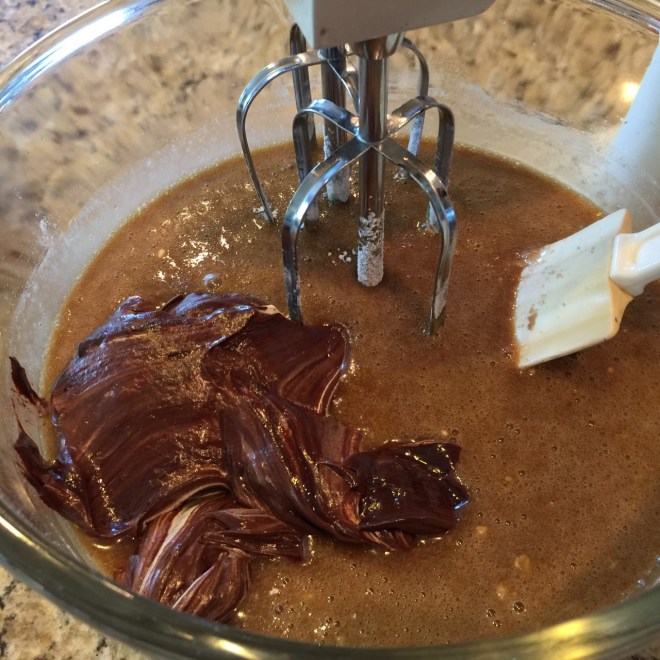 Add in half of remaining flour mixture and beat on low. Add in remaining chocolate mixture and beat on low. Finally, add in remaining flour mixture, beating until there’s still a little flour showing. Add in chocolate chips and beat on low, blending until all of flour is incorporated.
 Into a small bowl put the extra 1 T cocoa. Melt butter and pour into cocoa, stirring to make a paste.
 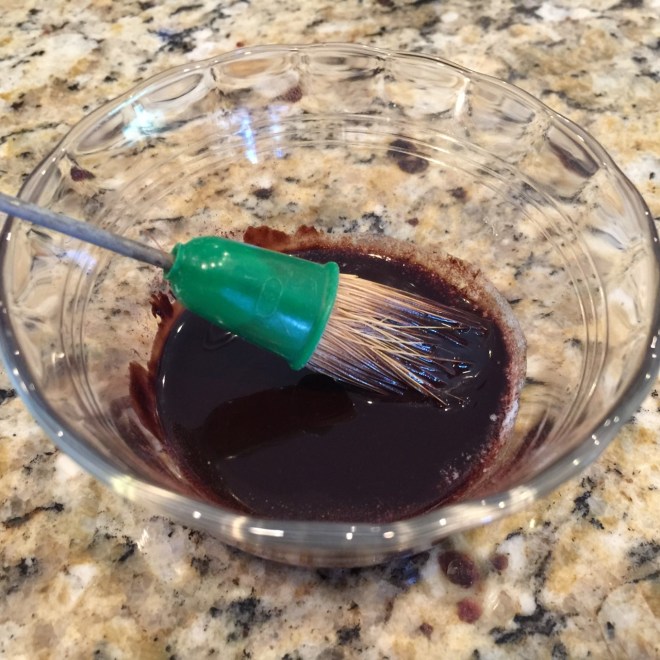 Using a pastry brush, coat the entire interior of bundt pan (even if it’s nonstick!). Use all of it – your cake will slide right out when done.
 Pour batter into prepared bundt pan. TIP: Cover hole in bundt pan to prevent batter accidentally spilling into hole. The lid from a spice bottle works perfectly. So does a Dixie cup. REMEMBER TO REMOVE IT BEFORE PLACING PAN IN OVEN!!! (If you look carefully, you can see an indentation in my lid caused by me forgetting to remove it. I remembered after about 10 minutes in the oven. It melted a little, but is still usable for this purpose. And, more importantly, the cake was fine.
  Bake at 350º F for 45 – 55 minutes, gently rotating after 30 minutes. (Mine is done at 45 minutes, but your oven may not be as hot as mine.) Check for doneness with a toothpick.
  Because of the chocolate chips, there may be a little chocolate on the toothpick. Try another area to be sure it’s not raw batter (crumbs are okay). Let set 20 minutes in pan.
Using a rounded knife, loosen cake from outside edge of pan. 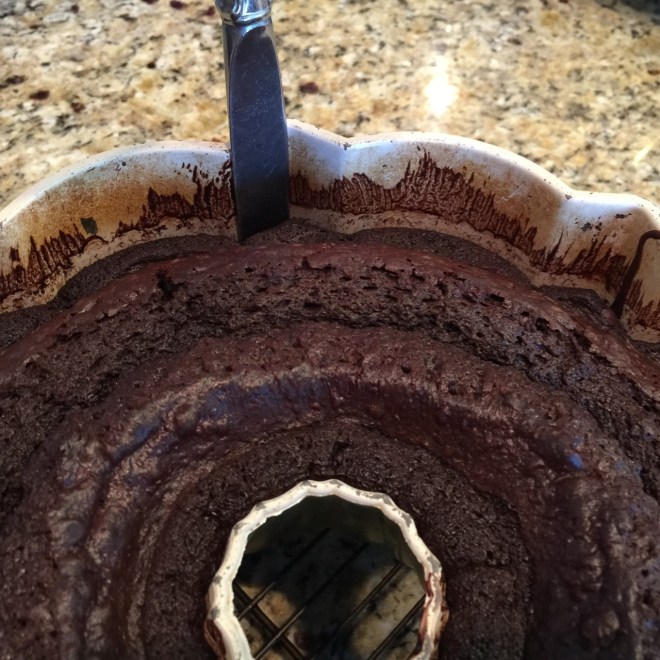 Place a rack on top and flip.
 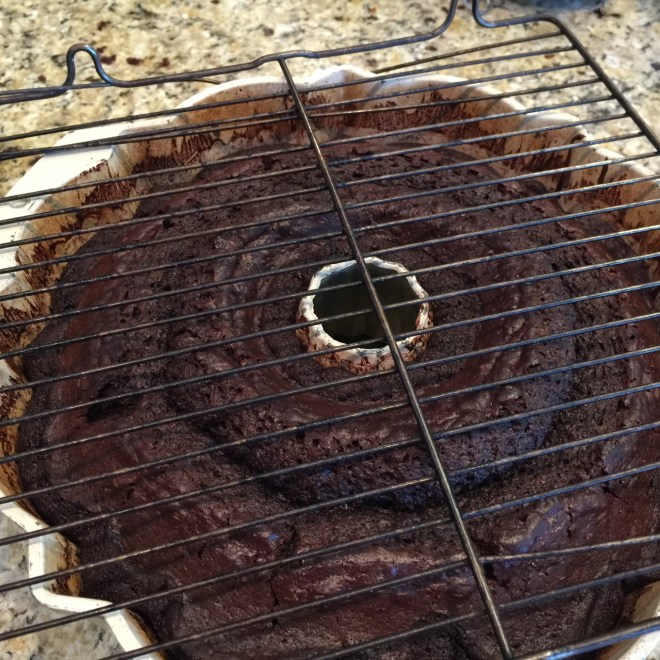 Remove bundt pan – the cake will have dropped to rack.
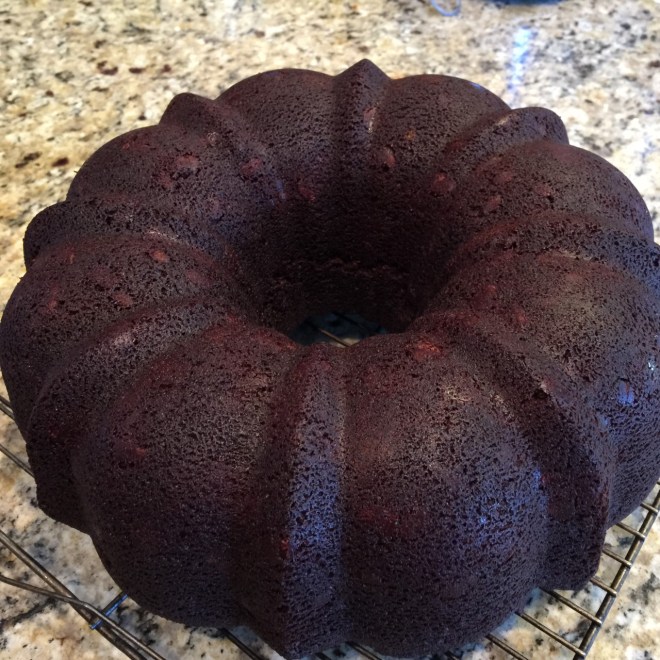 Let cool at least 4 hours.
Liberally sift on powdered sugar. (You can drizzle on a ganache if you like, but with the chocolate chips inside, I think it’s overkill.)
 Some things are just meant to be.
 Set out package of pastry sheets for an hour or so to thaw. (Overnight in the fridge is best.)
 When pastry sheets are soft enough to unfold, remove them from package. Cut a piece of parchment paper (NOT waxed paper!) to fit a rimmed cookie sheet. Lay just the parchment (not on the cookie sheet yet) on the counter. Very gently unfold one of the pastry sheets and place it on one side of the parchment. (If the pastry tears, repair by pinching dough together with wet fingers.)
 Overlap the other square on top. Press dough together firmly with fingers.
 Using a pizza cutter or knife, trim edges so they’re straight. (You may not need to do this step.)
 Paint entire rectangle with egg wash, but not the strips.
 Place long strips on top of long edges and paint them with egg wash. There will be an excess of dough, which will be cut off.
 Place the short strips along short side edges and paint them with egg wash. Cut off and discard overhanging dough strips. To help the border to rise straight upward (as opposed to up and out like mine did), press dough along inside edge of border.
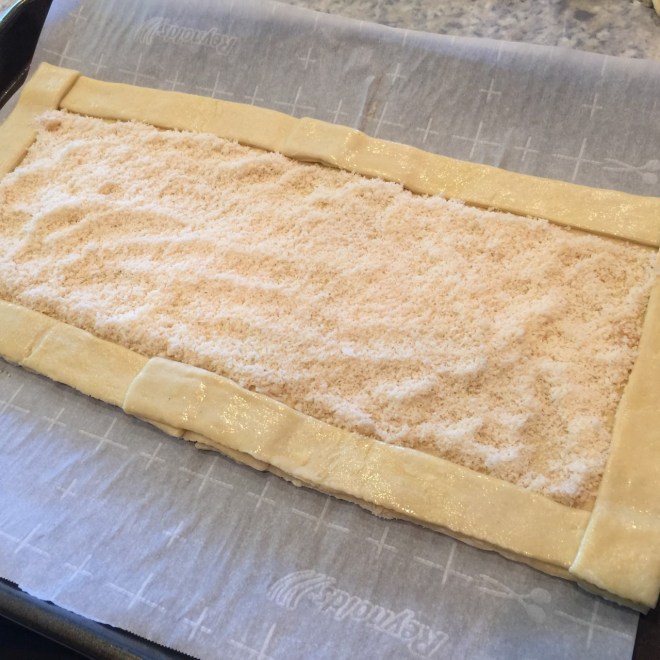 Using a fork, liberally dock holes through cheese and pastry,
 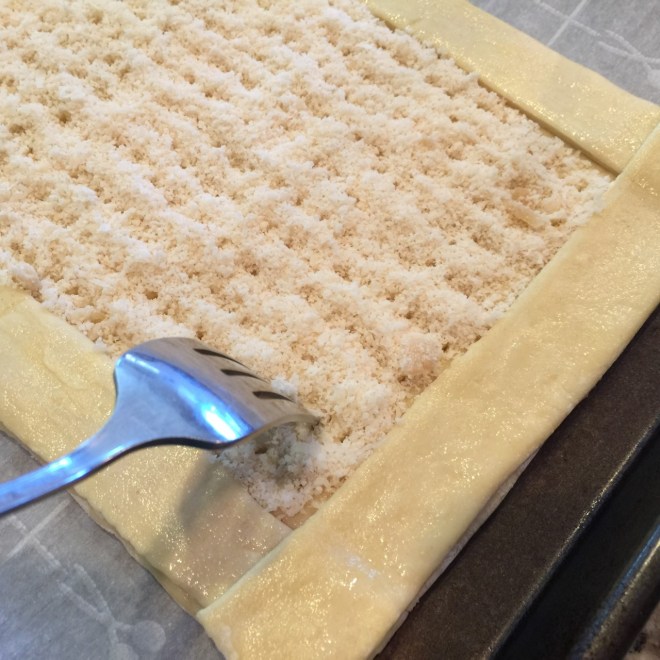 Bake at 425º F for 12 minutes. Remove from oven. If the center has puffed up, deflate by poking it with a sharp knife in a few places and gently pressing dough down with a fork.
 Sprinkle mozzarella evenly in cooked pastry, excluding the border.
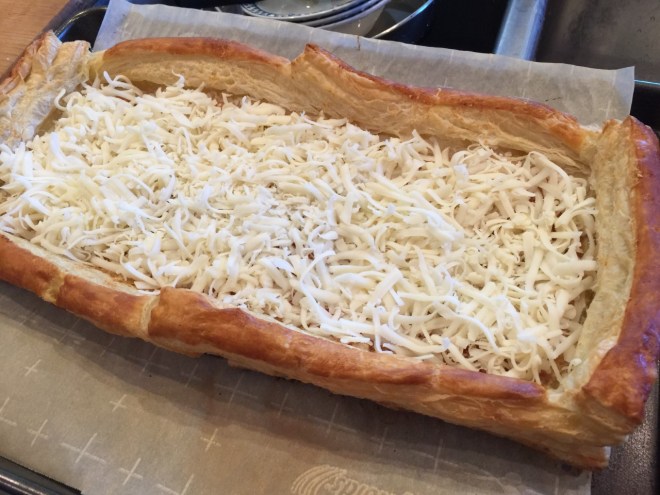 Layer on the tomato slices. Using a pastry brush, dab tomatoes with all of garlic/olive oil mixture.
 To prevent the borders from over-browning, cover with strips of foil. Bake at 425º F for 13-15 minutes. Remove from oven and sprinkle with basil. Let set a few minutes before slicing.

 Into serving bowl (which could be the bowl from above), place the romaine, tomato, olives, capers, mint, parsley, feta, and marinade with cucumbers/onions. Toss together. Pass around croutons, if desired.
 Good old mashed potatoes. Straight forward. Easy to prepare. And, most of all, filling. This last one is important if you have picky eater children (I speak from experience).
 Bring to simmer and cook until easily pierced with fork – about 35 minutes.
 Sauté 5 minutes – until they start to lose volume and become a little browned. Decrease heat to medium and continue cooking until well browned (about 20 minutes or so).
 Add in the port and letter simmer for 5 minutes to evaporate the liquid.
  Set aside.
 Gently fold in melted butter. Add in half & half, bleu cheese, remaining salt, and pepper. Very gently blend together. Taste for seasoning and adjust as necessary.
 Summer’s here and sometimes I just don’t feel like cooking….but I want a homemade meal. Gazpacho is the answer! It takes only a few minutes to prepare, NO COOKING, extremely low in calories, and it uses ingredients that are fresh from the garden (or farmer’s market).
 Corn on the cob is great, but sometimes one wants to enjoy fresh corn without having to floss our teeth before smiling afterwards.
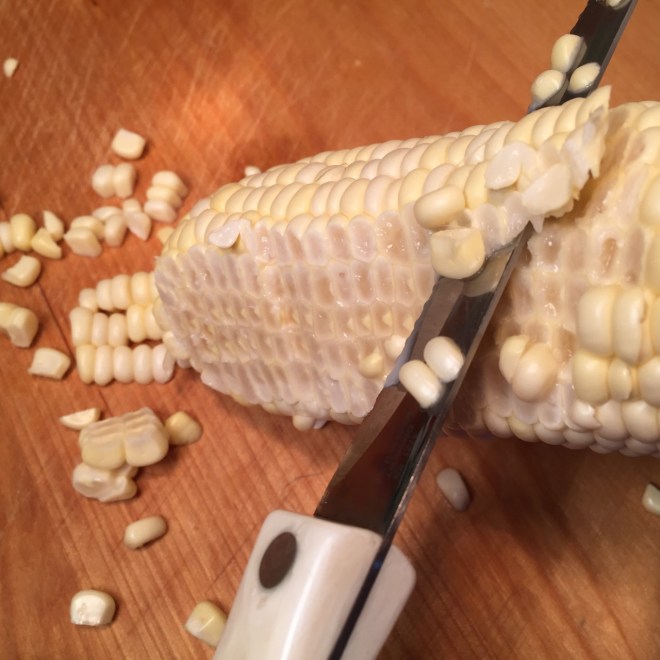 Flip the cob and repeat. Boil kernels in a little unsalted water for about 2 minutes, until done (adding salt at the beginning of cooking can lead to tough corn). Drain.
 Spring beckons backyard gardeners to the nursery in hopes of a bountiful crop. Summer brings the realization that, once again, we have an abundance of fresh vegetables that will rot if we don’t use them soon.
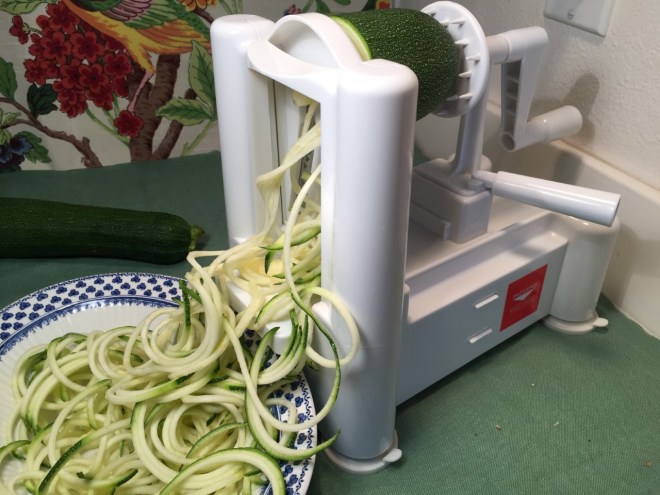 There are many brands of spiralizers – I bought the Paderno and am extremely happy with it.
 Bibimbap is a mouth watering Korean veggie/rice dish topped with a fried egg. (The egg is optional.) It even tastes good the next day…and the next – this recipe makes a lot!
 Whisk to combine and set aside.
  In a 2 cup measuring cup, combine 1 cup water, soy sauce, garlic,
 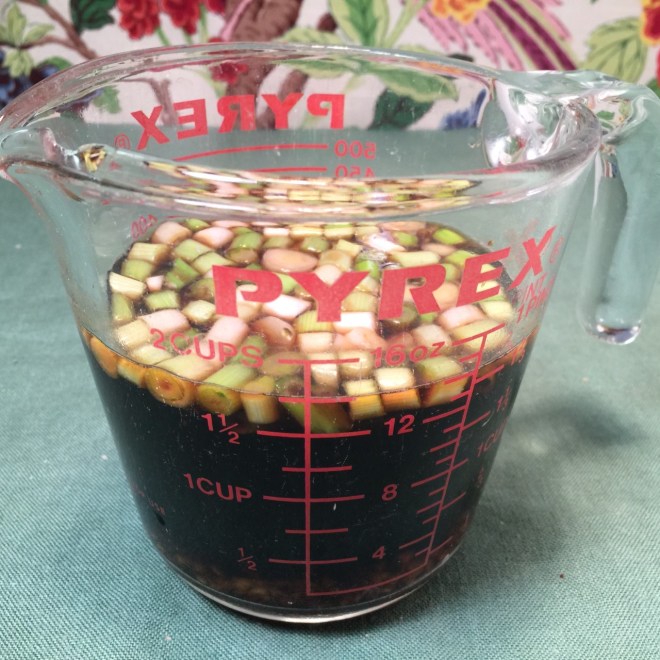 Shred the carrots – use a food processor, if you have one. Otherwise, use a box grater. Place in a bowl.
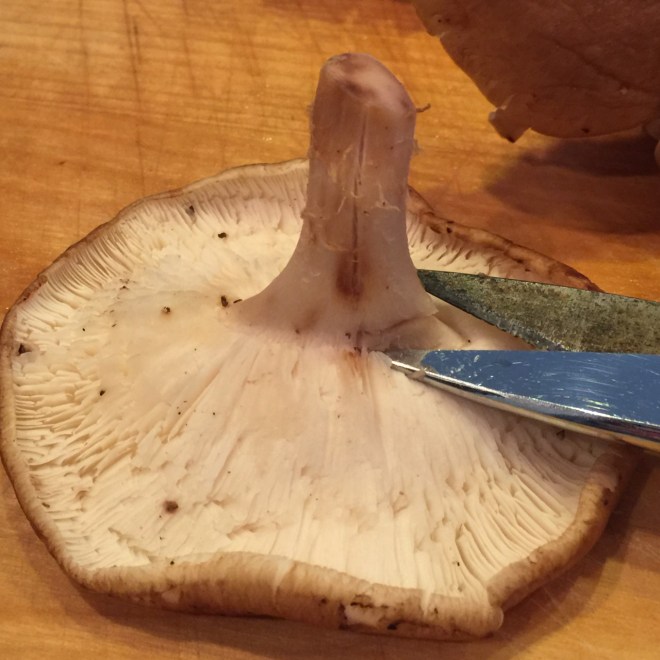 Coarsely chop and place in a bowl.
 Time to get cooking!!!
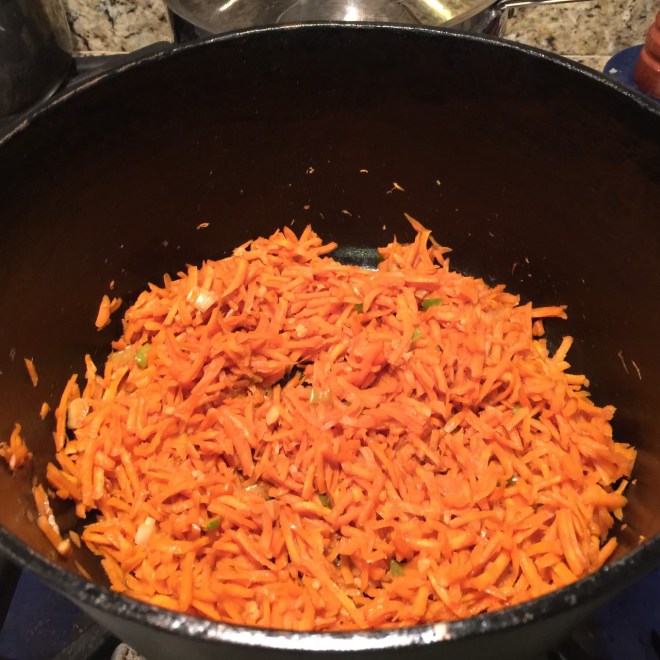 Transfer carrots back into bowl.
 Pour back into bowl.
 Cook until wilted. I’ve found the water doesn’t evaporate completely, so just go by the look of the spinach. (It’s amazing how that giant amount of spinach wilts down to nothing!)
 Pour back into bowl.
 Add the carrots, mushrooms, and spinach.
  Pour in the go-chu-jang sauce and mix.
  If you want to top with fried eggs, cook them in skillet either sunnyside-up or over-easy. Add these to individual bowls.
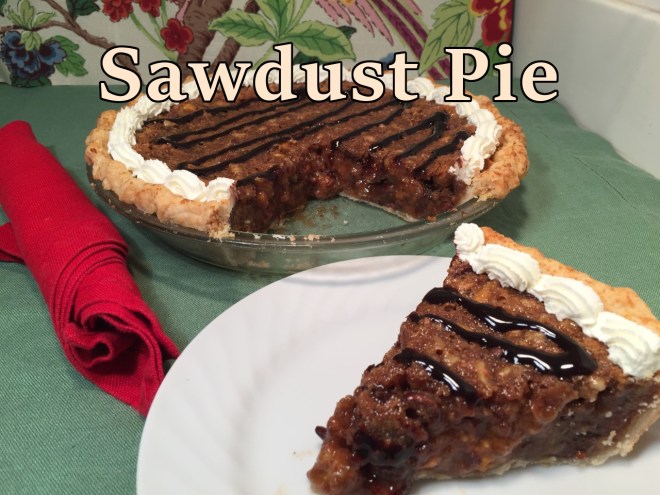 I hate wasting food! So, as the self-proclaimed Queen Of Freeze, I’m constantly freezing little bits of leftover this or that for future use. And it’s paid off many times.
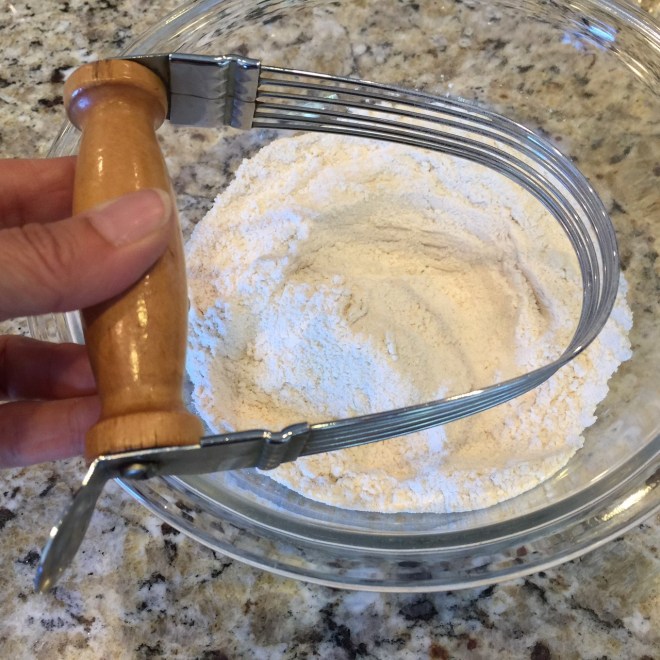 Add in the Crisco and use the cutter to combine the flour and Crisco.
  Work until it resembles a coarse meal.
 For the food processor method, put the flour, salt, and sugar in work bowl and pulse a couple of times. Add in the Crisco and pulse several times, until mixture forms a coarse meal. Empty into a mixing bowl. You are NOT adding the water in the food processor – your dough will be tough!!!
 Form the dough into a tight ball and chill at least 30 minutes to make it easier to roll.
  Sprinkle flour, then 2 T graham crackers on a flat surface to prevent the dough from sticking.
  Place the dough ball in the center. With floured hands, push down the dough with one hand while pressing in the sides with the other. This will help keep the edges from fraying.
  Sprinkle some flour on the flattened dough and spread it around so the rolling pin doesn’t stick.
 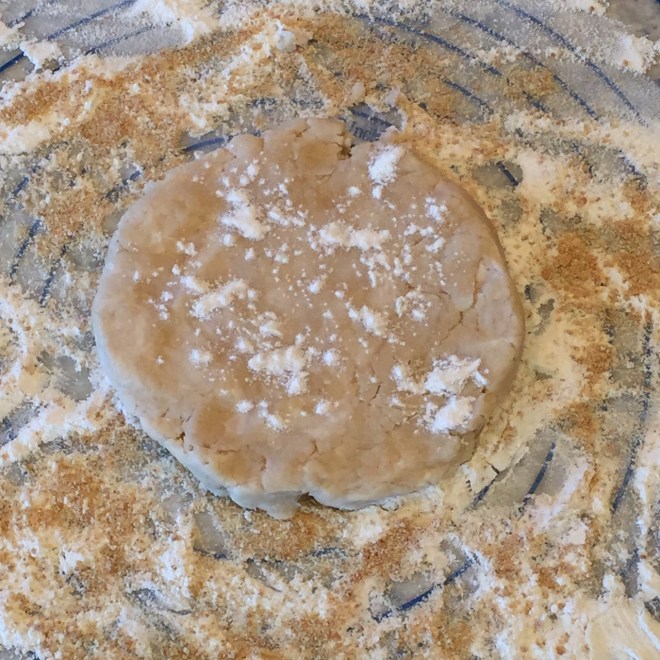 Using a floured rolling pin, begin rolling the dough from the center out in all directions. When it gets to be about 8″ in diameter, push in the edges again – they’ll probably be fraying again. Lift up the edges and brush the graham cracker crumbs underneath.
  Roll until the diameter is about 12½”. Sprinkle 2T graham cracker crumbs over the top of the pastry and lightly press them in with your fingertips. (Don’t use the rolling pin – the crumbs tend to stick to it.)
 Place the pie pan next to the circle. Fold dough in half towards you, then carefully lift it to pan. Unfold and center it, gently adjusting pastry so it fits into the corners. If the dough splits, just overlap it and press it together. Leaving a 1/2″ overhang border from the pie pan edge, cut away excess dough with kitchen scissors. Crimps edges by rolling this 1/2″ border in on itself, then pinching with thumbs and forefingers.
  Cut a piece of waxed or parchment paper about 2″ longer than diameter of pie pan. Place on top of pastry and fill with pie weights or raw beans (that’s what I use). Very gently work the paper and beans into corners so the beans weigh down the entire bottom.
 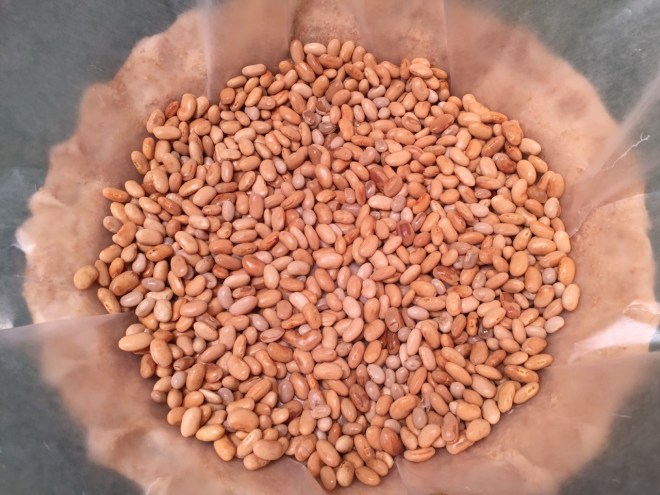 Parbake at 425º F for 7 minutes. Remove the paper and weights by pulling one corner of the paper slowly towards the center, then the opposite corner towards the center, then one of the other corners, and the final one. Grab all 4 and lift it out in a rolling motion – don’t pull straight up or the center may still be stuck. Bake another 5 minutes, then remove and cool.
 Using an electric mixer or rotary egg beater, beat egg whites until frothy on medium/low speed about 30 seconds – just to break them up.
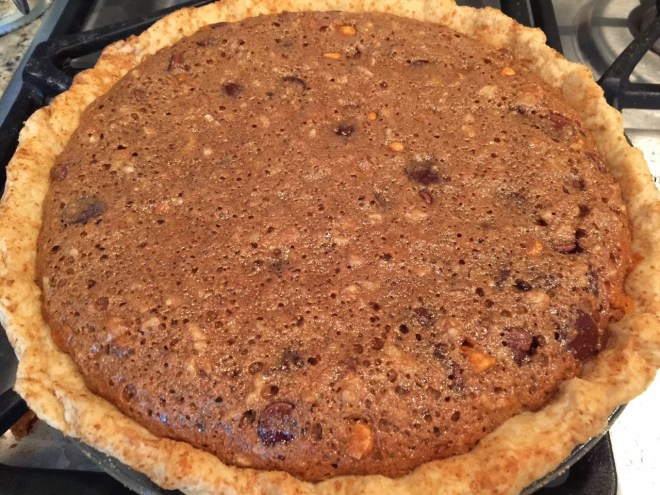 Cool on rack completely, then refrigerate at least 8 hours.
 What could be better when that late afternoon hunger hits than a nice cup of tea and a freshly baked scone?
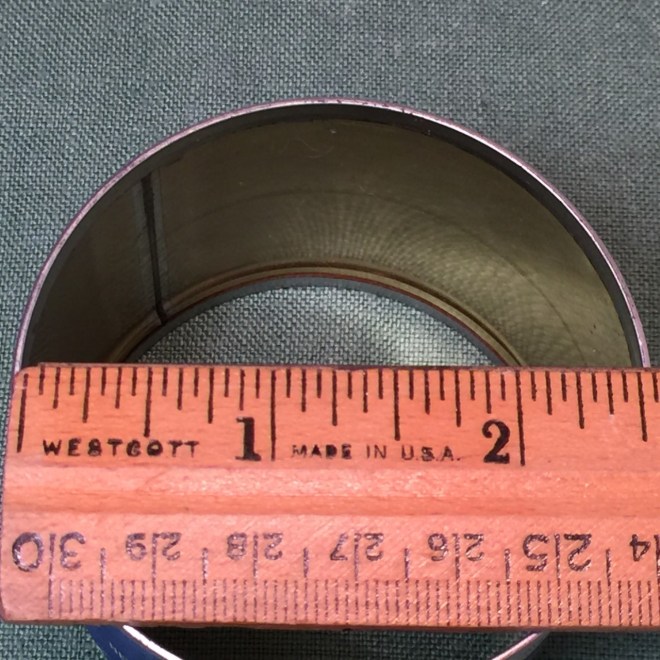
 Pulse 10 times to form a coarse texture.
  (If you don’t have a food processor, then crosscut the butter into small bits using 2 knives.)
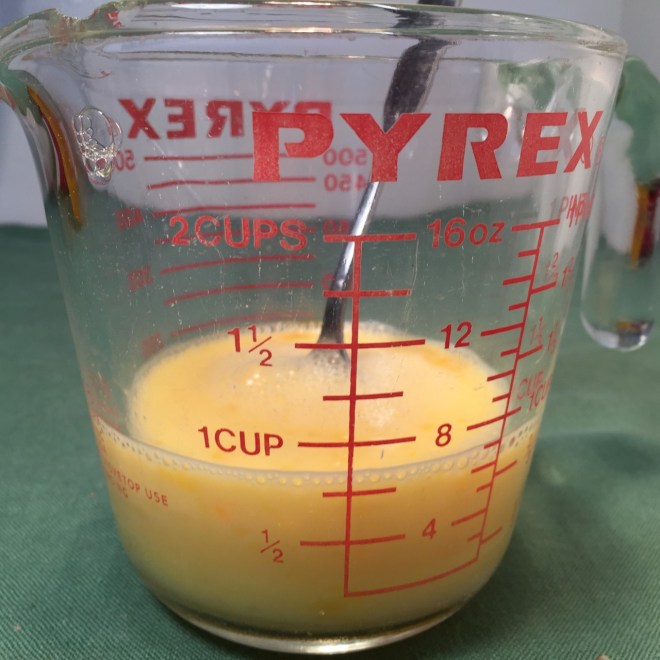 Empty flour mixture into a mixing bowl. Pour in all but 1 T egg mixture (you’re going to use the reserved liquid as a wash) and stir gently to blend. (You don’t want to overmix or the scone will be tough.)
  Lightly flour a flat surface and dump dough onto it. With floured hands, pat the dough into an 8″x5″ rectangle if cutting circles, or a 6″ diameter circle if cutting wedges.
  If you’re making circles, dip circle-mold in flour then press straight down into dough. Don’t twist. Dip into flour each time before cutting a circle. If making wedges, slice 3 lines, intersecting in middle to form 6 equal wedges.
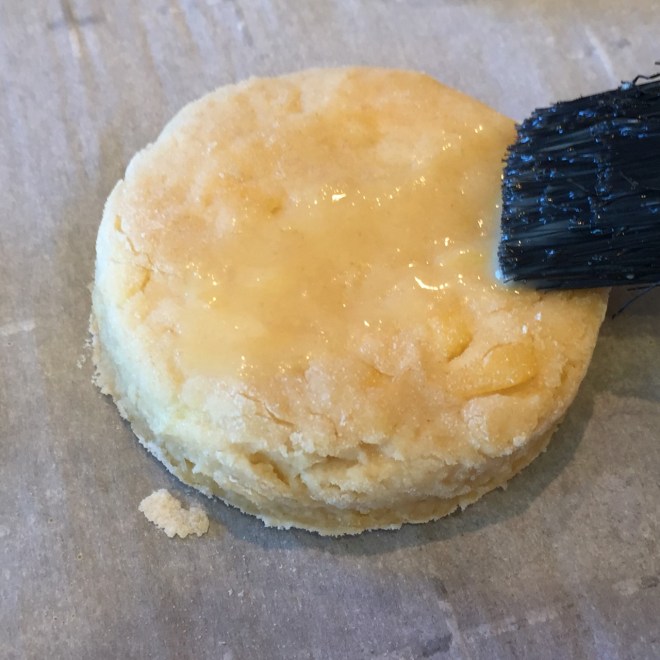 Sprinkle on a few strands of cheese, if you like.
  Place in preheated oven and bake until golden brown – about 12 minutes for circles, 13-15 minutes for wedges. Remove to a wire rack to cool a bit, then serve.