PEANUT BUTTER-BANANA BUNS: Snack Or Lunch!

Every now and then I challenge myself to improve on a just-okay recipe. In this case, it was my grandmother’s peanut butter buns (she called them ‘josh’, which means ‘snack’ in Armenian). While they were a big hit with her five children and my husband, I felt they were a little dry.

I decided the problem was two-fold: the dry dough and the dry peanut butter filling. Creating an enriched dough seemed the obvious answer to the dough. As for the filling, I considered using a jelly. Then I spied some ripe bananas in the fruit bowl. Hmmm! (Elvis came to mind.) Recalling a contestant on the British Bake Off cooking down bananas to evaporate excess moisture, this seemed like a good idea to prevent a mushy filling while, simultaneously, adding flavor. To give a nod to the classic jelly idea, I tried crushing freeze dried strawberries. The problem was I needed to use a lot to really taste them. As they’re very expensive, I chose to go with the peanut butter and banana on its own. You can add them, if you like.

NOTE: You can substitute a different nut butter, if you prefer.

PEANUT BUTTER-BANANA BUNS – makes 6

Dough

  • 121g (1/2 cup) milk, warmed to about 40°C (104°F)
  • 1 tsp yeast
  • 229g (1.75 cups) bread flour
  • 1 tsp salt
  • 28g (2 T) butter, room temperature
  • 40g (1/4 cup) granulated sugar
  • 1 egg white

Filling

  • 3 large ripe bananas
  • 118 (1/2 cup) peanut butter (or other nut butter)
  • 1/4 tsp salt
  • Optional: 31g (1 oz) freeze dried fruit, crushed

Prepare the dough:

Proof the yeast by stirring the warmed milk and yeast together, letting it set about 5 minutes.

Into the workbowl of your food processor, put the flour, 1 tsp salt, sugar, softened butter, egg white, and proved yeast/milk. Process about 40 seconds, pausing to scrape down the sides as needed.

Empty dough onto lightly floured counter and knead about 6 times to bring dough into a ball. A bench scraper works well for this task.

Place dough ball in a lightly oiled bowl, then flip the ball so both sides are coated with oil. Cover and let rise 1.5 hours on counter.

While dough is rising, prepare the filling:

Into a saucepan, place the peeled bananas. Mash with a potato masher or fork.

Over medium/high heat, cook the bananas, stirring often, until most of the water has been cooked out – about 11 minutes. Remove from heat.

Stir in the peanut butter and 1/4 tsp salt. (If you’re using freeze dried fruit, stir it into the mixture) Chill until dough has finished rising.

Once the dough has risen, assemble the buns:

Empty the risen dough onto a lightly floured surface and divide it into 6 pieces. Roll each piece into a 9″x 4″ (23cm x 10cm) strip.

Divide the peanut butter-banana filling evenly between the strips. Spread the filling over the dough strip, leaving a 1/2″ (1cm) border along all 4 sides. The filling will be spread very thinly – this is good – it’s how you’ll get that lovely swirl.

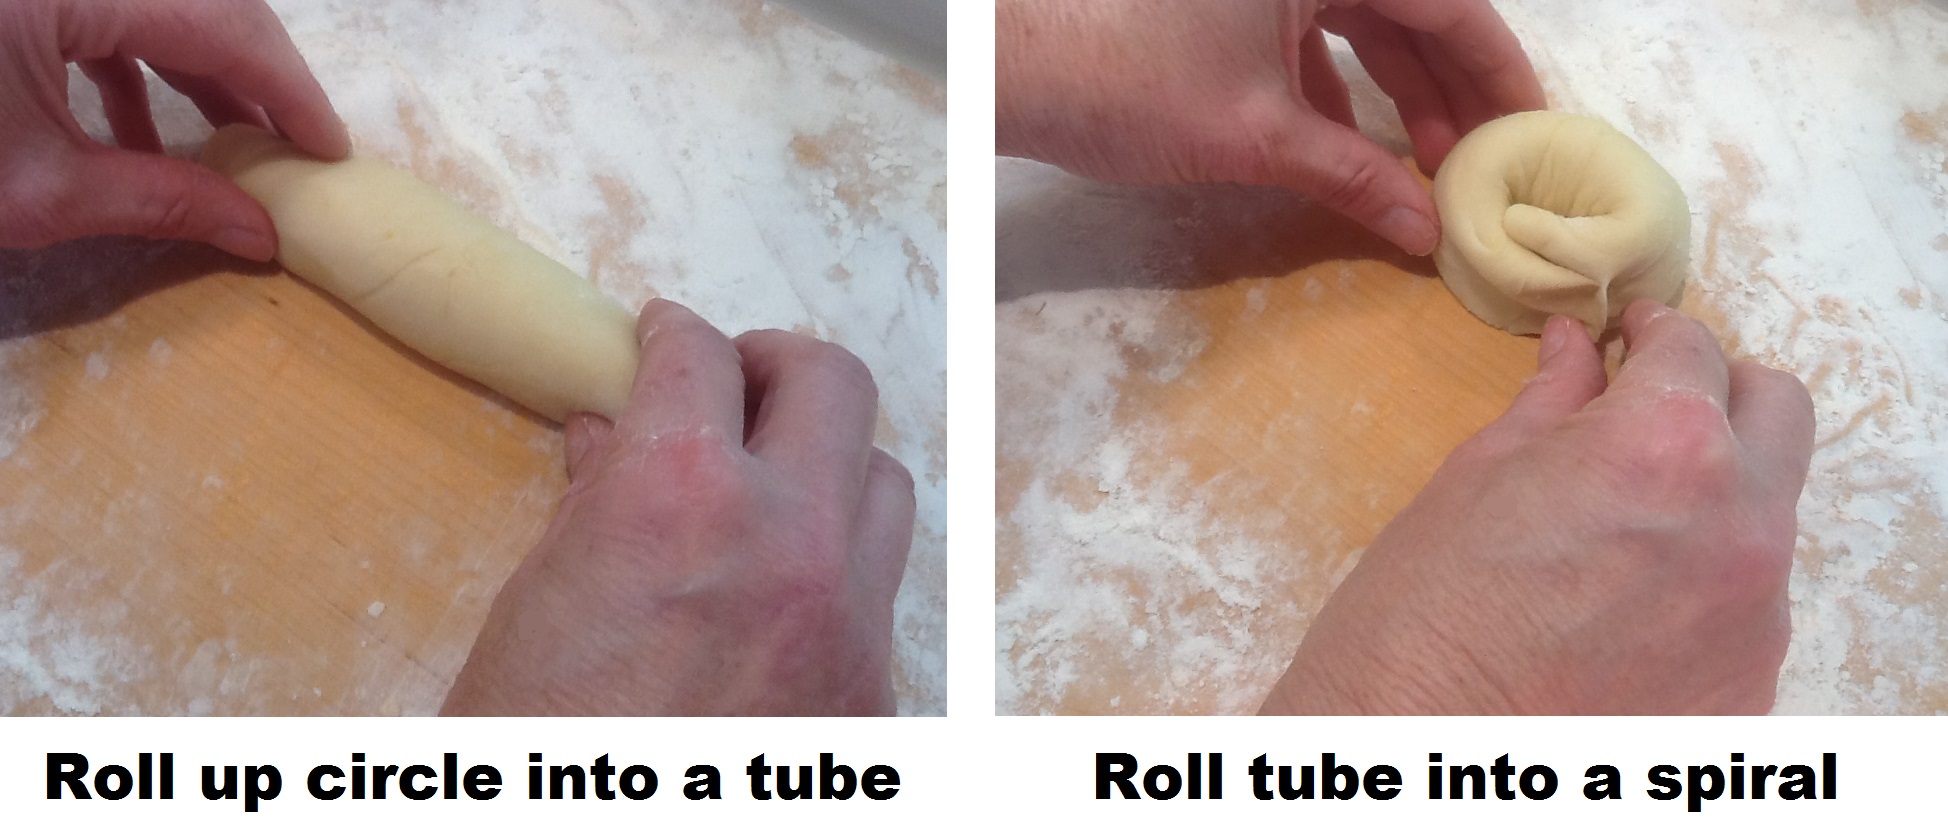
Roll each strip from the short side up along the long side. Pinch the dough to seal the seam.

Roll the log towards you 90°, so the seam is facing you. (This is so the seam will be protected from bursting open during baking.)

Pinch both ends to seal them. Then, snail the log by rolling it sideways. (The seam formed along the length of the log will now be encased in the snail.) Pinch closed the end of the log to the body of the roll.

Place the rolled buns on a greased or parchment lined baking sheet. Lightly press down each bun so they’re about 1″ (2.5cm). Cover and let rise 1/2 hour. Preheat oven to 200°C (400°F) during the rise.

Once the buns have risen, place the baking sheet in the preheated oven. Decrease the temperature to 177°C (350°F) and bake about 20 minutes – until browned on top. (There is NO wash for these buns – I’ve tried egg, milk, and cornstarch/water – they cause the top to flake. They come out much better with a dry top.) Remove baked buns to a wire rack to cool.

NOTE: If you forgot to decrease the oven temperature, it’s not a problem. Just keep an eye on the brownness – you may have to decrease the bake time.

Peanut Butter Buns – OR, Two Salts Do Not A Sugar Make

Djash - Peanut Butter Roll

Djash – Peanut Butter Bun

You may or may not be aware, but we Armenians love our food.  I mean we LOVE our food. When I was a kid, family gatherings were centered around the preparing of the feast, the eating of the feast, the cleaning up after the feast, a brief interlude, and then the eating of the leftover feast. Yeah – we like our food.

My dad always loved telling us about how his mother made this fabulous after-school snack called ‘djash’ (pronounced ‘josh’).  It was a rolled bread filled with peanut butter.  With five hungry children in the house, she used to hide it – hoping to dole it out bit by bit.  But hungry children can be very resourceful and they always found it.  This wasn’t a food my grandmother made for holidays – rather it was an everyday kind of thing.  Something to tide her offspring over between the time they came home from school and dinner.

As far as I knew, djash was just another Armenian food that my family ate, along with shish kabab, dolma, madzoon, lahmajoon, etc.  When people familiar with Armenian foods asked which dishes we ate, I would rattle off a variety of foods.  They nodded knowingly until I got to djash – they’d never heard of it.  I didn’t really think twice about that, except even Armenians didn’t know what it was.  My cousin Sue and I were talking about this (she’d experienced the same thing), and she found out why:  ‘djash’ isn’t a specific food – it means ‘lunch’ or ‘little dinner’.  So when my grandmother made djash, she really meant ‘snack’ – it just so happened the snack was a peanut butter bun.  Now I know why I could never find it in any of the tons of Armenian cookbooks I own.

Years ago my dad had me type up (on a real typewriter – that’s how long ago this was) his mother’s djash recipe.  This was years before I learned to cook anything, let alone a yeast bread, so I didn’t see anything amiss with the recipe.  But recently I made djash and, while it was okay, it seemed like it was missing something.  Then I realized it tasted like it needed sugar.  I went back to the original recipe and there it was – the problem.  Salt was listed twice on the ingredients list, in different amounts.  More than likely, I just figured this was a mistake and eliminated one of the salts.  Now that I’m a seasoned cook (I say modestly), I fixed the problem by reinstating the sugar.

If this is your first time making a yeast roll, fear not – I’ll walk you through it.

DJASH (PEANUT BUTTER BUNS) – makes 12 buns

  • ½ T yeast
  • ¾ cup water, approximately 100ºF
  • 3 cups all-purpose flour
  • 8 T butter, cut up and softened (NOTE: more butter is used further down the ingredients list for the filling)
  • 1 egg
  • 1 tsp salt
  • 2 T sugar
  • ½ lb peanut butter (I used the kind you grind in market yourself, made only with peanuts)
  • 2 T butter, softened
  • egg wash (1 egg and 1 T water beaten together)

NOTE:  If you want a sweeter peanut butter filling, you might want to use a brand like Skippy.  The grind-it-yourself kind has no salt, sugar, or oil added.

Stir the yeast into the water and let proof as you prepare the other ingredients.  Into the food processor put the flour, 8 T butter, egg, salt, and sugar.  Pulse several times.  Once the yeast water is proofed (foamy), turn on the food processor and pour in the yeast gradually through the feed tube.  Soon a dough ball will form.  Let the machine knead the dough for 45 seconds.

Smoosh the dough ball into a greased bowl, then flip it so the top is now on bottom.  (That way the ball is completely greased).  Cover and let rise for 1 hour.  In a small bowl, stir together the peanut butter and 2 T butter. Don’t melt the butter – it will make the filling too runny.

Punch down the dough and divide into 12 balls.  One by one, roll each ball to a 4″-5″ circle on a well floured board.  Spread a rounded tablespoonful of peanut butter over the circle to ½” from the edge.

djash roll up bigger

Roll up the circle, like a cigar.  Then roll up this tube sideways into a spiral circle.  Pinch the end into the roll.  After rolling each one, place it on a greased cookie sheet.  Cover them and let rise for ½ an hour.

Preheat oven to 400º F.

Press down each risen roll to ½” thick.  Paint them with the egg wash.  When the oven is heated, place the cookie sheet on the middle rack, then IMMEDIATELY LOWER TEMPERATURE TO 350º F.  Bake for 20 minutes, until lightly golden brown. Remove rolls to a wire rack.  They’re ready to eat hot out of the oven.

One final note from my husband – they would probably taste really good topped with a chocolate frosting.  But, of course, what wouldn’t?!