
 Brazilian Cheese Rolls – where have these been all my life?! Crusty outside, stretchy inside. An added bonus for those of you who have a problem with gluten: they’re gluten-free!
I recently watched an America’s Test Kitchen episode that featured these yummy rolls. The gluten-free aspect caught my attention. Even though I’m not gluten-free myself, I like to expand my horizons and post recipes for people with a variety of needs.
Note: It can be a little tricky to find the tapioca flour (also called tapioca starch). It, most likely, will be found in the area where the alternative flours in small bags are kept. I was only able to find Bob’s Red Mill brand in my area.
Note: Weighing flour is always the best way to go – especially with tapioca flour. It’s very powdery (like cornstarch), and using a measuring cup will give you vastly different amounts, which may make a difference.
Note: If you like, you can try different cheeses.
BRAZILIAN CHEESE ROLLS – makes 8 3″ rolls
- 12 oz (about 3 cups) tapioca flour
- 2 tsp kosher salt (or 1 tsp of table salt)
- 1/4 tsp baking powder
- 2/3 cup + 2 T milk (175 ml) (I used 1% milk)
- 1/2 cup (125 ml) olive oil (you can use vegetable oil, too)
- 1½ T butter
- 2 eggs
- 3½ oz (1¼ cups or 50 grams) Parmesan cheese, grated
- 3½ oz (1¼ cups or 50 grams) Pecorino-Romano cheese, grated
- optional: egg wash – 1 egg + 1 T water + pinch of salt), beaten together
In the large bowl of your electric mixer (if you don’t have an electric mixer, just use a large bowl and mix by hand), put the tapioca flour, salt, and baking powder. Gently swirl together to blend.  Put the milk, olive oil, and butter in a small saucepan. Over a low/medium flame, bring just to a boil, stirring constantly. Immediately pour into the flour.
 Turn the mixer on low and beat until all the flour is incorporated – about 1-2 minutes. (It will look rough and crumbly.)
  Add in the eggs and mix on low speed. Once it looks creamy (like frosting), continue to beat another minute.
 Add in the cheeses, and mix just to blend on low.
 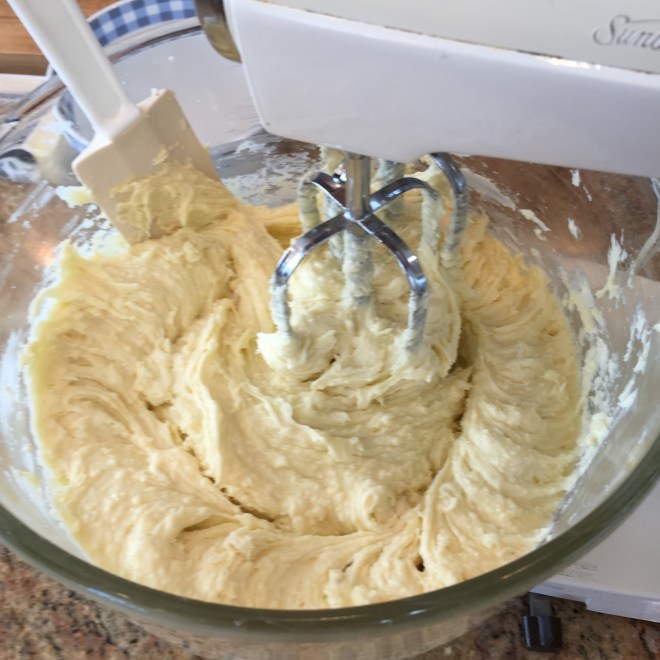 Scrap down the dough and smooth top. Cover bowl and refrigerate at least 2 hours – this will firm up the dough, making it easier to work with.
Preheat oven to 450º Fahrenheit, rack in the middle position. (Don’t short-change the temperature.)
If using an egg wash, beat together 1 egg with 1 T water and a pinch of salt. I highly recommend using an egg wash – it gives the rolls an appetizing sheen.
Score the dough into 8 even wedges.  Using a large spoon, scrap out each wedge and roll into a smooth ball (it helps to have one of your hands wet so the dough doesn’t stick). Place each ball on a parchment lined baking sheet. They’re going to rise as they bake, so make sure to space them. One large sheet will hold all 8 rolls.
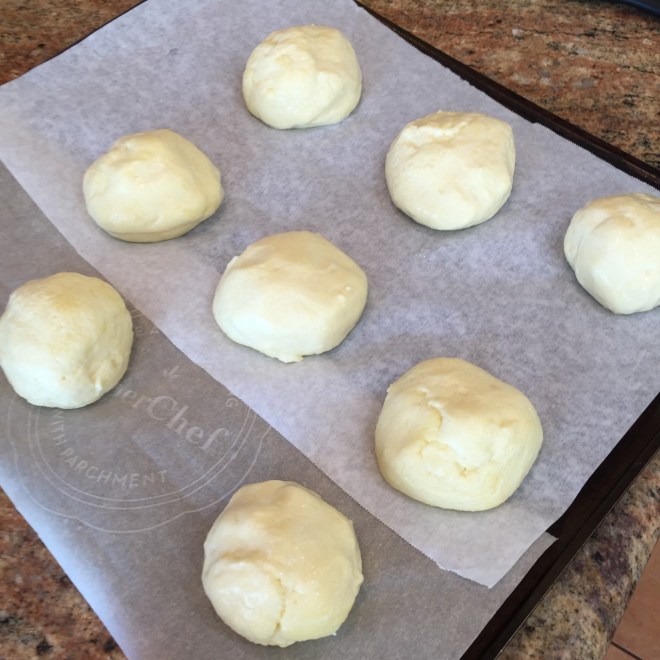 Using a pastry brush, paint the sides and tops of rolls with the egg wash.
  I’m going to use all caps because this is important!: PLACE SHEET IN OVEN, THEN IMMDEDIATELY LOWER TEMPERATURE TO 375º F. (The initial high heat is important to give the rolls a spring, but you need to lower it so they don’t burn.) Bake for about 40 minutes (yes, this is a long time). Remove to wire rack to cool enough to handle – about 5 minutes before eating.


 Turn your electric mixer on medium to break up the whites. When the whites begin to foam, add in the cream of tartar.
  Increase mixer speed to high and beat whites until stiff peaks form.
  Pour the yolks/yogurt into the beaten whites and turn on mixer to very low. Beat until the yolks are blended into the whites – this won’t take long. Don’t overbeat – you don’t want to deflate the whites.
  On a parchment lined cookie sheet, ladle out the batter into whatever shape you want, making them about 1/2″ thick. Space them at least 1″ apart.
 Bake in 300º F oven about 25 – 30 minutes (mine took 25 minutes) – until beginning to brown.
  Place the Cloud Bread still on parchment on wire rack. After about 5 minutes, remove bread from paper to wire rack to completely cool. They should really rest at least an hour before using, in order to set. Store in fridge.
 I’ve been on a mission to try making foods from scratch that you would normally never think of, such as tortillas (flour and corn), Italian rustic bread, yogurt, cream cheese, and pasta. I think you get the idea.
